Numberplan Manager · Documentation
Complete technical documentation for the Numberplan Manager – setup, configuration, routing types, multi-tenant and troubleshooting.
Introduction
The Numberplan Manager is a SaaS application that lets you control complete Microsoft Teams telephony management – no PowerShell knowledge, no complex scripts.
What do you get?
- Visual number plan with live sync to Microsoft Teams
- Automatic license assignment during onboarding (M365 + Teams Phone)
- Location management with auto-assignment based on Entra ID fields
- Multi-tenant architecture for unlimited customer tenants
- Role-based access control down to the location level
- Audit log for complete compliance documentation
Get a subscription
Just signed in for the first time and you have no active subscription yet? This step-by-step guide walks you through Microsoft Marketplace – including the 30-day free trial.
Step 1 – First login
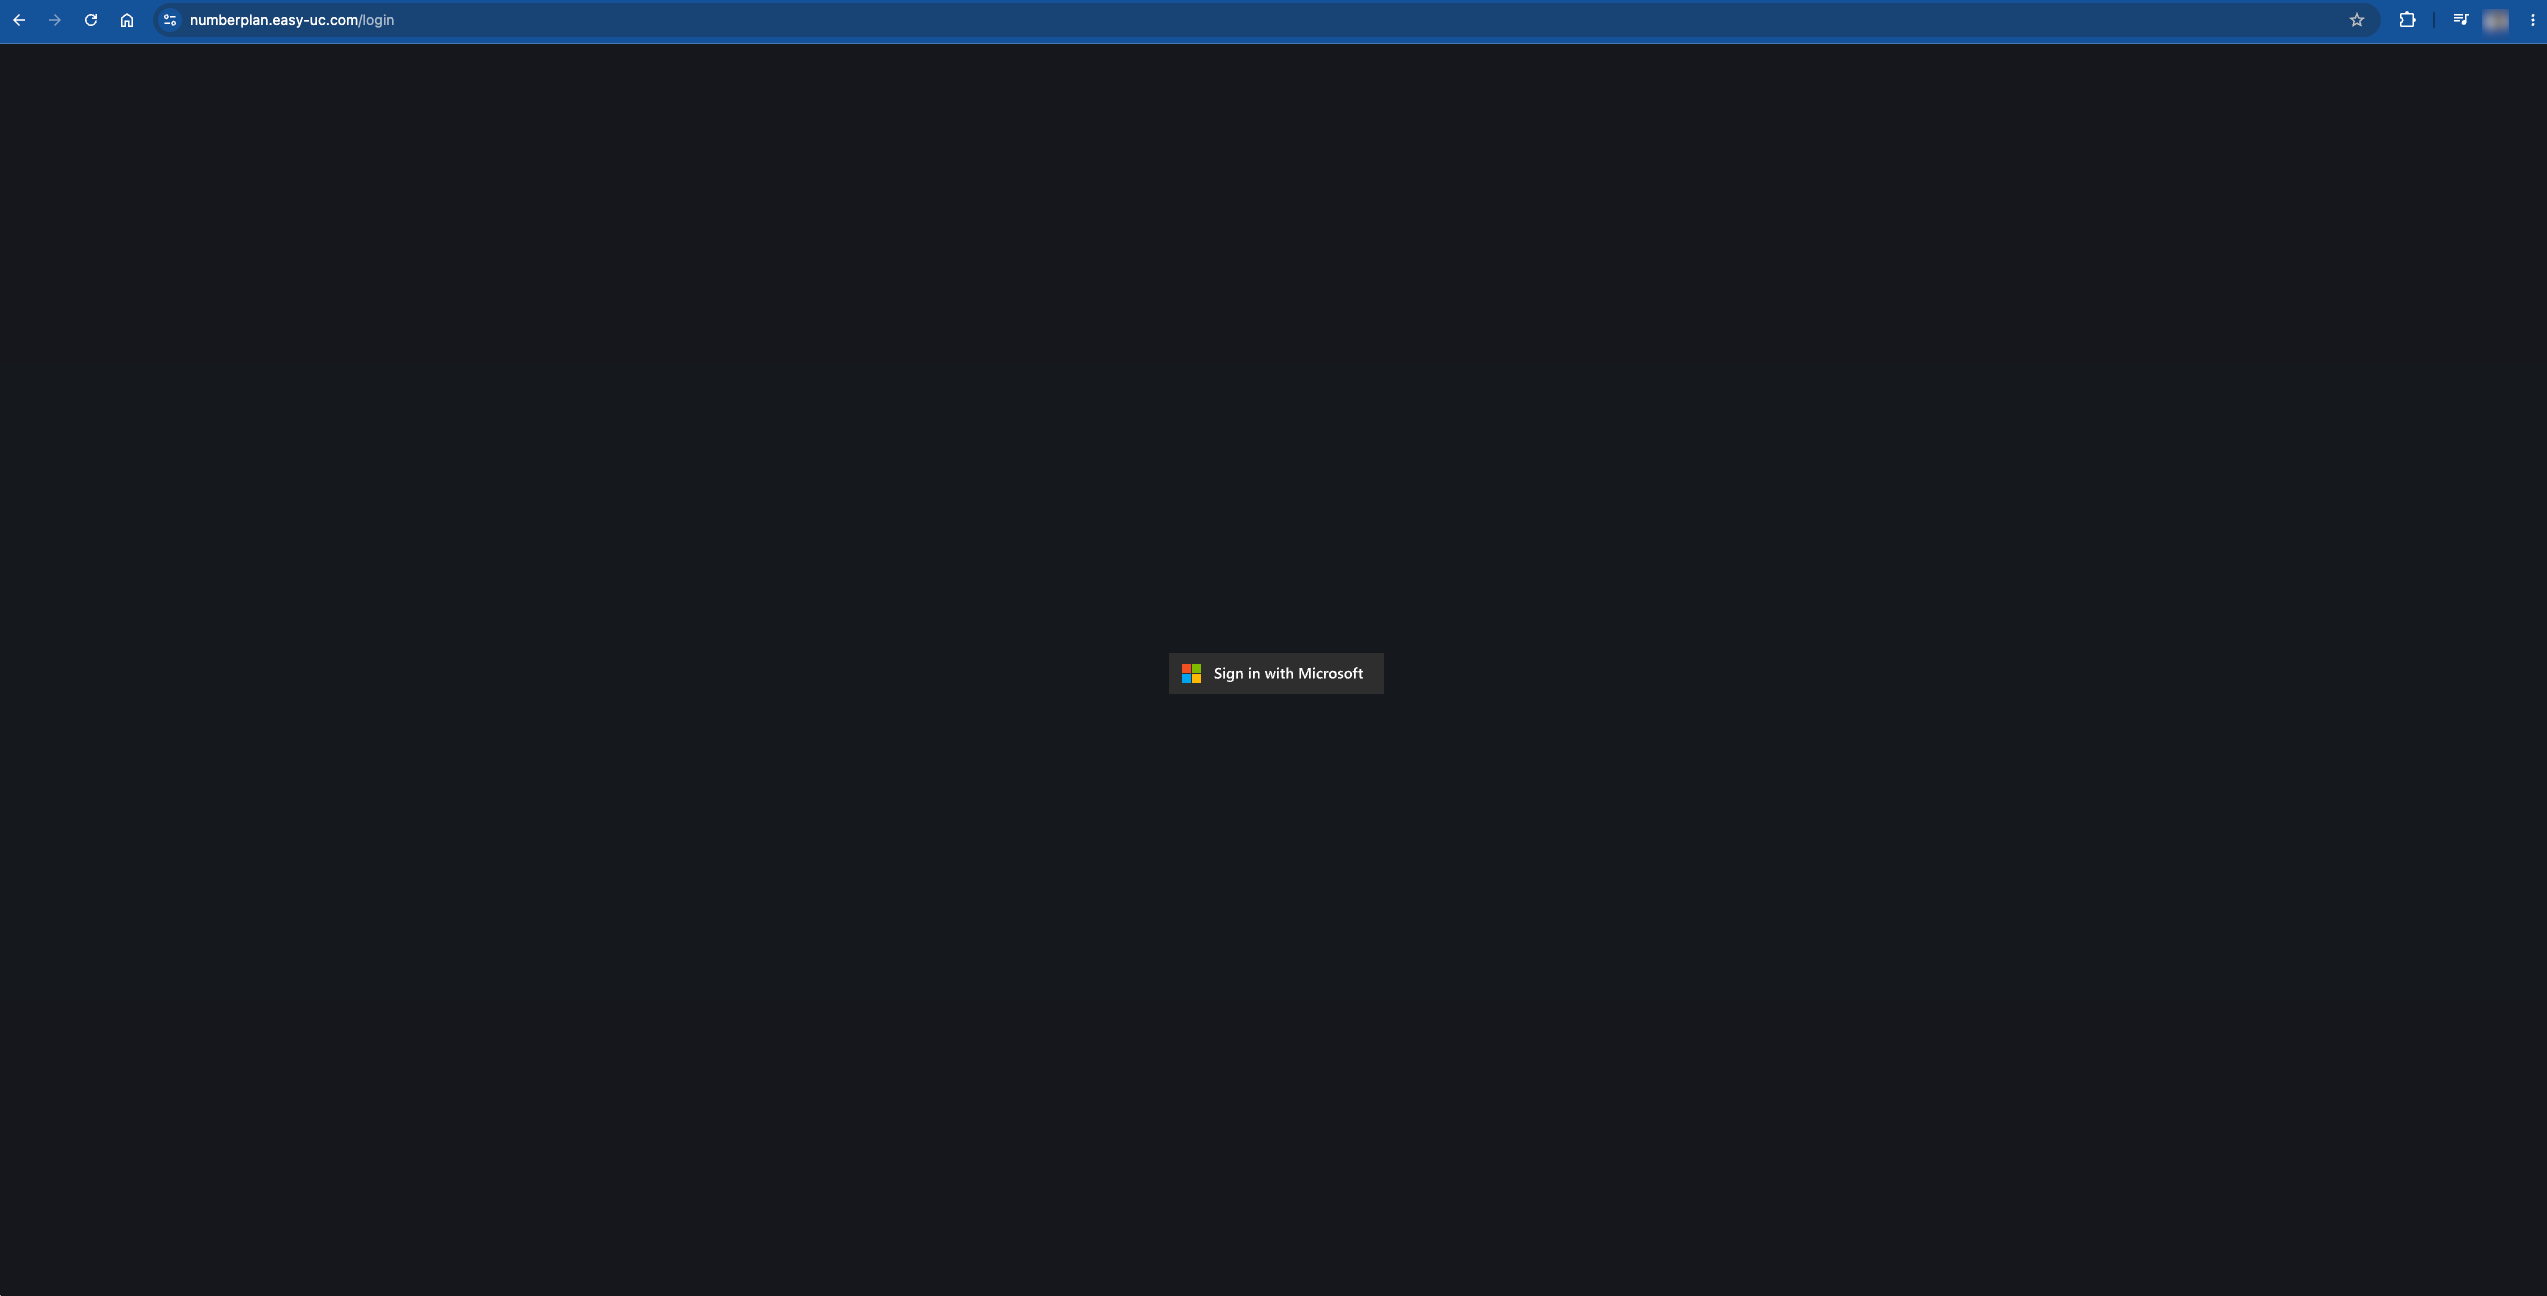
Open numberplan.easy-uc.com/login and click "Sign in with Microsoft". You will be redirected to Microsoft sign-in. Use your business Microsoft 365 account that holds admin permissions in your tenant.
Step 2 – "No active subscription" notice
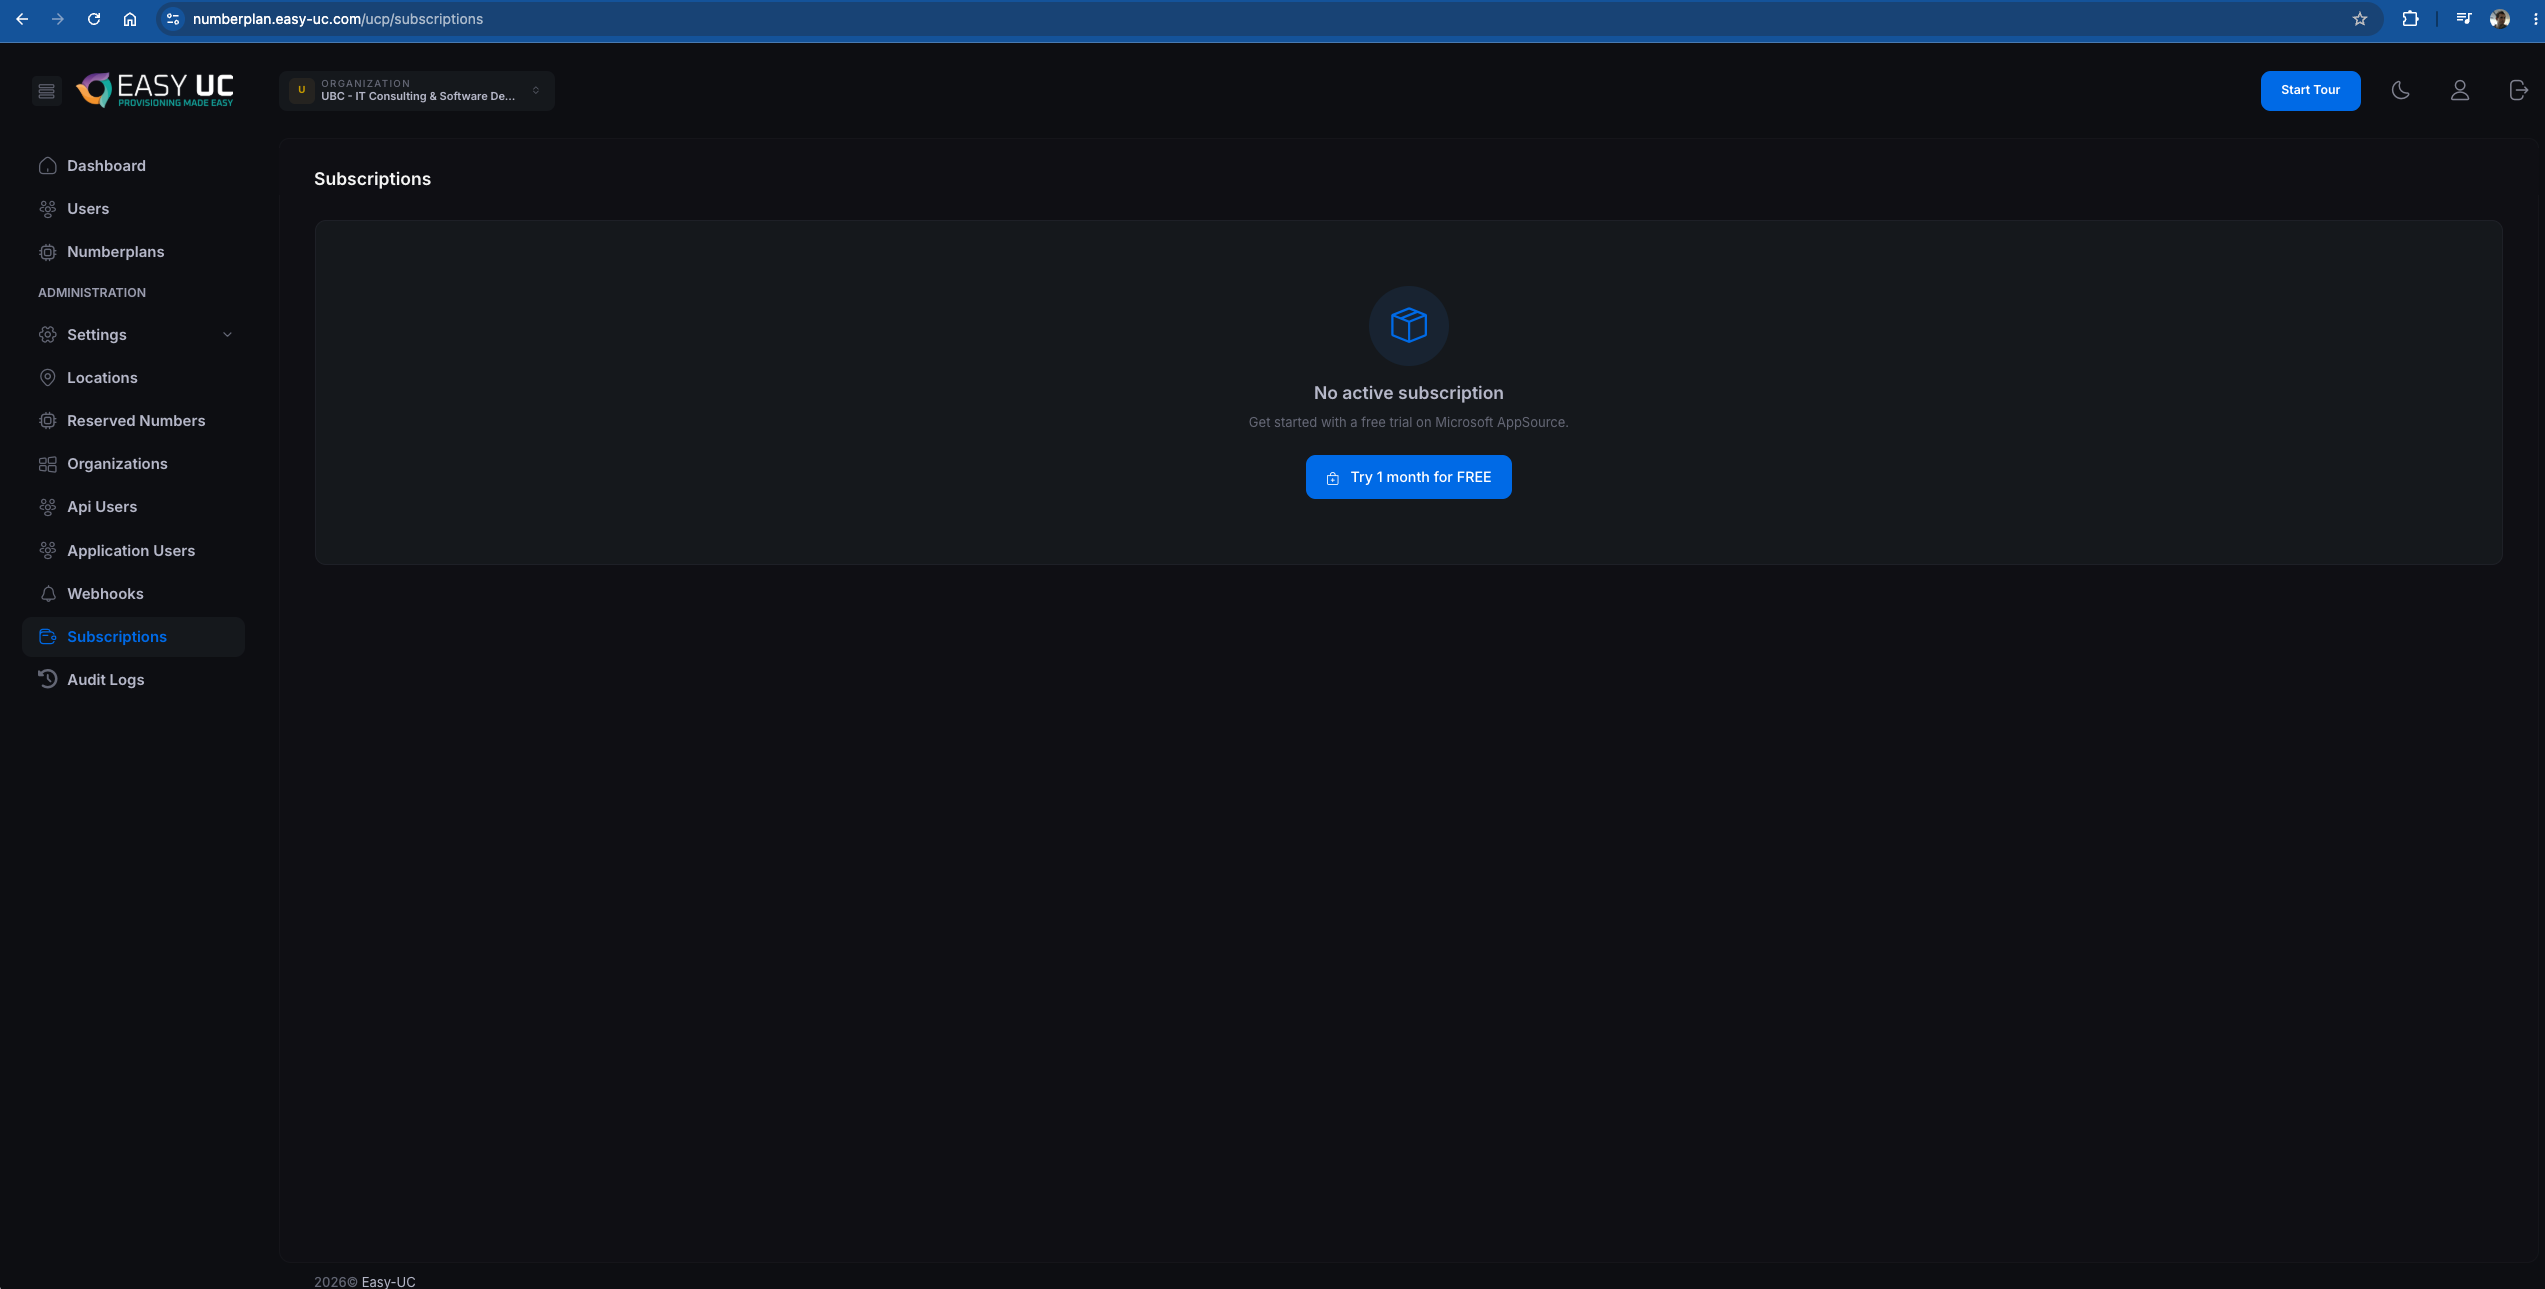
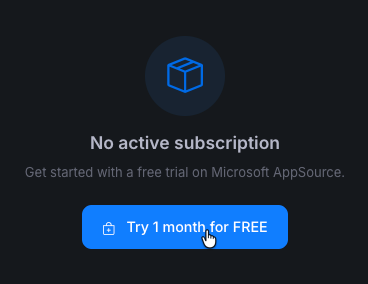
After the first login you land in the Subscriptions area. Since your tenant has no subscription yet, the "No active subscription" notice appears. Click the blue "Try 1 month for FREE" button to go to Microsoft AppSource.
Step 3 – Product page in Microsoft Marketplace
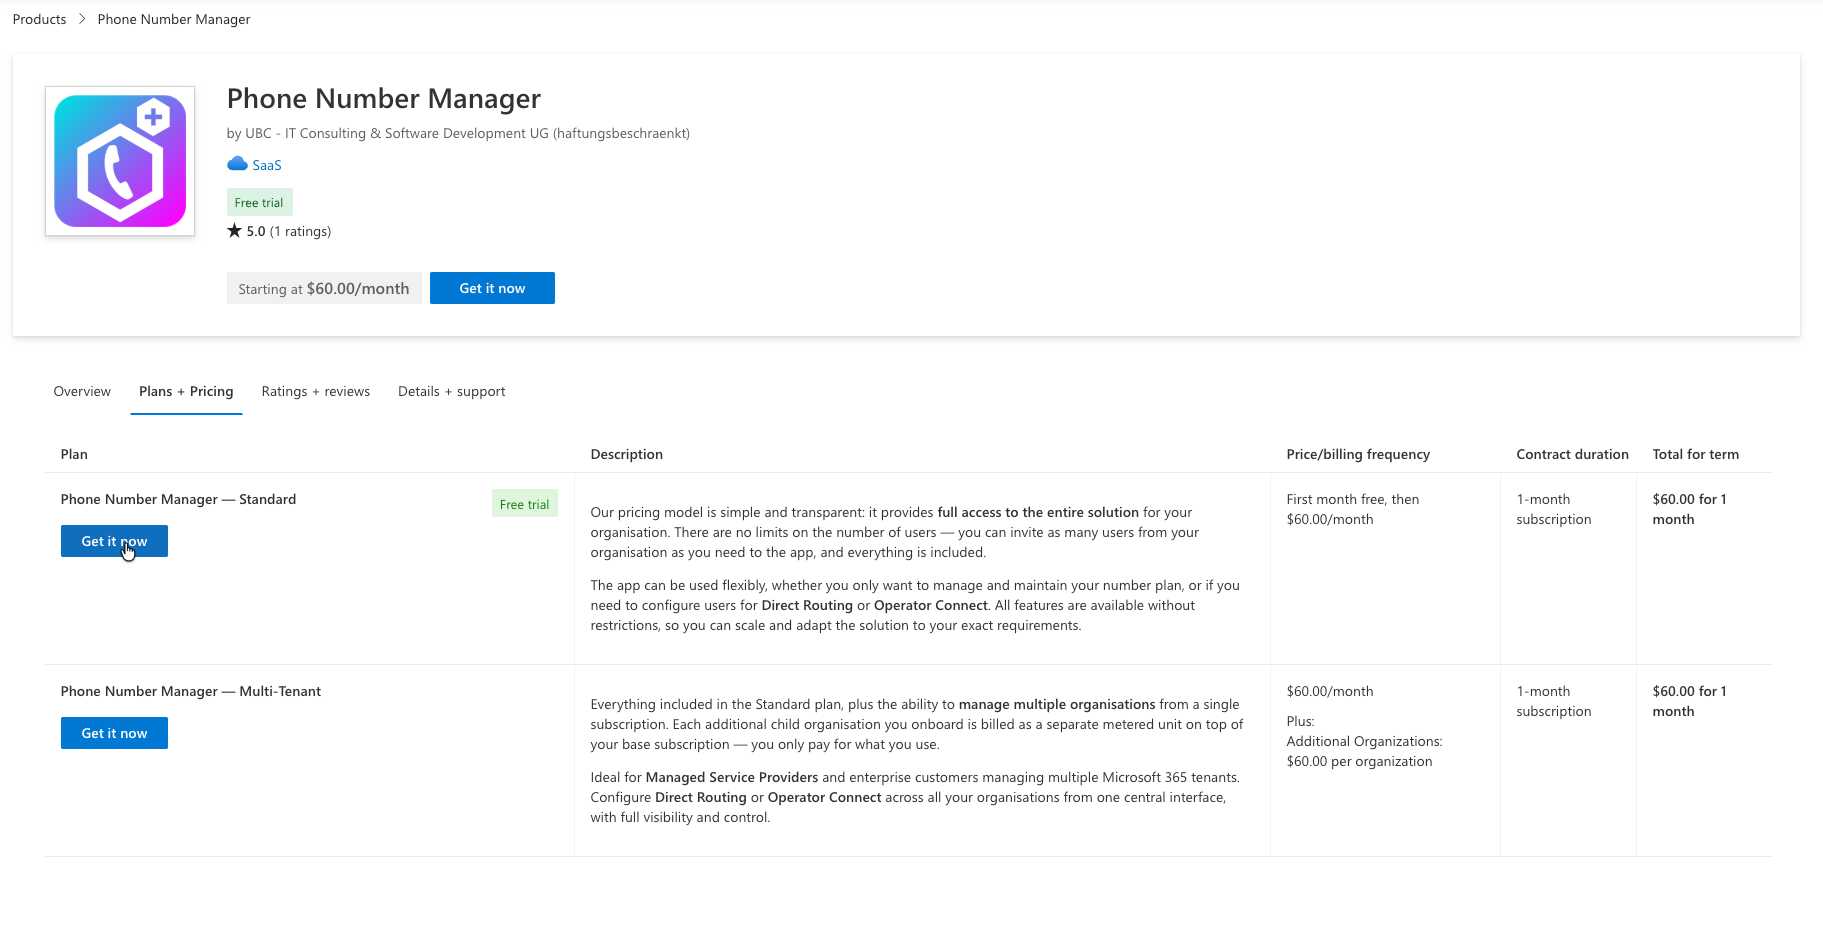
Microsoft opens the "Phone Number Manager" product page with available plans. There are two plans:

- Phone Number Manager — Standard: $60/month · first month free · ideal for single-tenant setups
- Phone Number Manager — Multi-Tenant: $60/month + $60 per additional organisation · for MSPs
Step 4 – "Get it now" on the right plan
Click "Get it now" on the plan you want. For most customers the Standard plan is the right choice – Multi-Tenant only makes sense for Managed Service Providers.
Step 5 – Sign in to Microsoft Marketplace
Microsoft opens a "Sign in to Microsoft Marketplace" dialog. Enter the email address of your business Microsoft 365 account and click "Sign in".

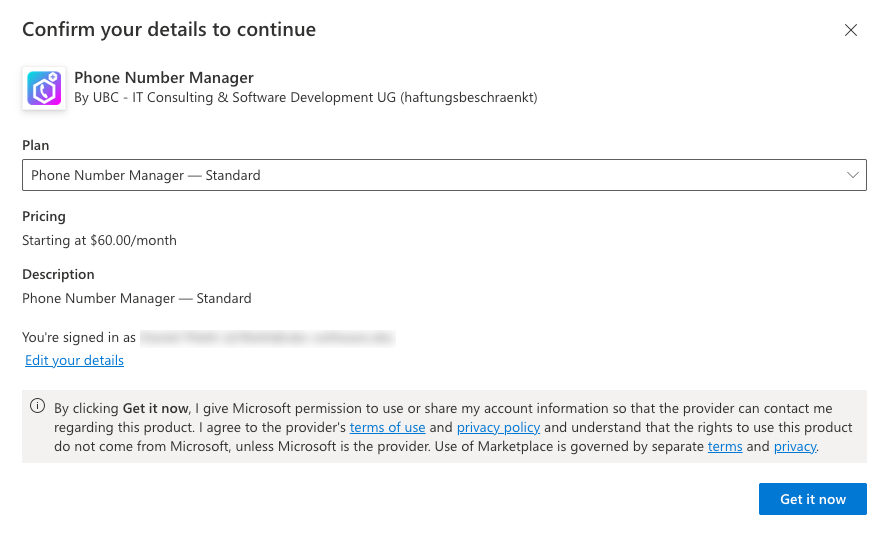
name@company.com). Personal Microsoft accounts (outlook.com, hotmail.com) are not supported.Step 6 – Confirm plan details
A "Confirm your details to continue" dialog appears. It shows: selected plan, pricing and signed-in account. Briefly review the terms of use and privacy policy, then click "Get it now" at the bottom right.
Step 7 – In Azure portal: "Subscribe to Phone Number Manager"
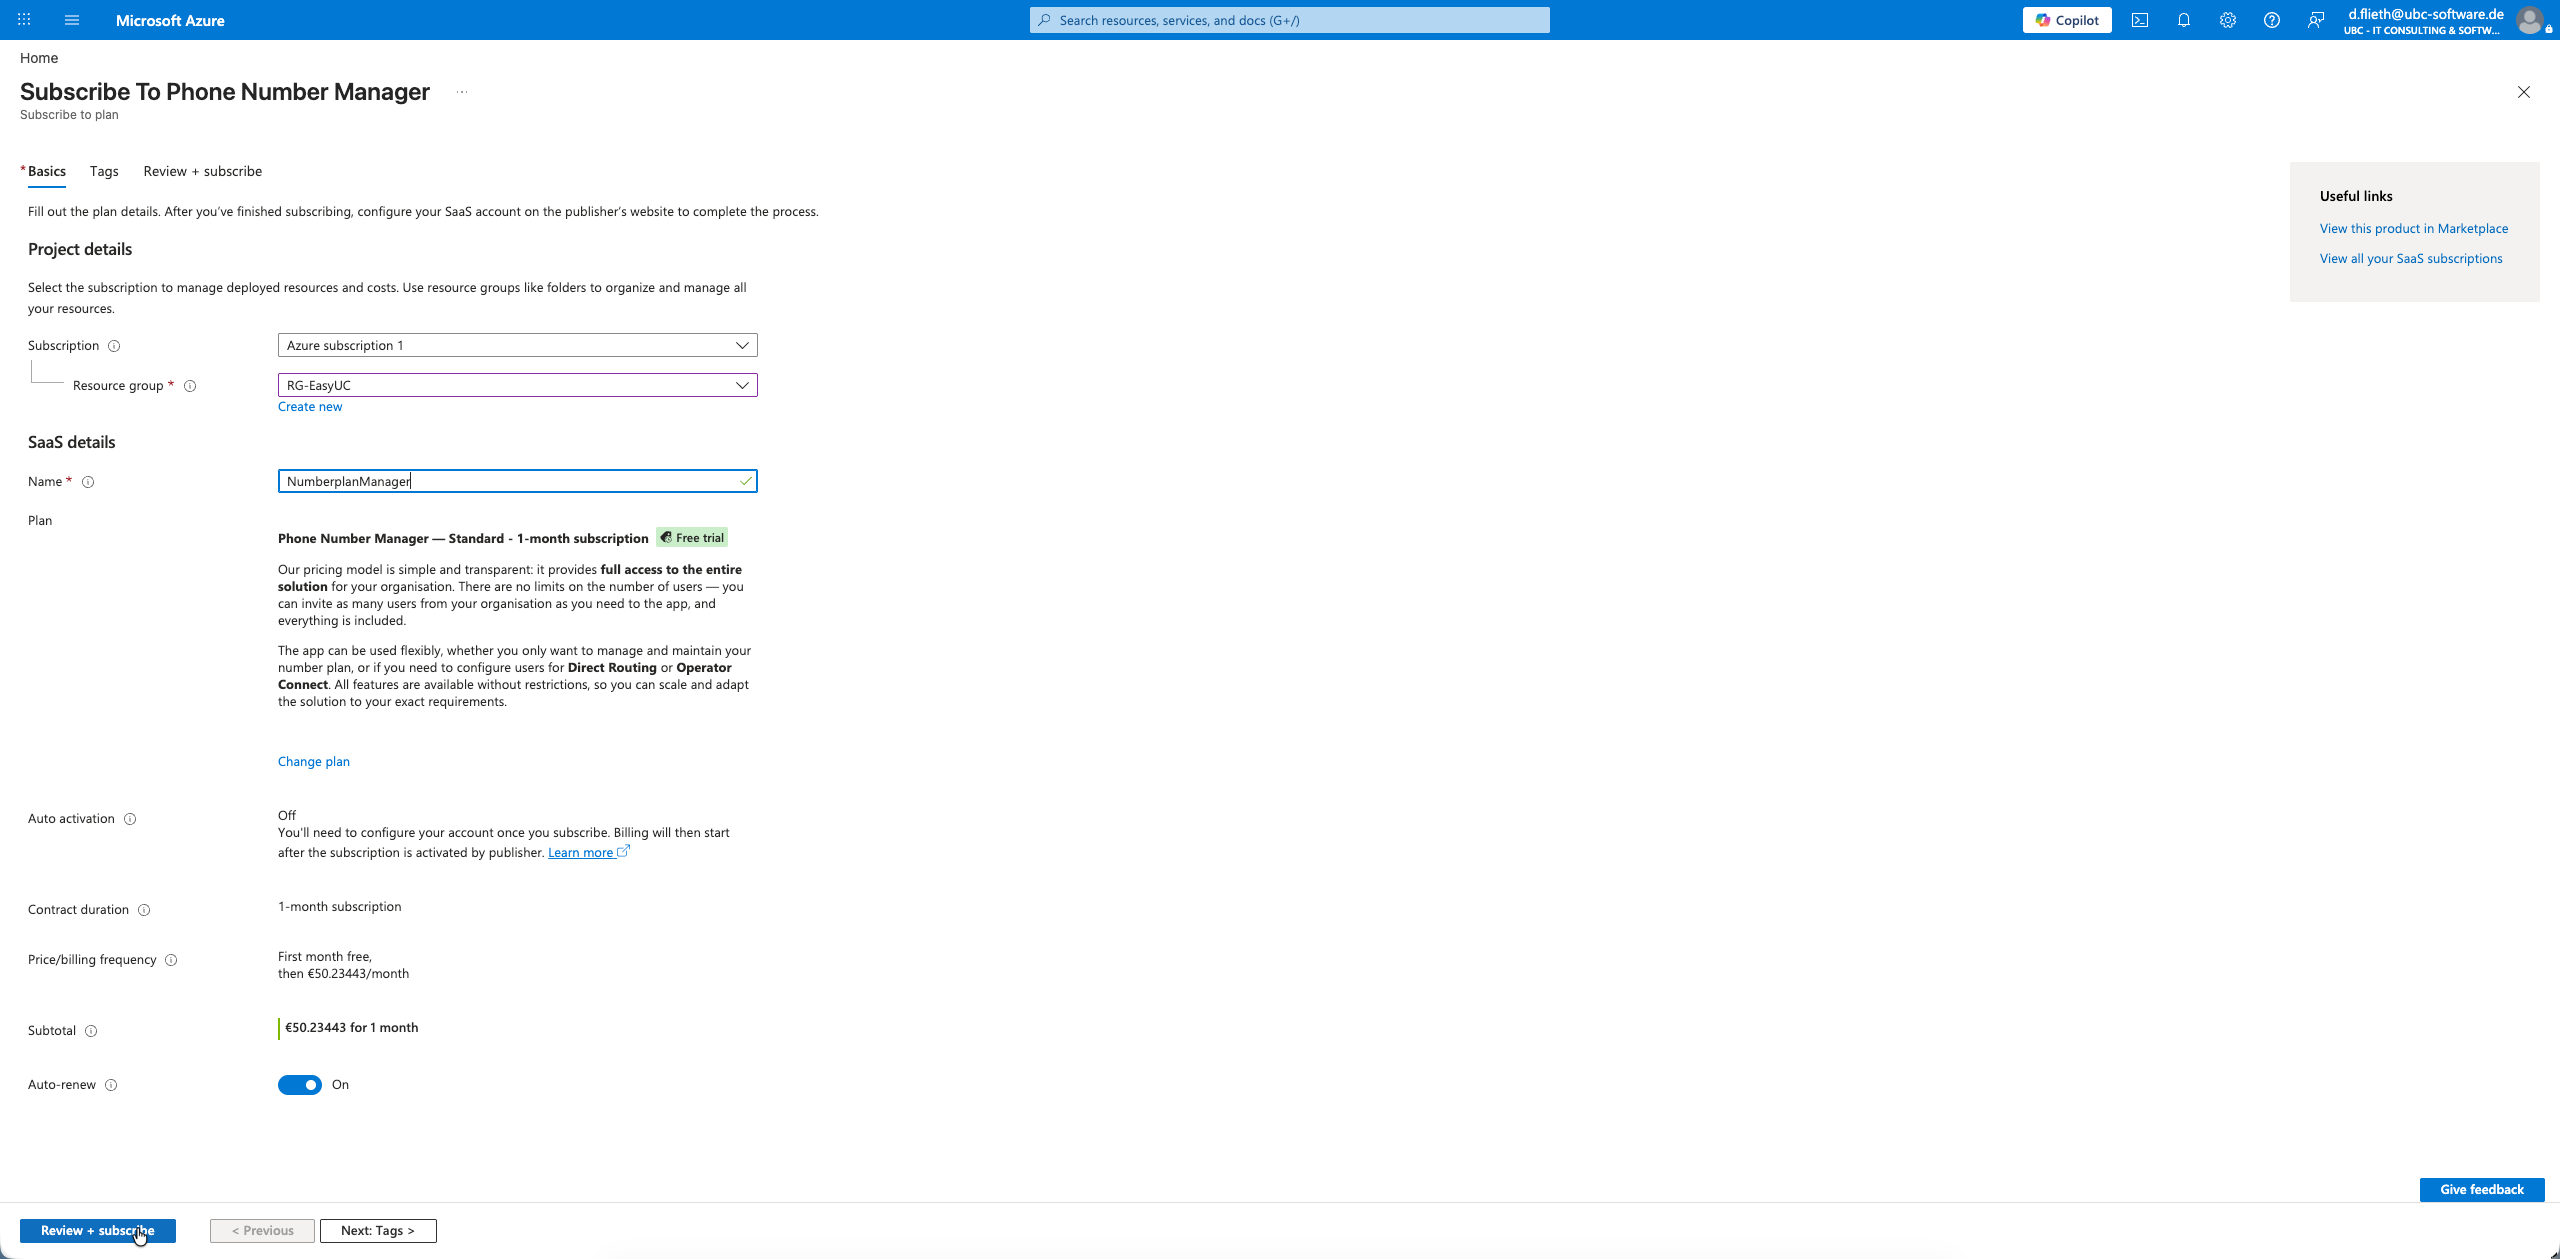
Microsoft automatically redirects you to the Azure portal and opens the subscribe dialog on the "Basics" tab. The following fields appear:

- Subscription: your Azure subscription (e.g. "Azure subscription 1") – used for billing.
- Resource group: pick an existing one or create a new one via "Create new" (recommended:
RG-EasyUC). - Name: an internal name for the subscription – e.g.
NumberplanManager. - Auto activation: can stay Off – activation is handled automatically by Easy UC once you return to
numberplan.easy-uc.comafter step 9. - Auto-renew: On recommended – so your subscription renews automatically after the first 30 days.
Step 8 – Fill in the fields and "Review + subscribe"
Once all fields are filled, the dialog looks like this. Click "Review + subscribe" at the bottom left to proceed to the final step.
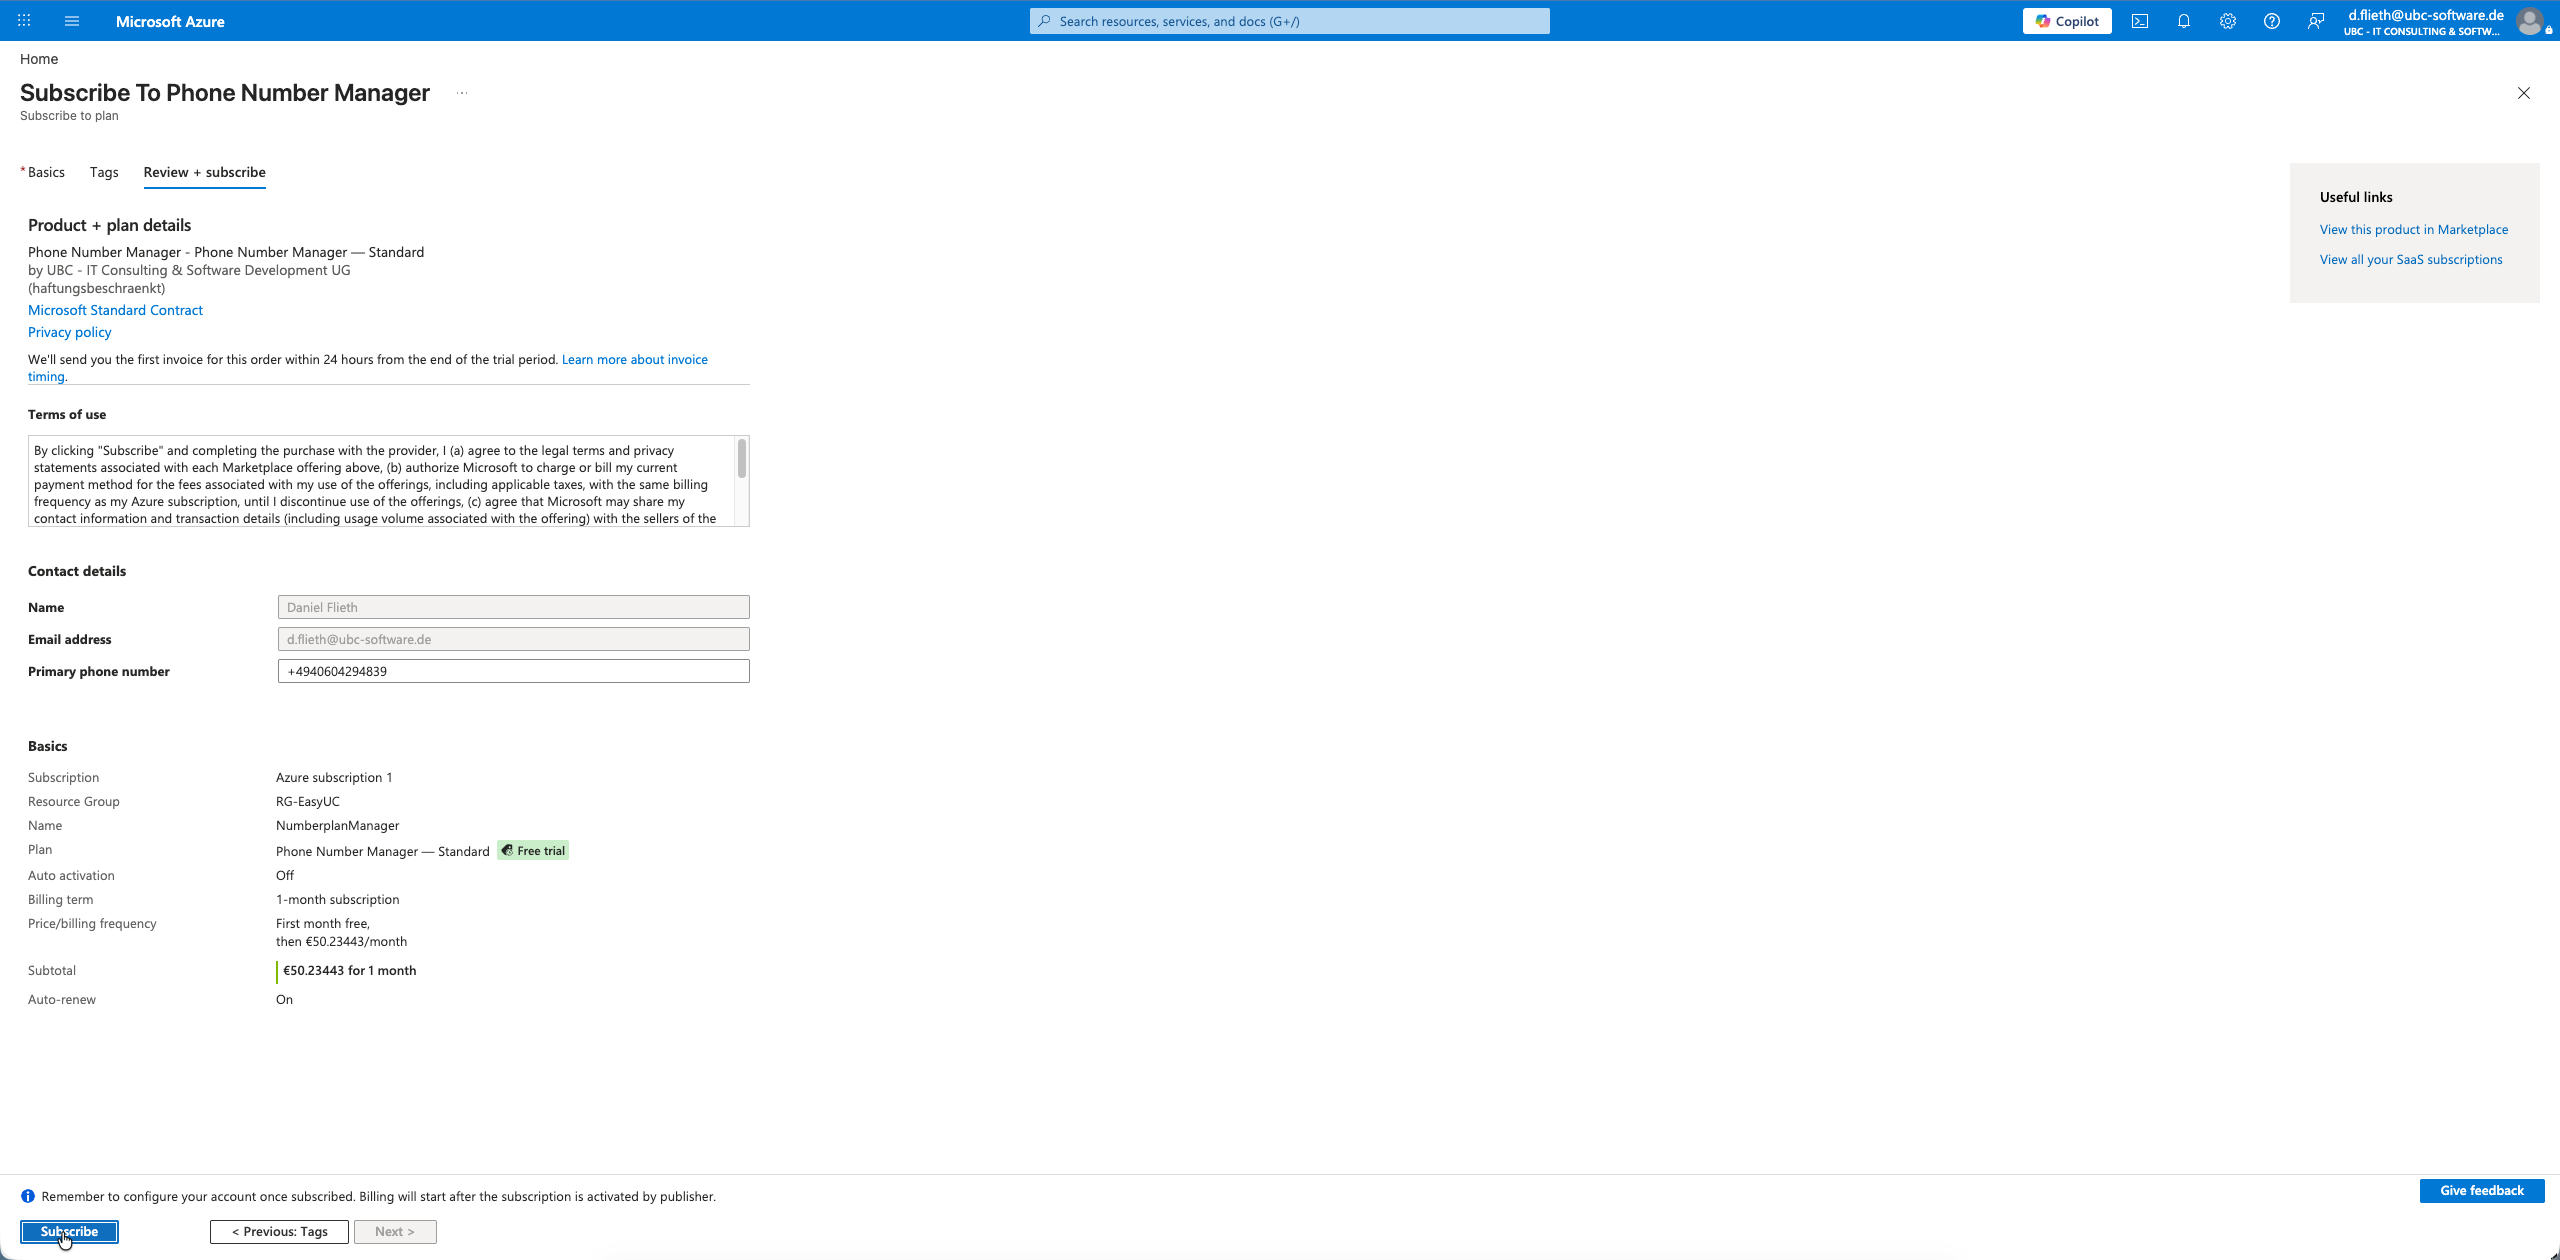
Step 9 – Review + Subscribe
On the "Review + subscribe" tab Microsoft validates your inputs and displays your contact details (name, email, phone) for the publisher. These are shared with UBC so we can contact you. Click "Subscribe" at the bottom left to create the subscription on Microsoft's side.
Step 10 – Back to Easy UC: first login with an active subscription
Microsoft shows a confirmation page with a "Configure account" button – this brings you back to numberplan.easy-uc.com. Easy UC detects the new subscription automatically, activates it and opens the dashboard. You will immediately see: Users Summary, Licenses Summary, Locations Summary and Voice Calling Summary.

First login after activation
What to expect right after subscription activation: users are already synced from Microsoft Teams, but locations, license rules and number sync are still empty. Here is how to tackle it.
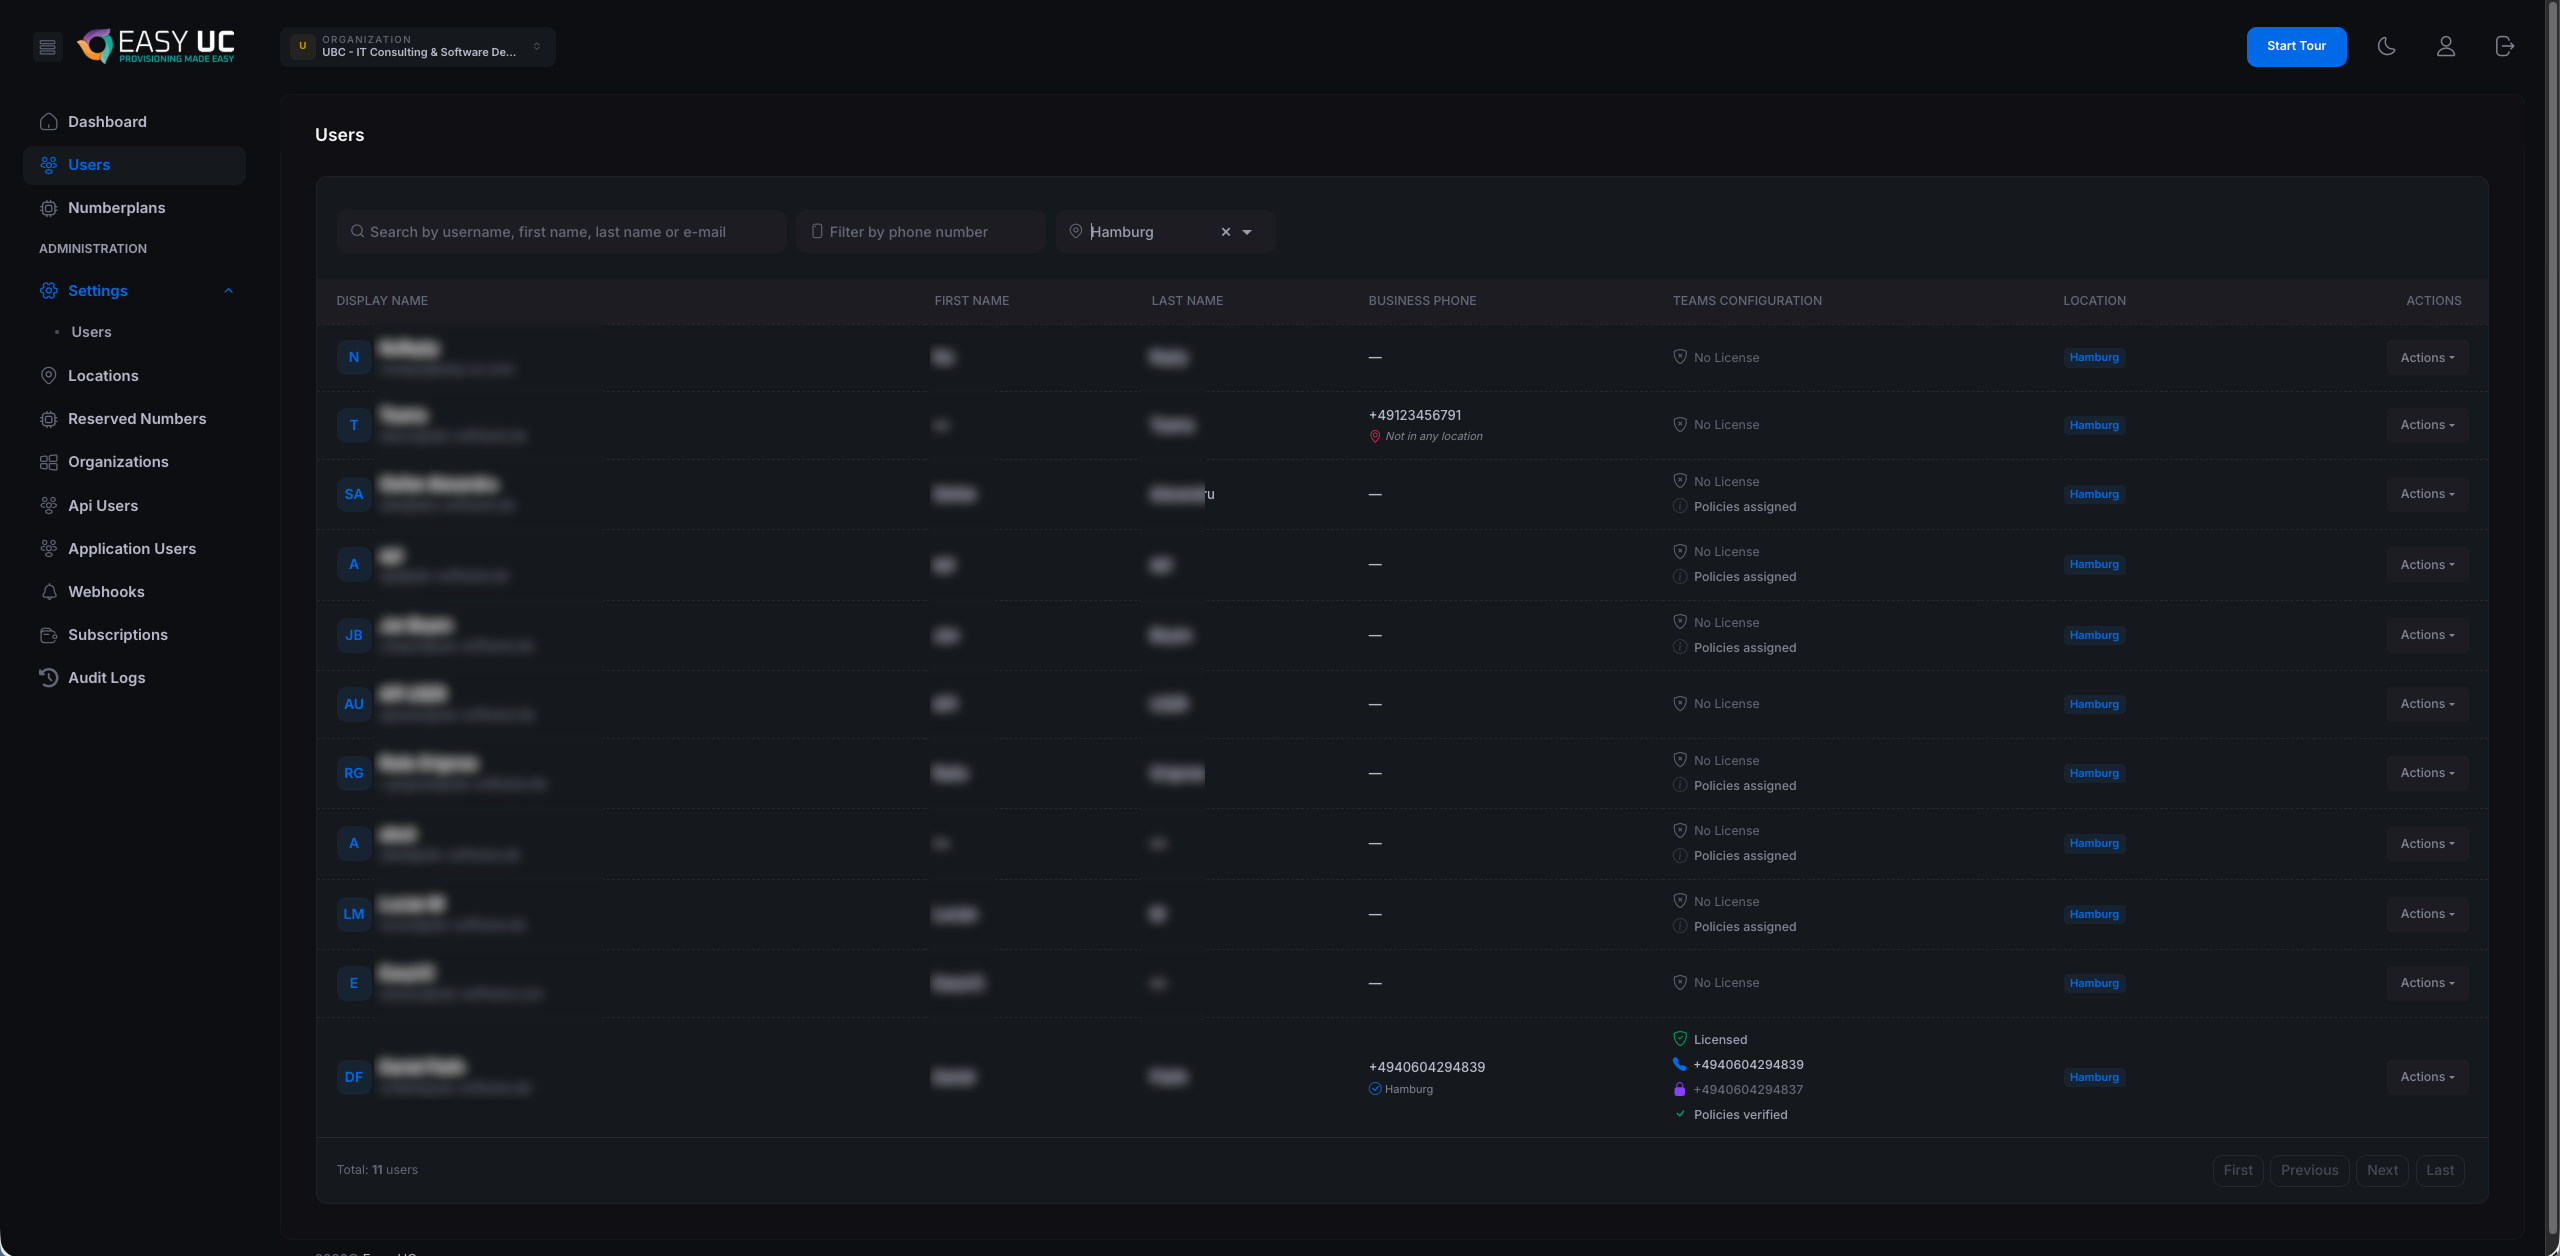
Users — already synced, not yet configured
In the Users tab you already see every user from your Microsoft 365 tenant. Easy UC fetches the list via Microsoft Graph automatically – name, email, business phone are shown directly. Per user you will see:
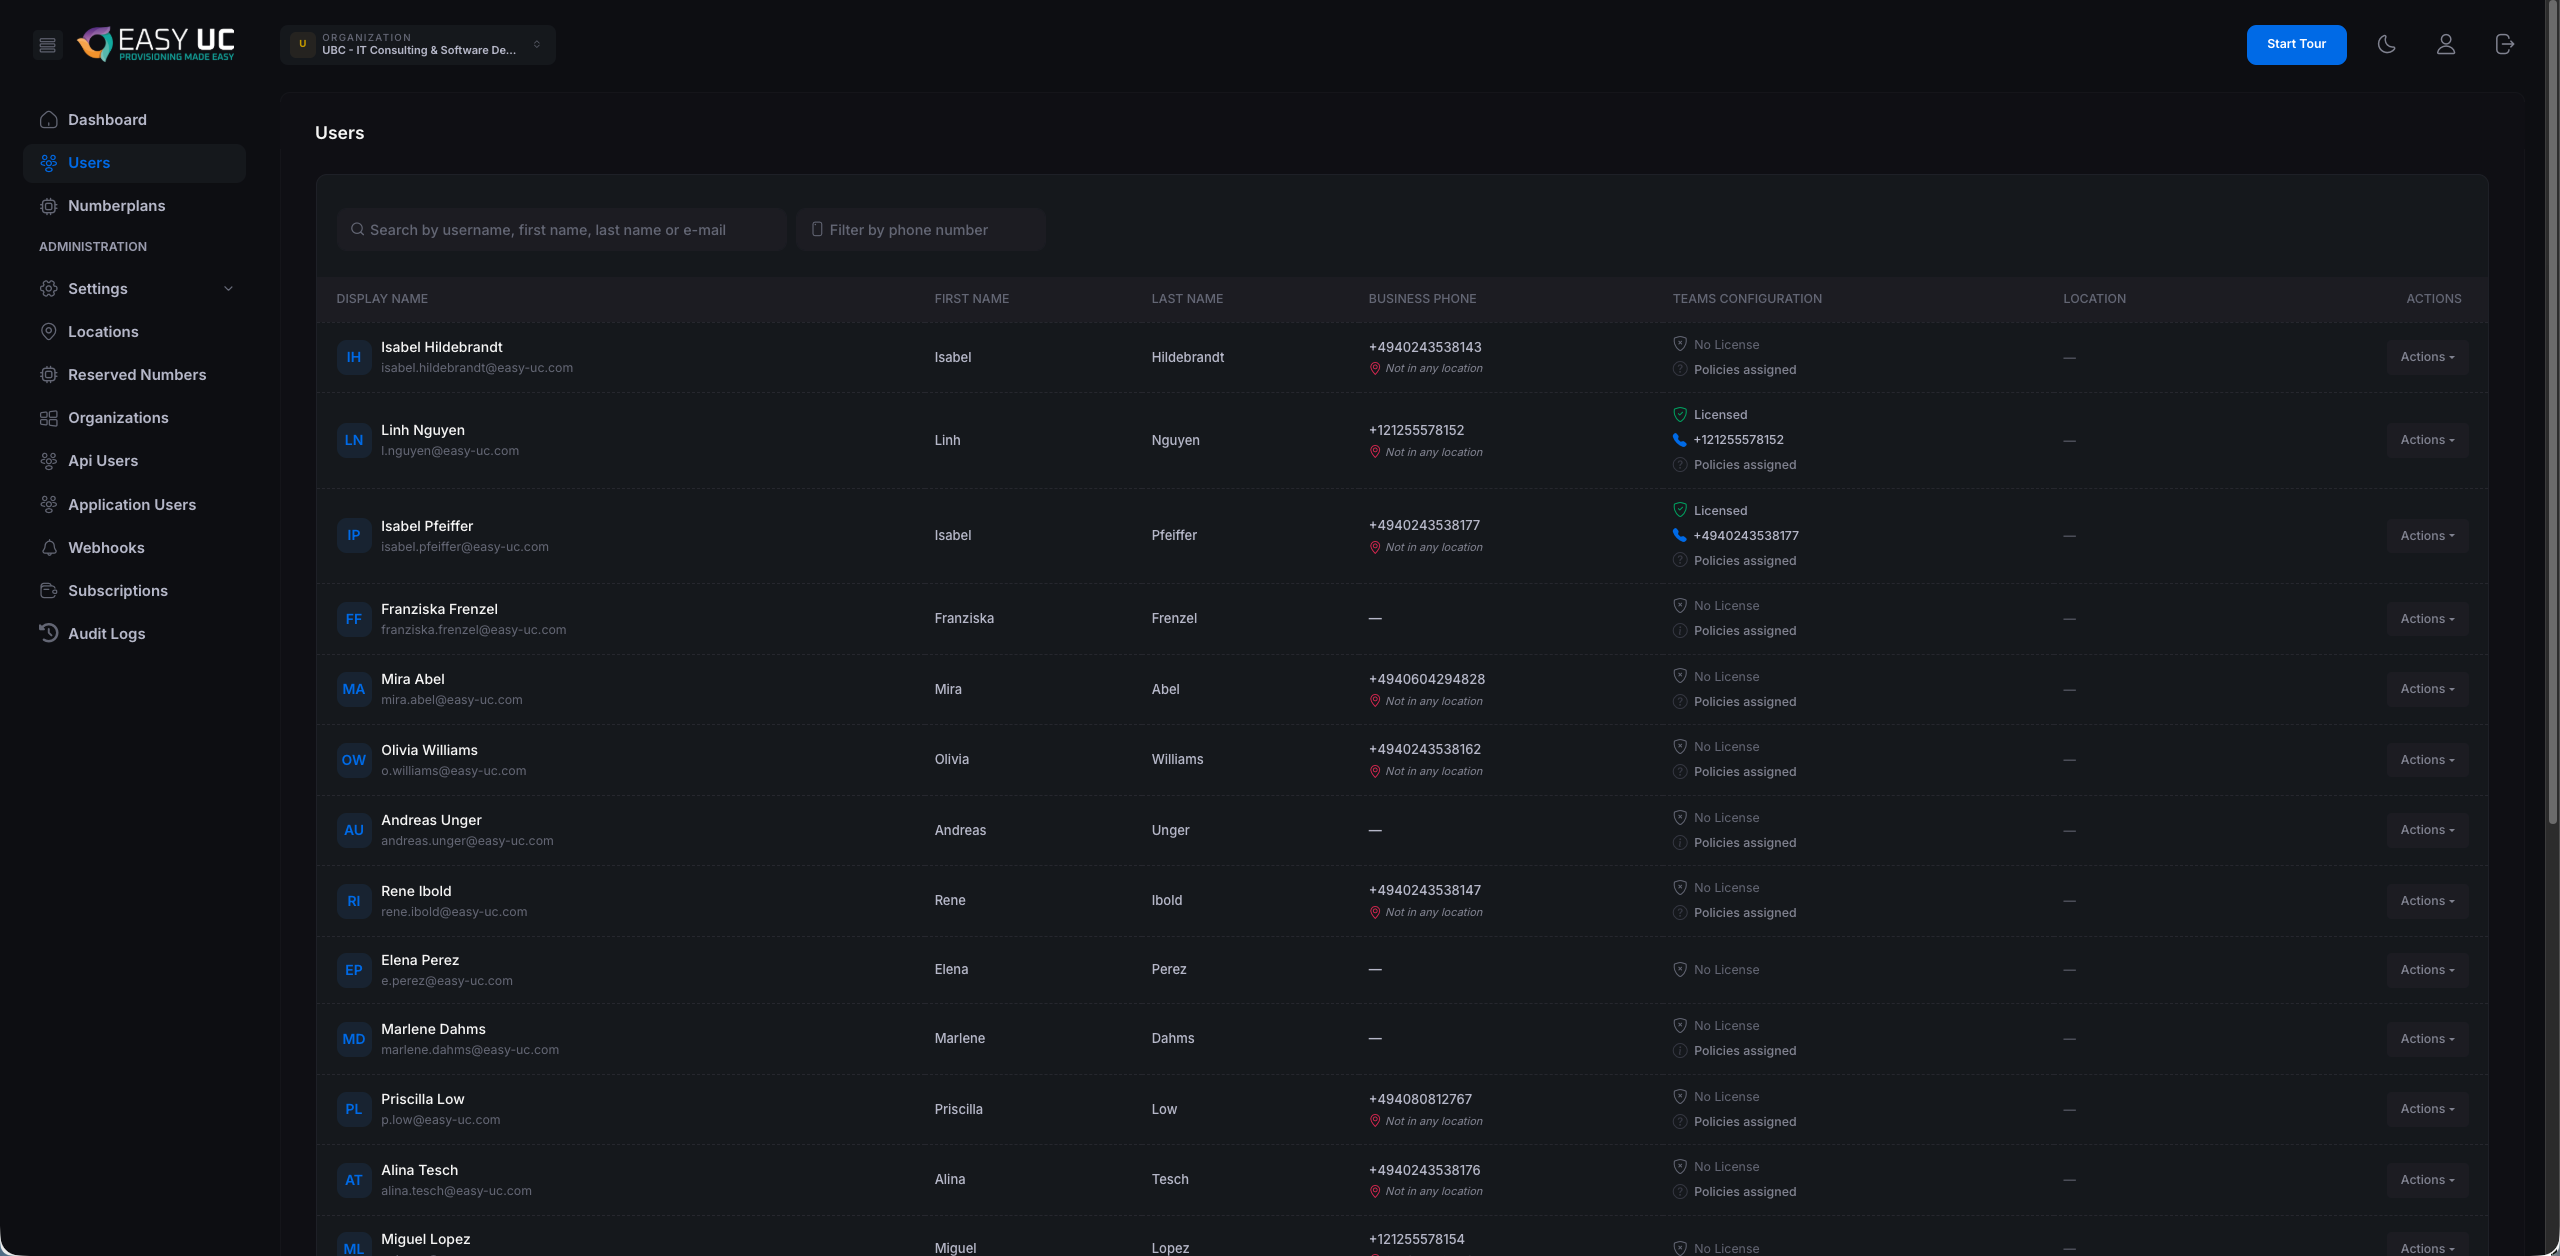
- "No License": no Teams Phone or M365 license entry — will be configured in the "Automatic Licensing" step.
- "Policies assigned": the user is not assigned to a location yet — handled in the "Locations" step.
- A phone icon indicates whether the user already has a Business Phone (read from Teams).
- Via "Actions" on the right you can onboard each user individually — once your locations are in place.
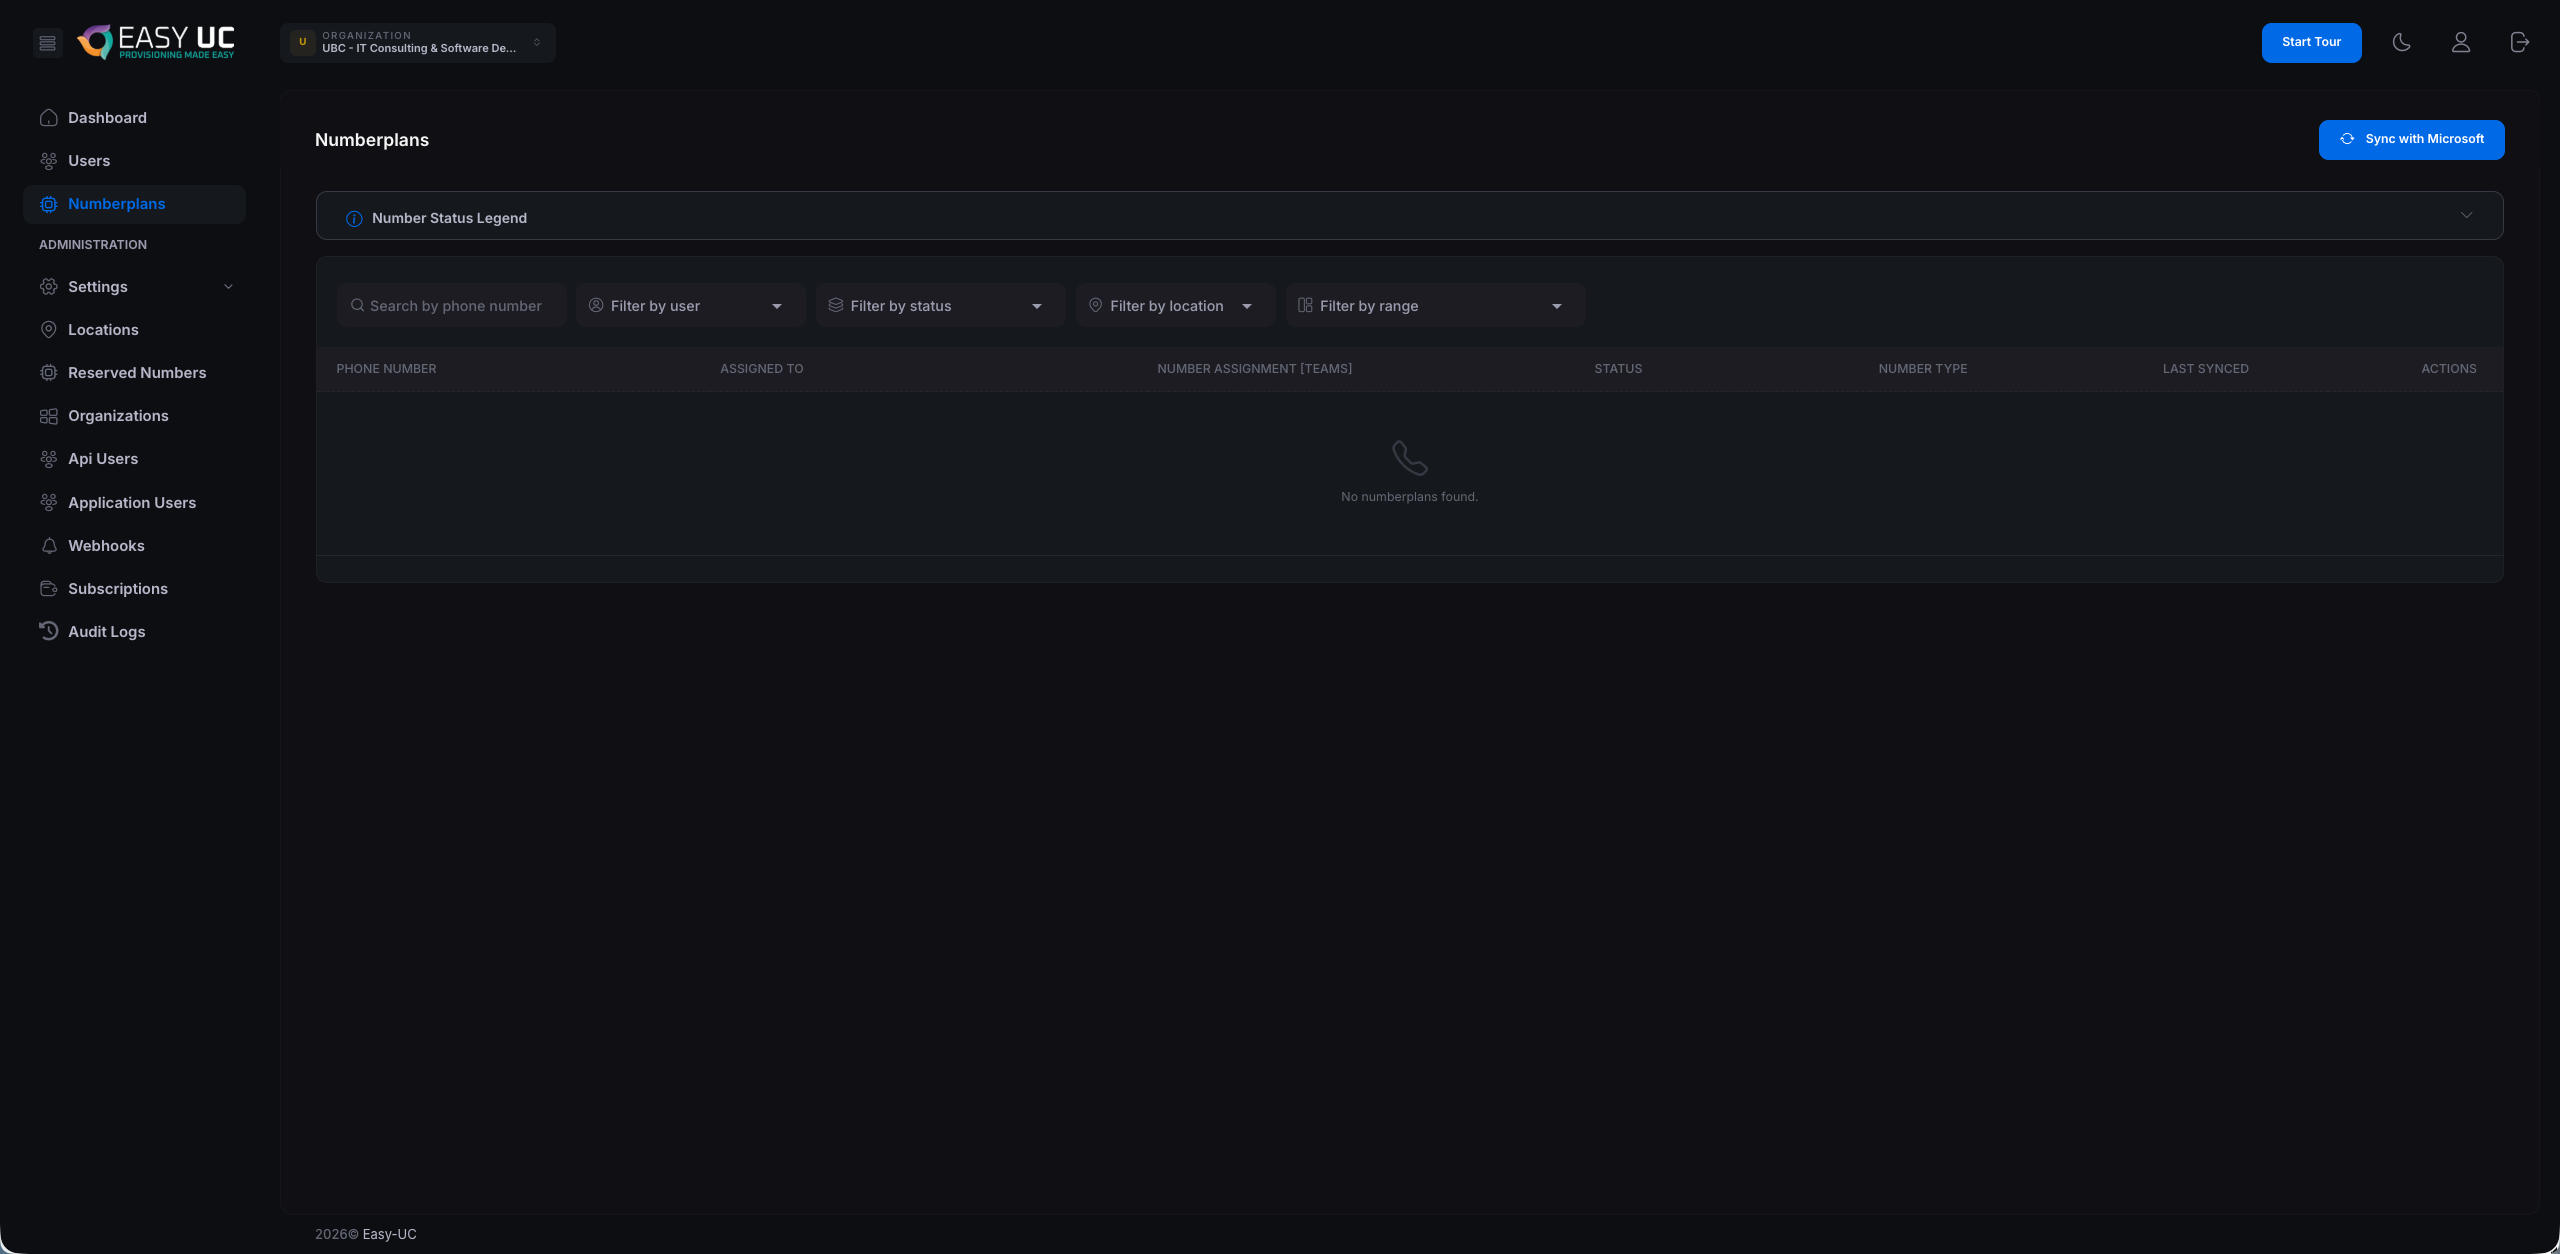
Numberplans — empty, sync needed
The Numberplans tab is still empty after first login ("No numberplans found."). That is expected — Easy UC is waiting for the first sync with Microsoft Teams. Click the blue "Sync with Microsoft" button at the top right to import the phone numbers configured in Teams.
Recommended order for the first configuration
To let Easy UC play to its strengths, walk through these four steps in this order:
- Start the number sync: click "Sync with Microsoft" in Numberplans — this fills the overview.
- Create your first location: in the Locations tab define a location — name, number ranges (E.164), calling policy and emergency address. → Locations guide
- Define license rules: which Microsoft licenses should be assigned automatically when numbers are assigned? → Licensing guide
- Onboard your first user: in the Users tab pick someone, click "Actions → Onboard" and follow the guided 6-step wizard. → Onboarding wizard
Set up permissions
API permissions are granted automatically on first login – the Teams Telephony role must be assigned manually by the Teams or M365 admin. Here is how to check and complete all permissions.
Overview in Easy UC
In the Organizations tab you see a card "Required Roles & Permissions" with two columns: API Permissions (left) and Teams Role (right). Below, your organization shows the current state — green "Enabled" = all good, red/orange = something missing.
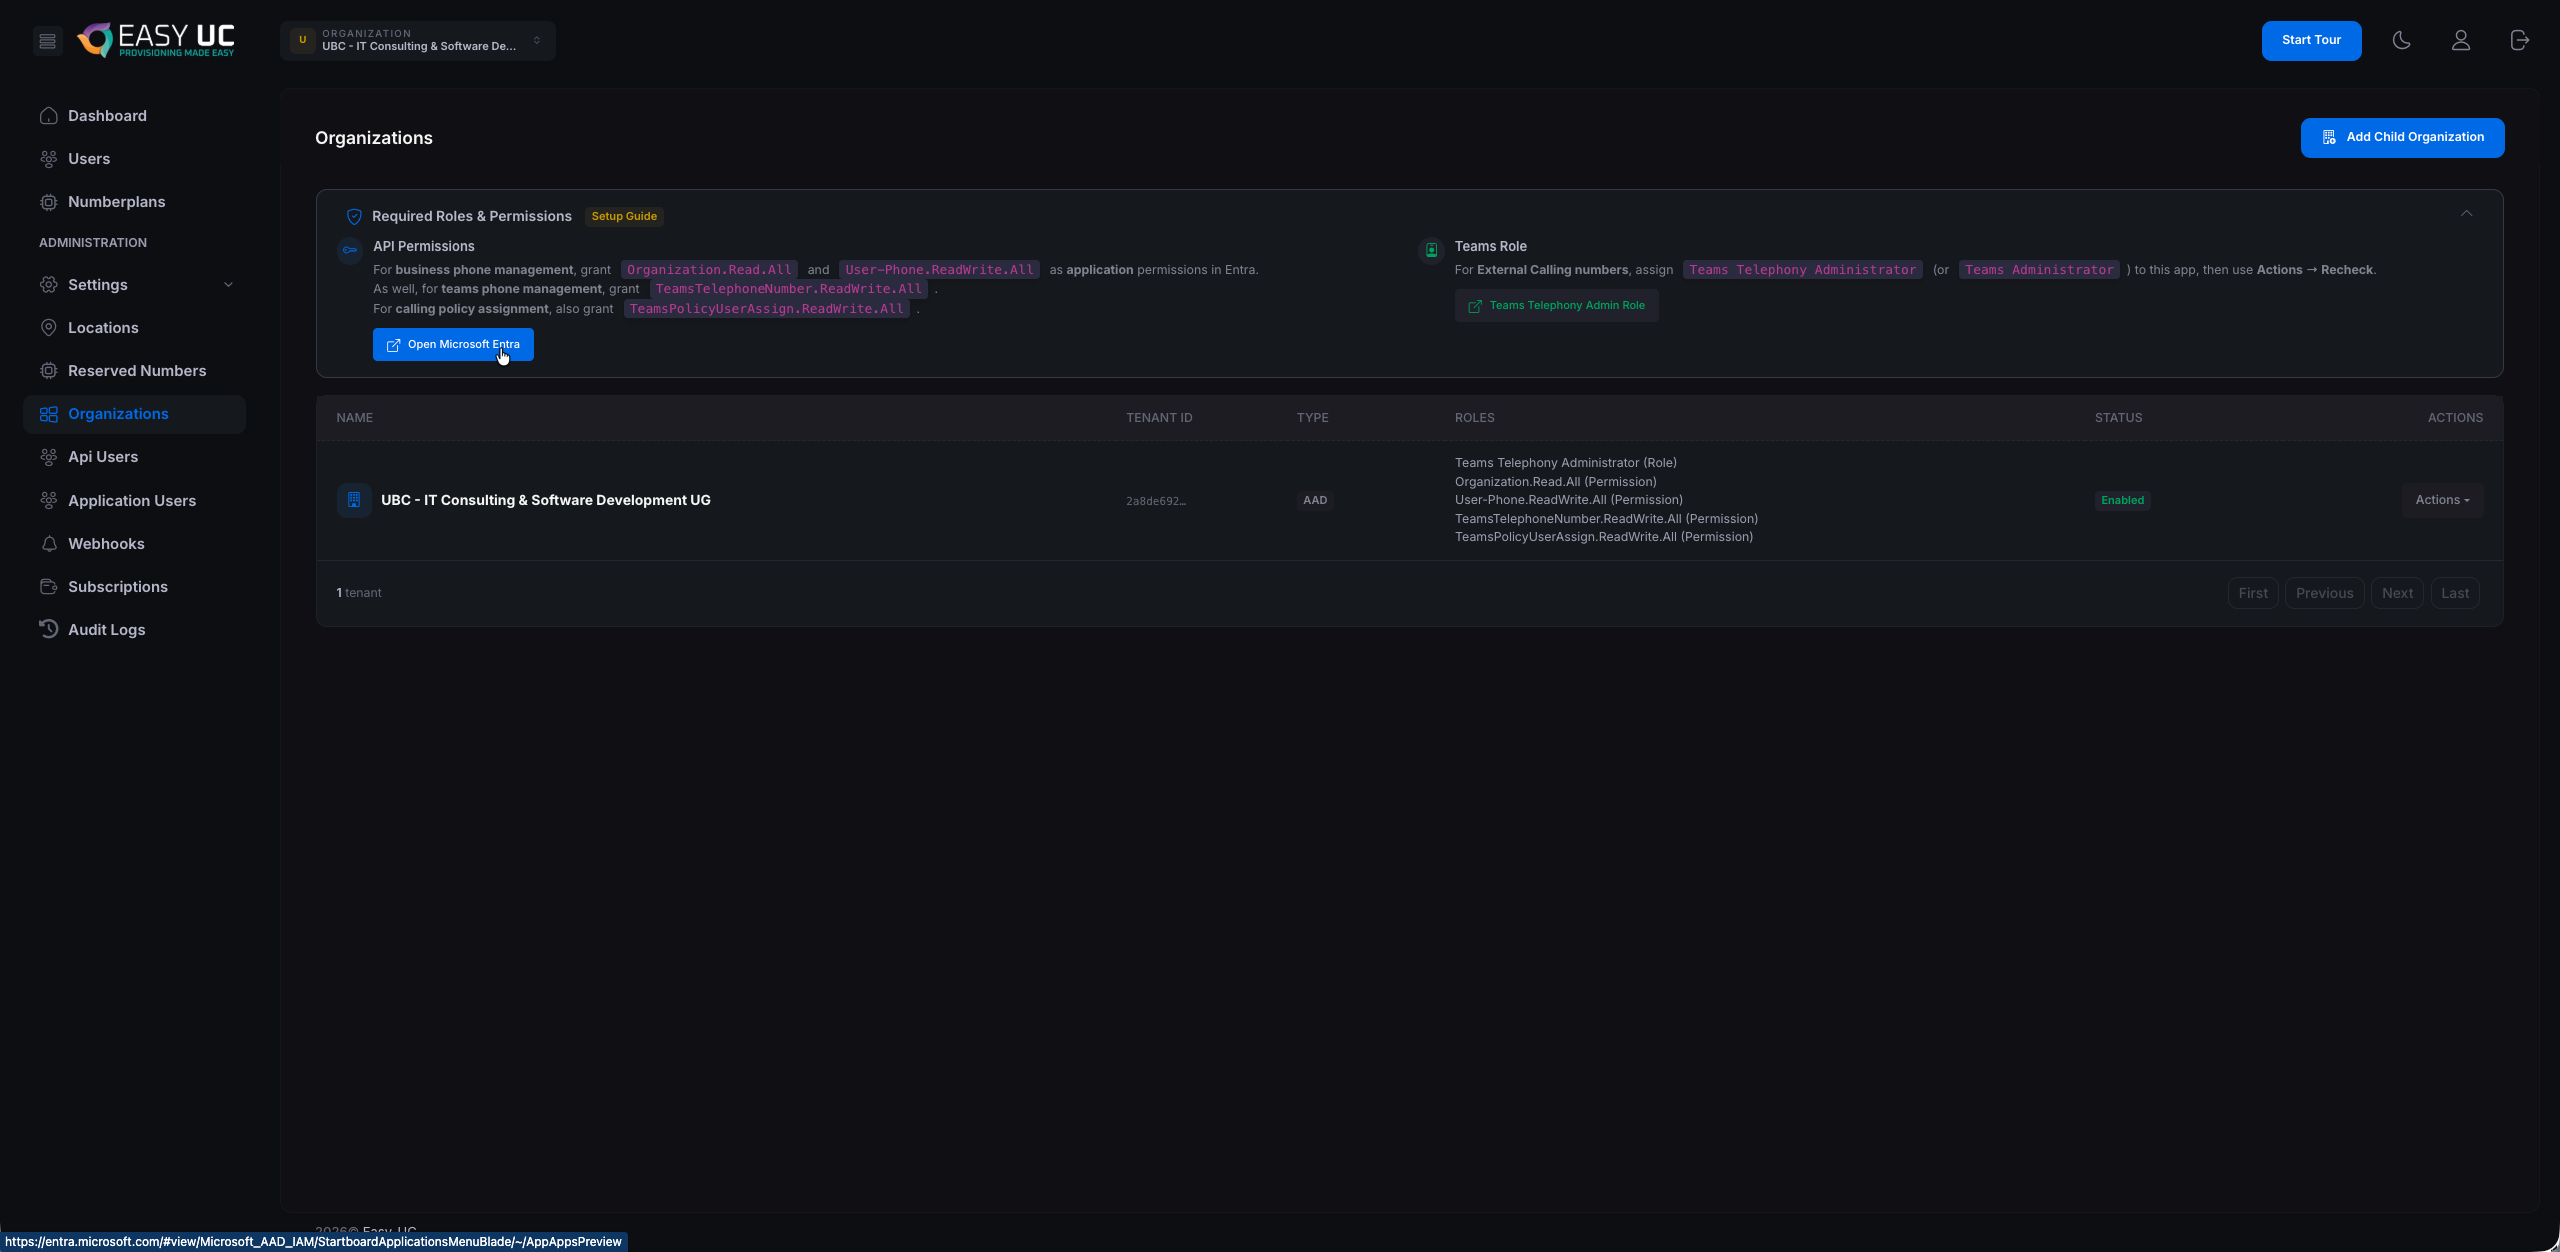
API Permissions — set automatically
On the first login, Easy UC presents a Microsoft consent dialog where you, as admin, grant all required API permissions with one click. No manual setup needed. The list below is just a reference – useful if a permission has been removed in your Entra tenant or you want to audit what is in place:
- Organization.Read.All – Read tenant organisation data – required for business phone management.
- User-Phone.ReadWrite.All – Assign and unassign phone numbers to users.
- TeamsTelephoneNumber.ReadWrite.All – Teams phone number management — required for Direct Routing and Operator Connect.
- TeamsPolicyUserAssign.ReadWrite.All – Assign calling and emergency policies per user.
Teams Role — must be assigned manually by the Teams admin
Microsoft does not allow the Teams Telephony Administrator role to be granted automatically via consent. You therefore have to assign it once manually. Here is how:
- In Easy UC click "Teams Telephony Admin Role" in the right column of the Roles card — this opens the correct page in Microsoft Entra Admin Center directly.
- In the Entra portal you land on the role "Teams Telephony Administrator". Switch to "Assignments" in the left sidebar.
- At the top, click "+ Add assignments".
- Search for your app – typically
Phone Number Manager. It is listed as a Service Principal. Select it and confirm with "Add". - The role takes effect immediately. No app restart or re-login required.
How it looks in Entra Admin Center
After assignment, your app appears in the "Teams Telephony Administrator" role's Assignments list. The entry shows: Name = Phone Number Manager, Type = ServicePrincipal, Scope = Directory. That is exactly the expected state:

Re-check the status in Easy UC
Back in Easy UC under Organizations: in the row of your organisation click "Actions → Recheck". Easy UC re-queries Entra and refreshes the status. With everything in place, the entry switches to green "Enabled" and all listed permissions show a check.
App initial setup
From an empty system to a first productive location: pick the user visibility mode, create a location with auto-assignment, license pool, number range and policies — and watch users and numbers fall into place automatically.
City field.Step 1 – Choose user visibility (Settings → Users)
Before we get going, an important decision: who sees which users? Easy UC offers two modes.
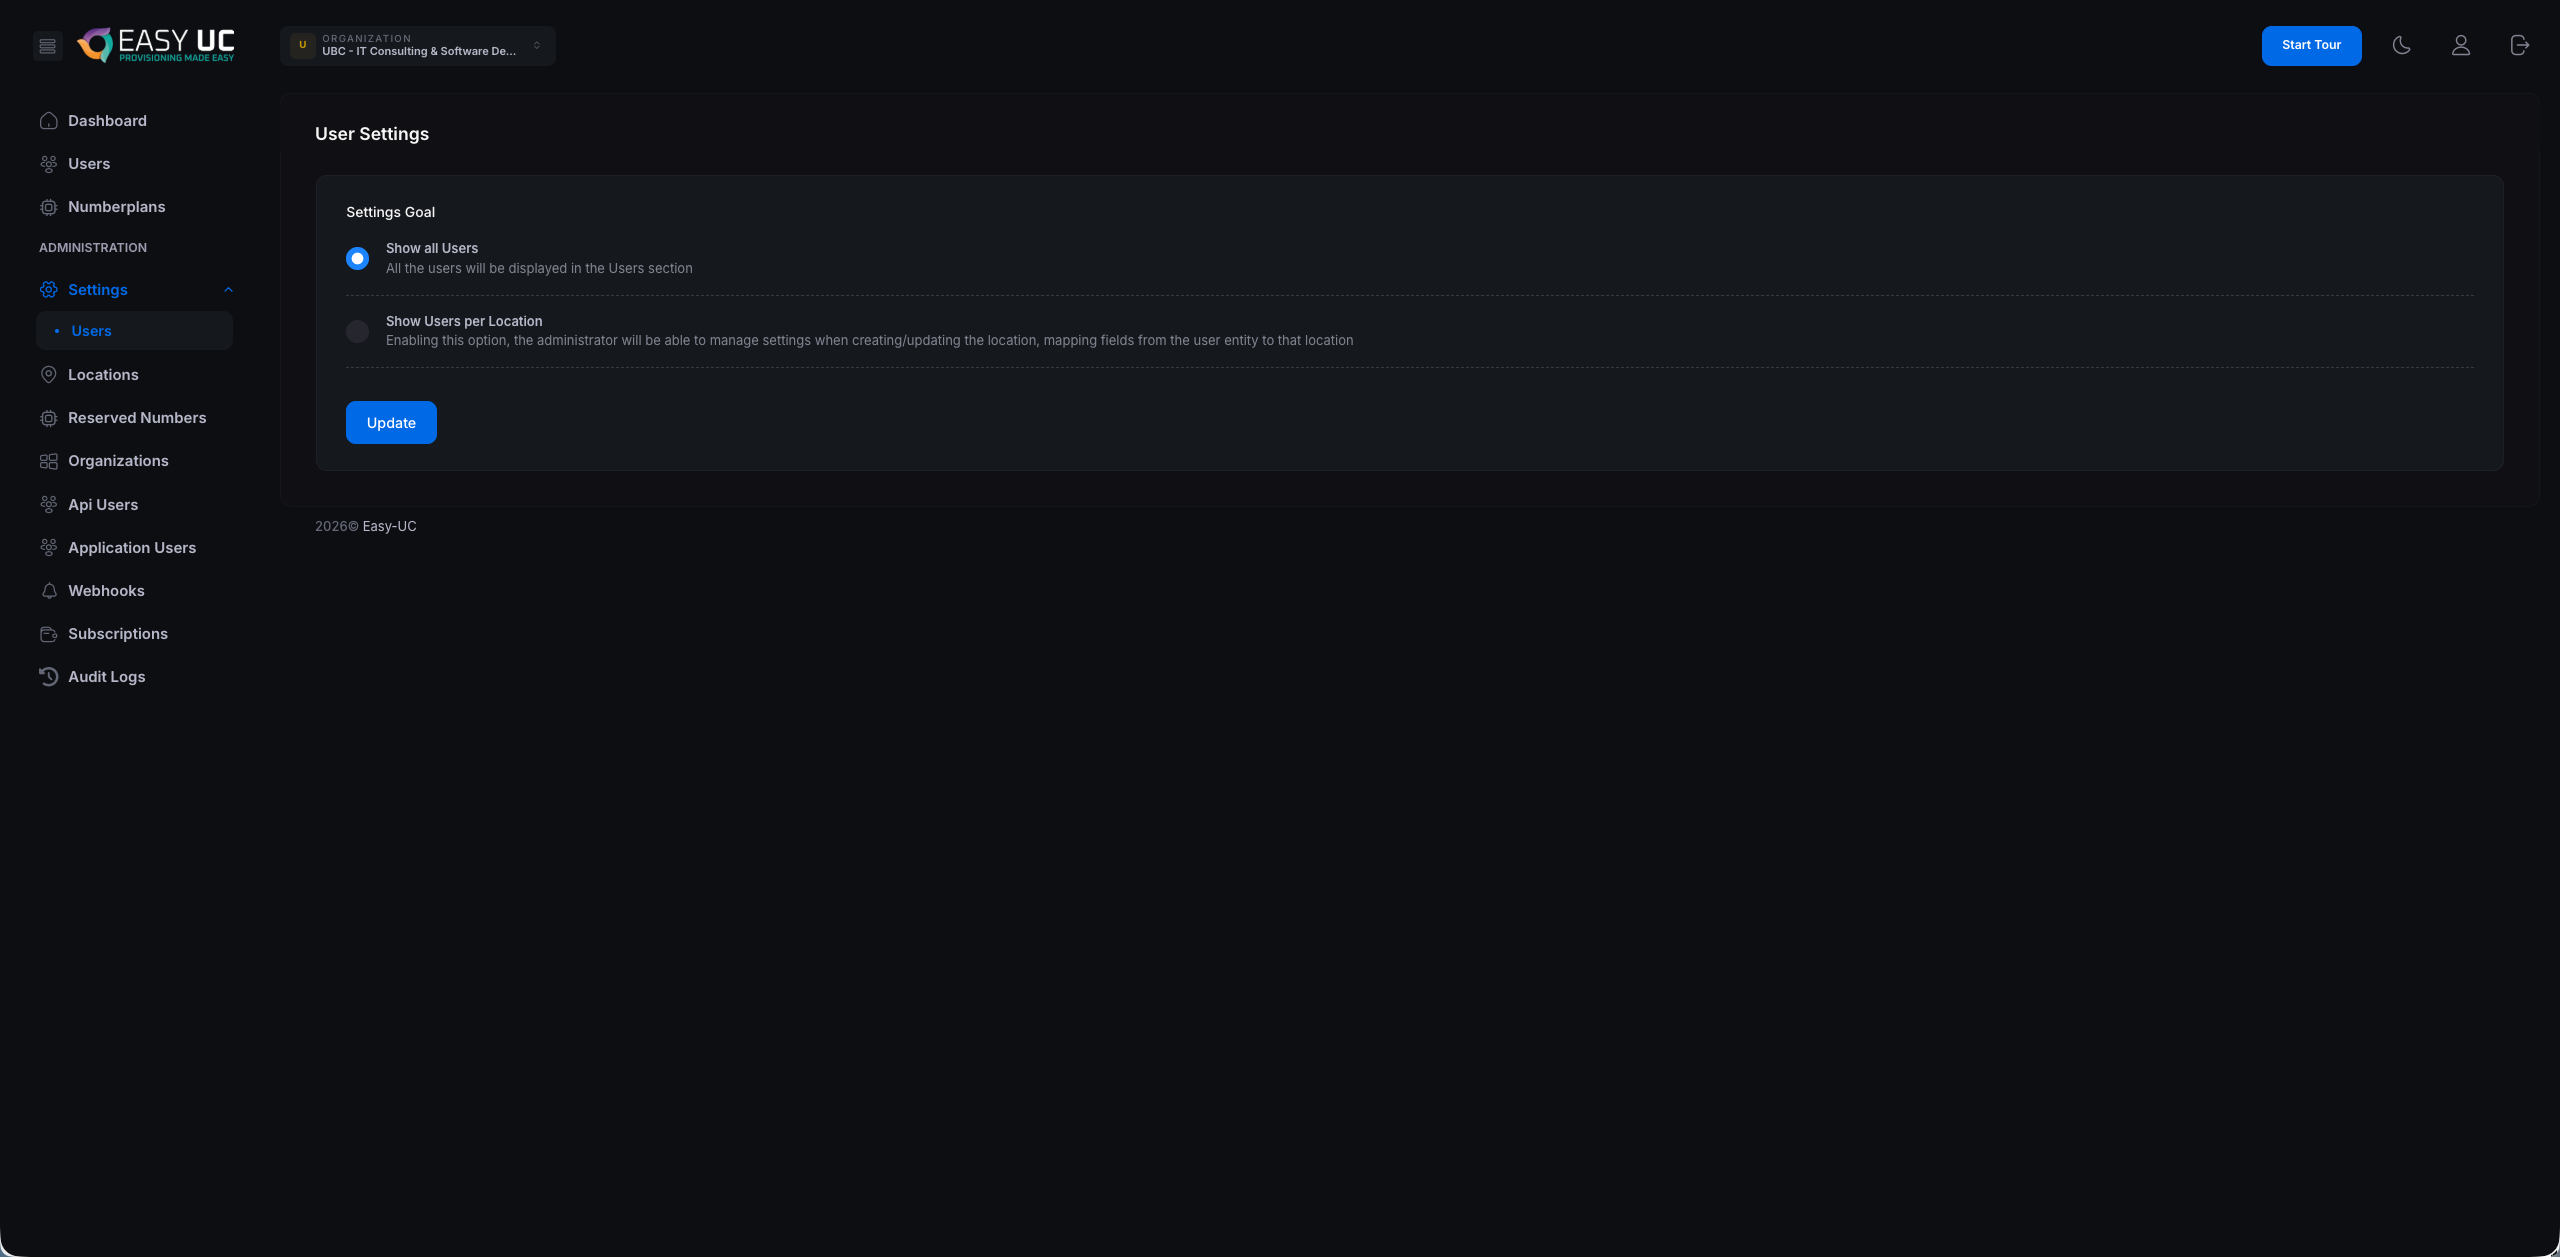
- Show all Users – Default. Every signed-in admin sees every user from the Microsoft 365 tenant. Recommended for small teams or centrally managed environments.
- Show Users per Location – Recommended for helpdesks or MSP scenarios. Each admin sees only the users from the locations they are assigned to. Prerequisite: every location needs an auto-assignment field (see step 4).
Pick your option with the radio button and click Update. A success toast confirms the change:

Step 2 – Switch to the "Locations" tab
In the left menu under Administration click Locations. Right after activation the list is empty and shows "No locations found.". A prominent "New Location" button sits at the top right.
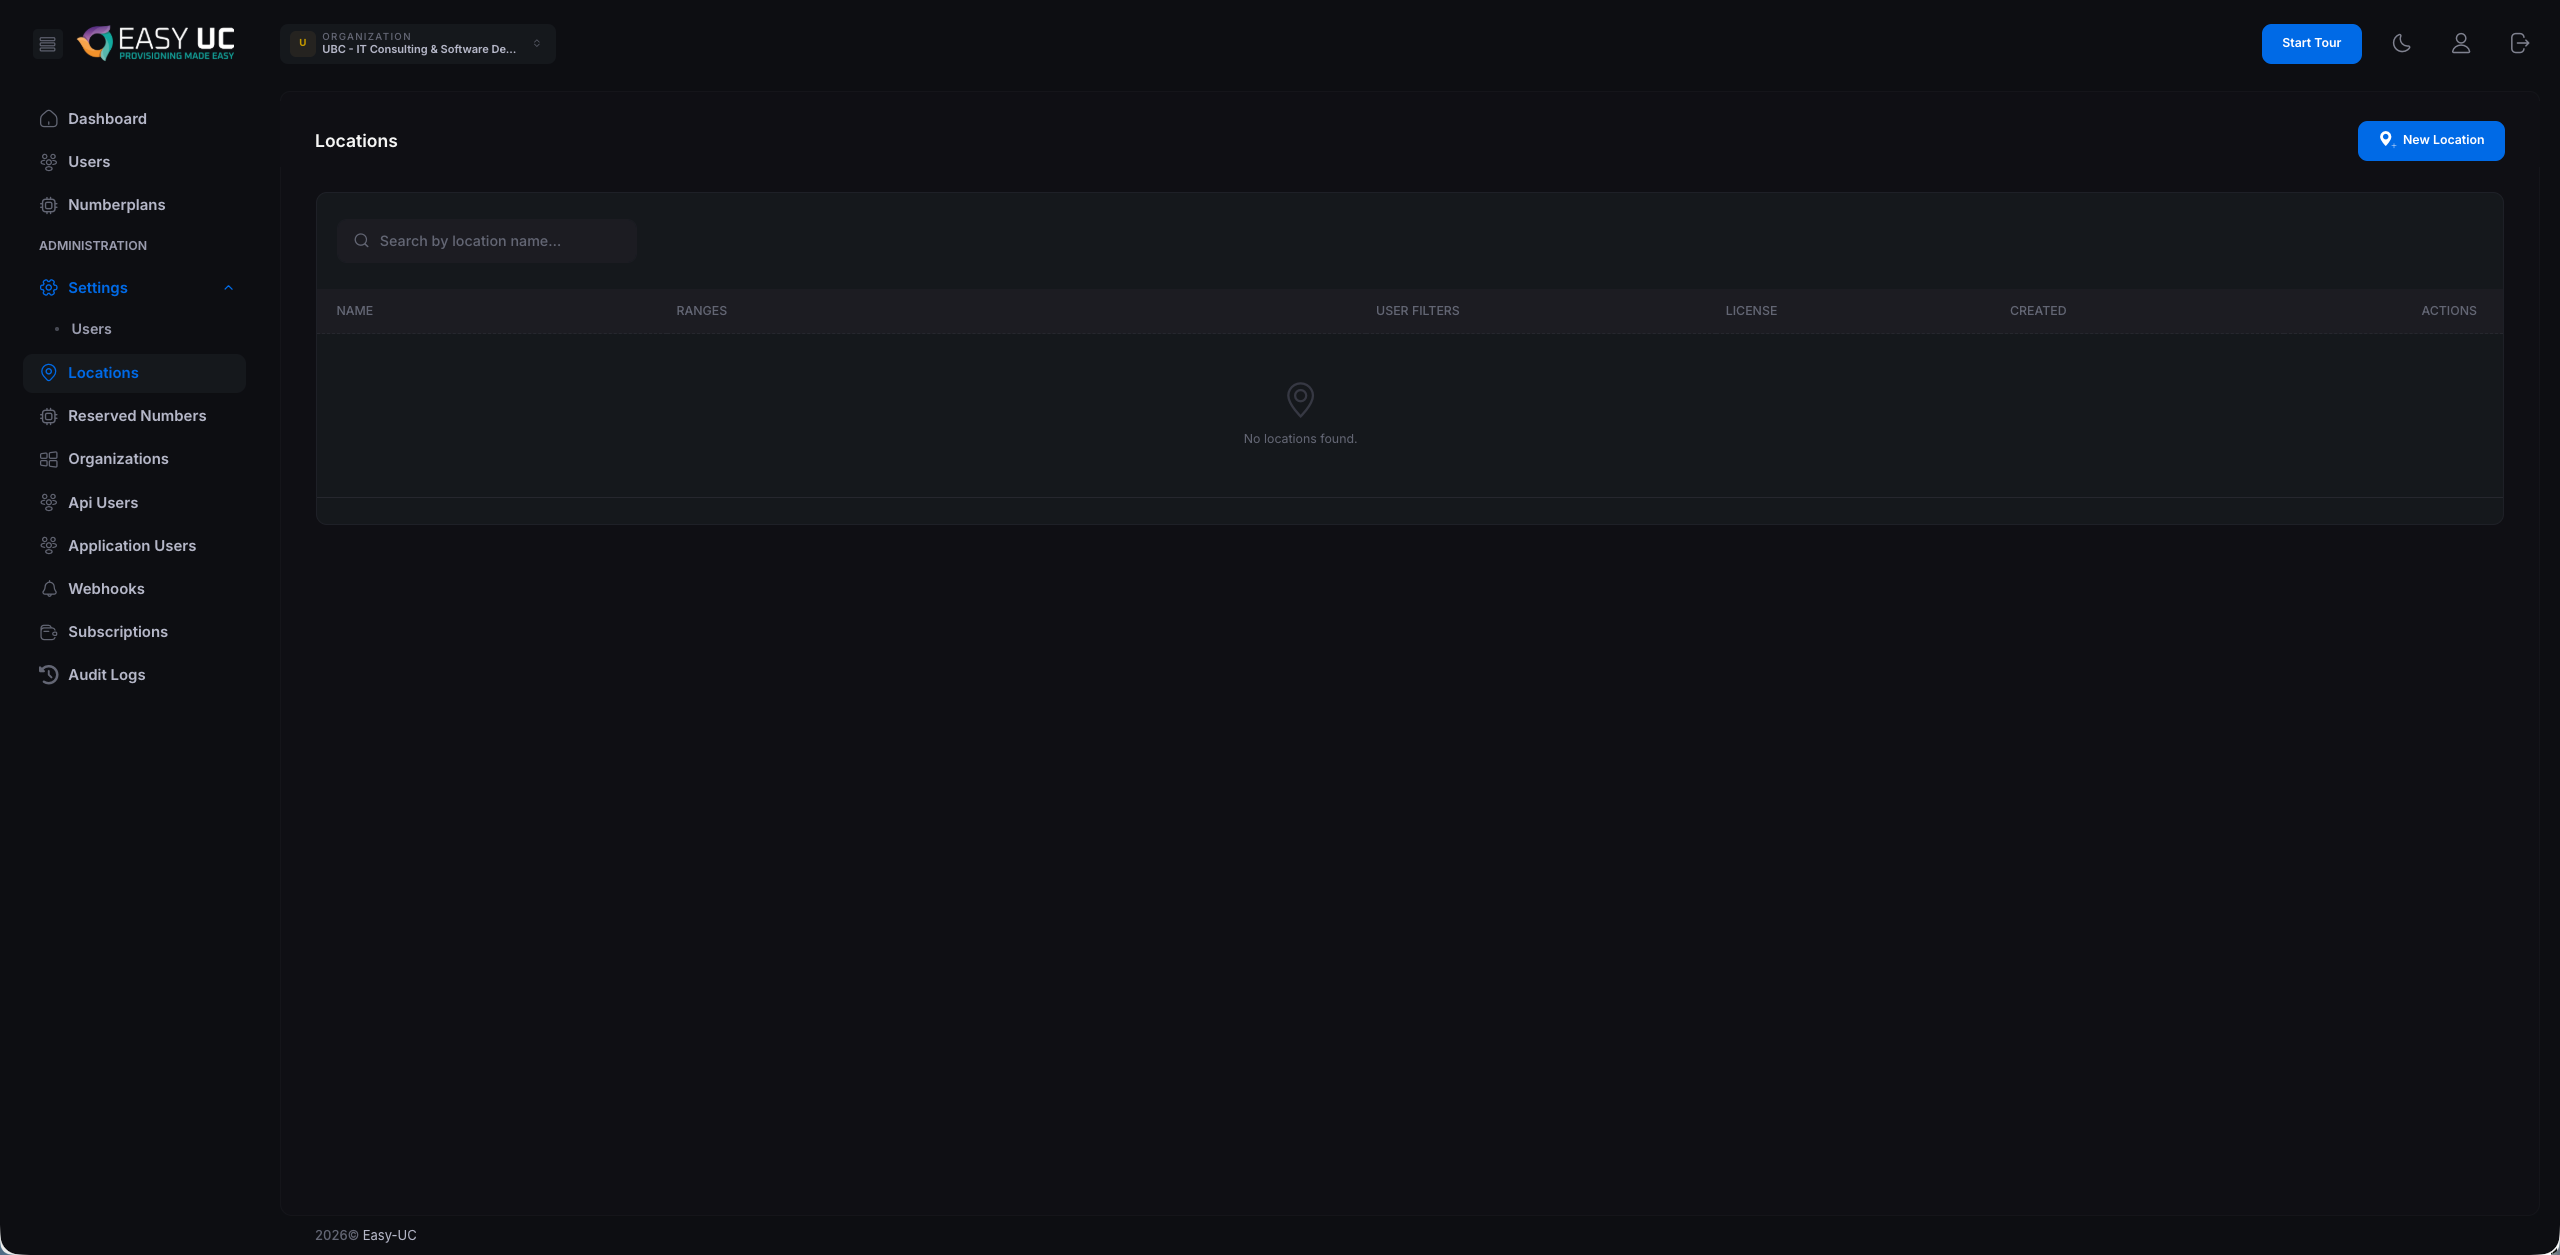
Step 3 – Click "New Location"
The blue button opens the location creation modal. Everything that matters happens here — name, auto-assignment, licenses, number range and policies.

Step 4 – Name, user settings & license provisioning
The modal is split into three sections. We walk through them top to bottom — using Hamburg as the example.
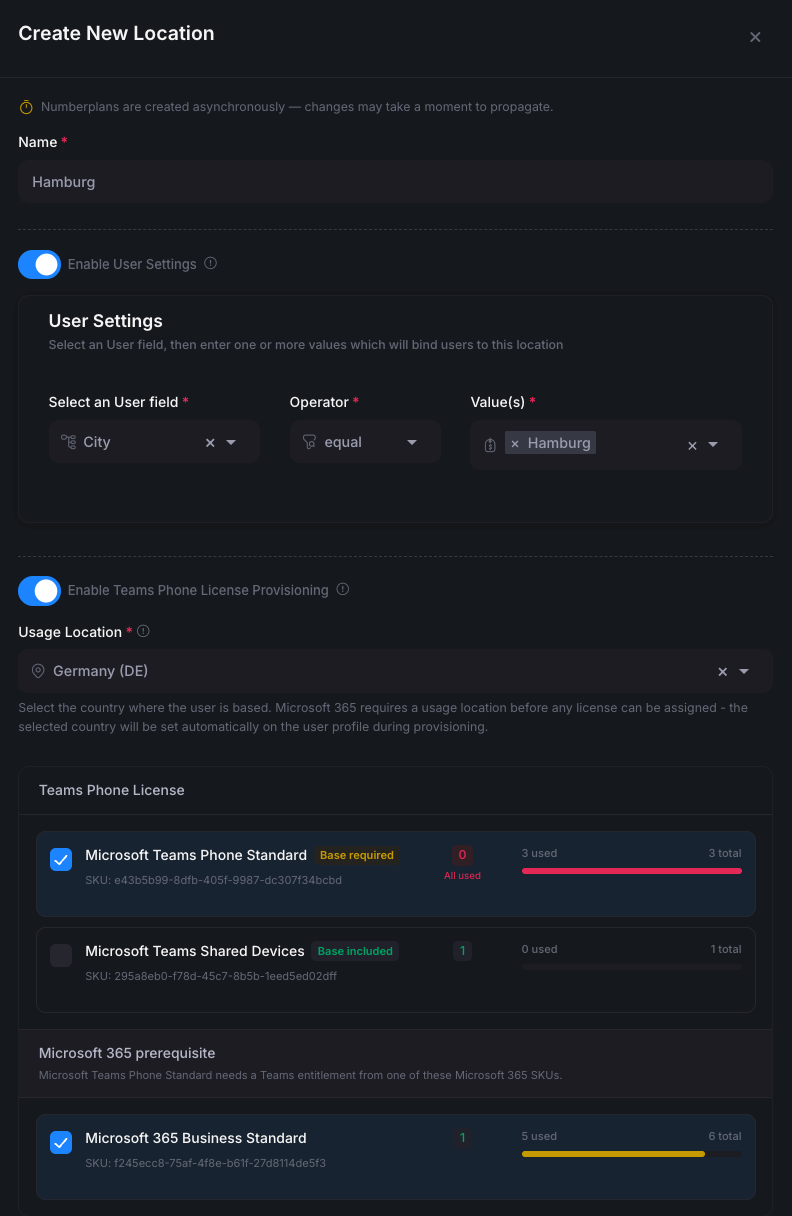
A) Name
- Enter a meaningful name – e.g.
Hamburg,BerlinorHH-HQ. It later shows up in filters and reports. - Notice at the top of the modal: "Numberplans are created asynchronously" — changes take a few seconds to propagate.
B) Enable User Settings — auto-assignment via Entra field
Turn on Enable User Settings, then define a rule that auto-assigns users to this location:
- User field: The Entra field used for matching. Example:
City— other common picks:Department,Country,OfficeLocation. - Operator:
equalfor exact match,containsfor substring matches. - Value(s): One or more values. Example:
Hamburg. You can add multiple values if one location should cover several city names (e.g.Hamburg+HH+Hamburg-City).
C) Enable Teams Phone License Provisioning
Turn on Enable Teams Phone License Provisioning. Easy UC will then auto-assign the required licenses during onboarding:
- Usage Location: Required. The country where users primarily work — set as the Usage Location in Microsoft 365 (prerequisite for any license assignment). Example:
Germany (DE). - Teams Phone License: Check the Teams Phone license you want to assign.
Microsoft Teams Phone Standardis the default for regular users (marked "Base required"). Easy UC shows the live pool: used / available / total. - Microsoft 365 prerequisite: Microsoft Teams Phone Standard requires a valid M365 base entitlement. Pick the matching SKU – example:
Microsoft 365 Business Standard.
Step 5 – Number range + policies
Below the license settings you define one or more number ranges. Range 1 is this location's primary block:
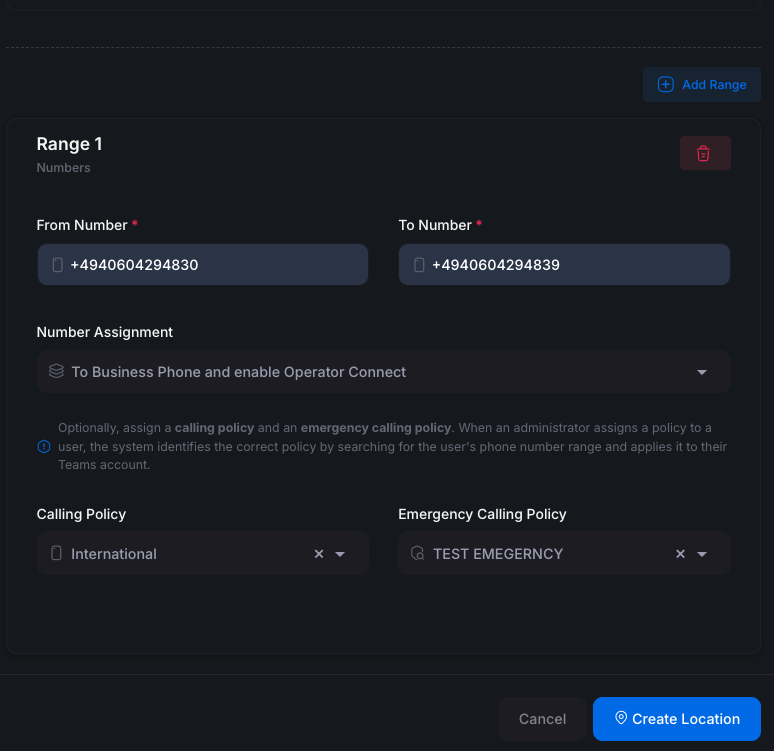
- From Number / To Number: Start and end number in E.164 format. Example:
+4940604294830through+4940604294839— 10 Hamburg numbers. - Number Assignment: How the number is set on the user.
To Business Phone and enable Operator Connectis the typical choice for Operator Connect carriers. Alternatives: Direct Routing, or "set as Business Phone only" without voice activation. - Calling Policy: The Teams calling policy applied on every assignment. Example:
International. Easy UC matches the right policy by number range (see the note in the modal). - Emergency Calling Policy: Emergency policy for E911 / 110 / 112. Example:
TEST EMERGNCY. Required in many countries – missing it risks regulatory non-compliance.
Use "+ Add Range" to add further ranges – e.g. a Direct Routing block next to the Operator Connect block, or sub-ranges for special numbers (hotlines, meeting rooms).
Click "Create Location" at the bottom right to save everything. The modal closes and the new location appears in the overview.
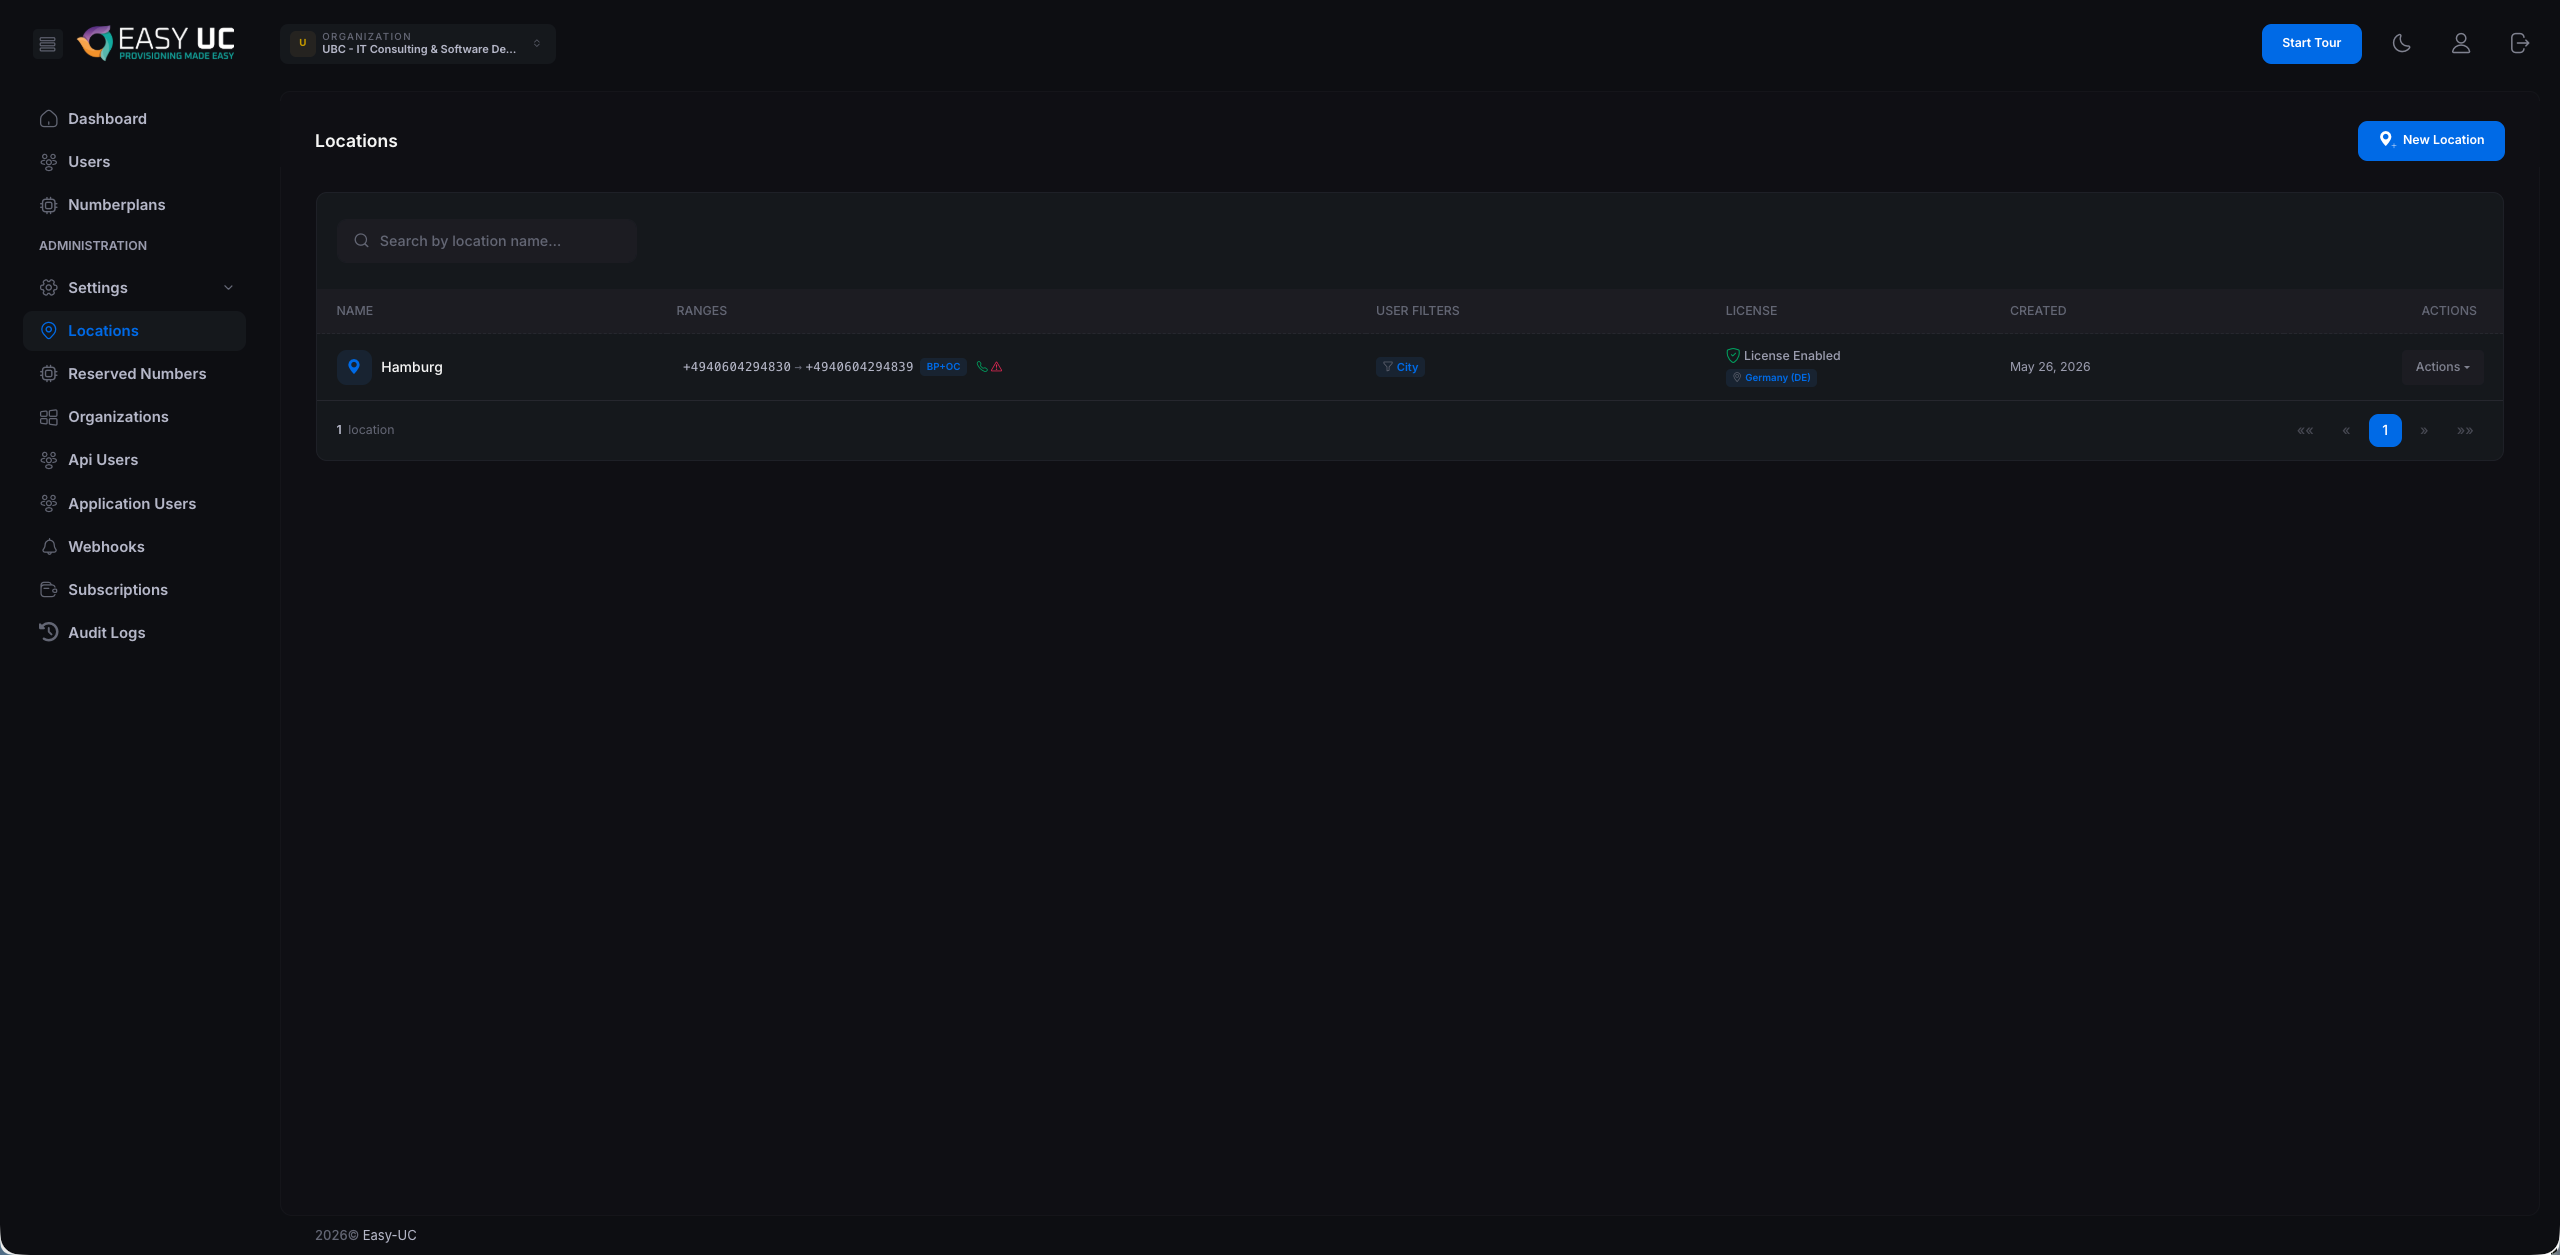
Step 6 – Location in the overview
Right after saving, Hamburg shows up in the locations list with: the configured range, the active user filter ("City"), license status ("License Enabled · Germany (DE)") and the creation date. Use Actions on the right to edit, clone or delete the location.
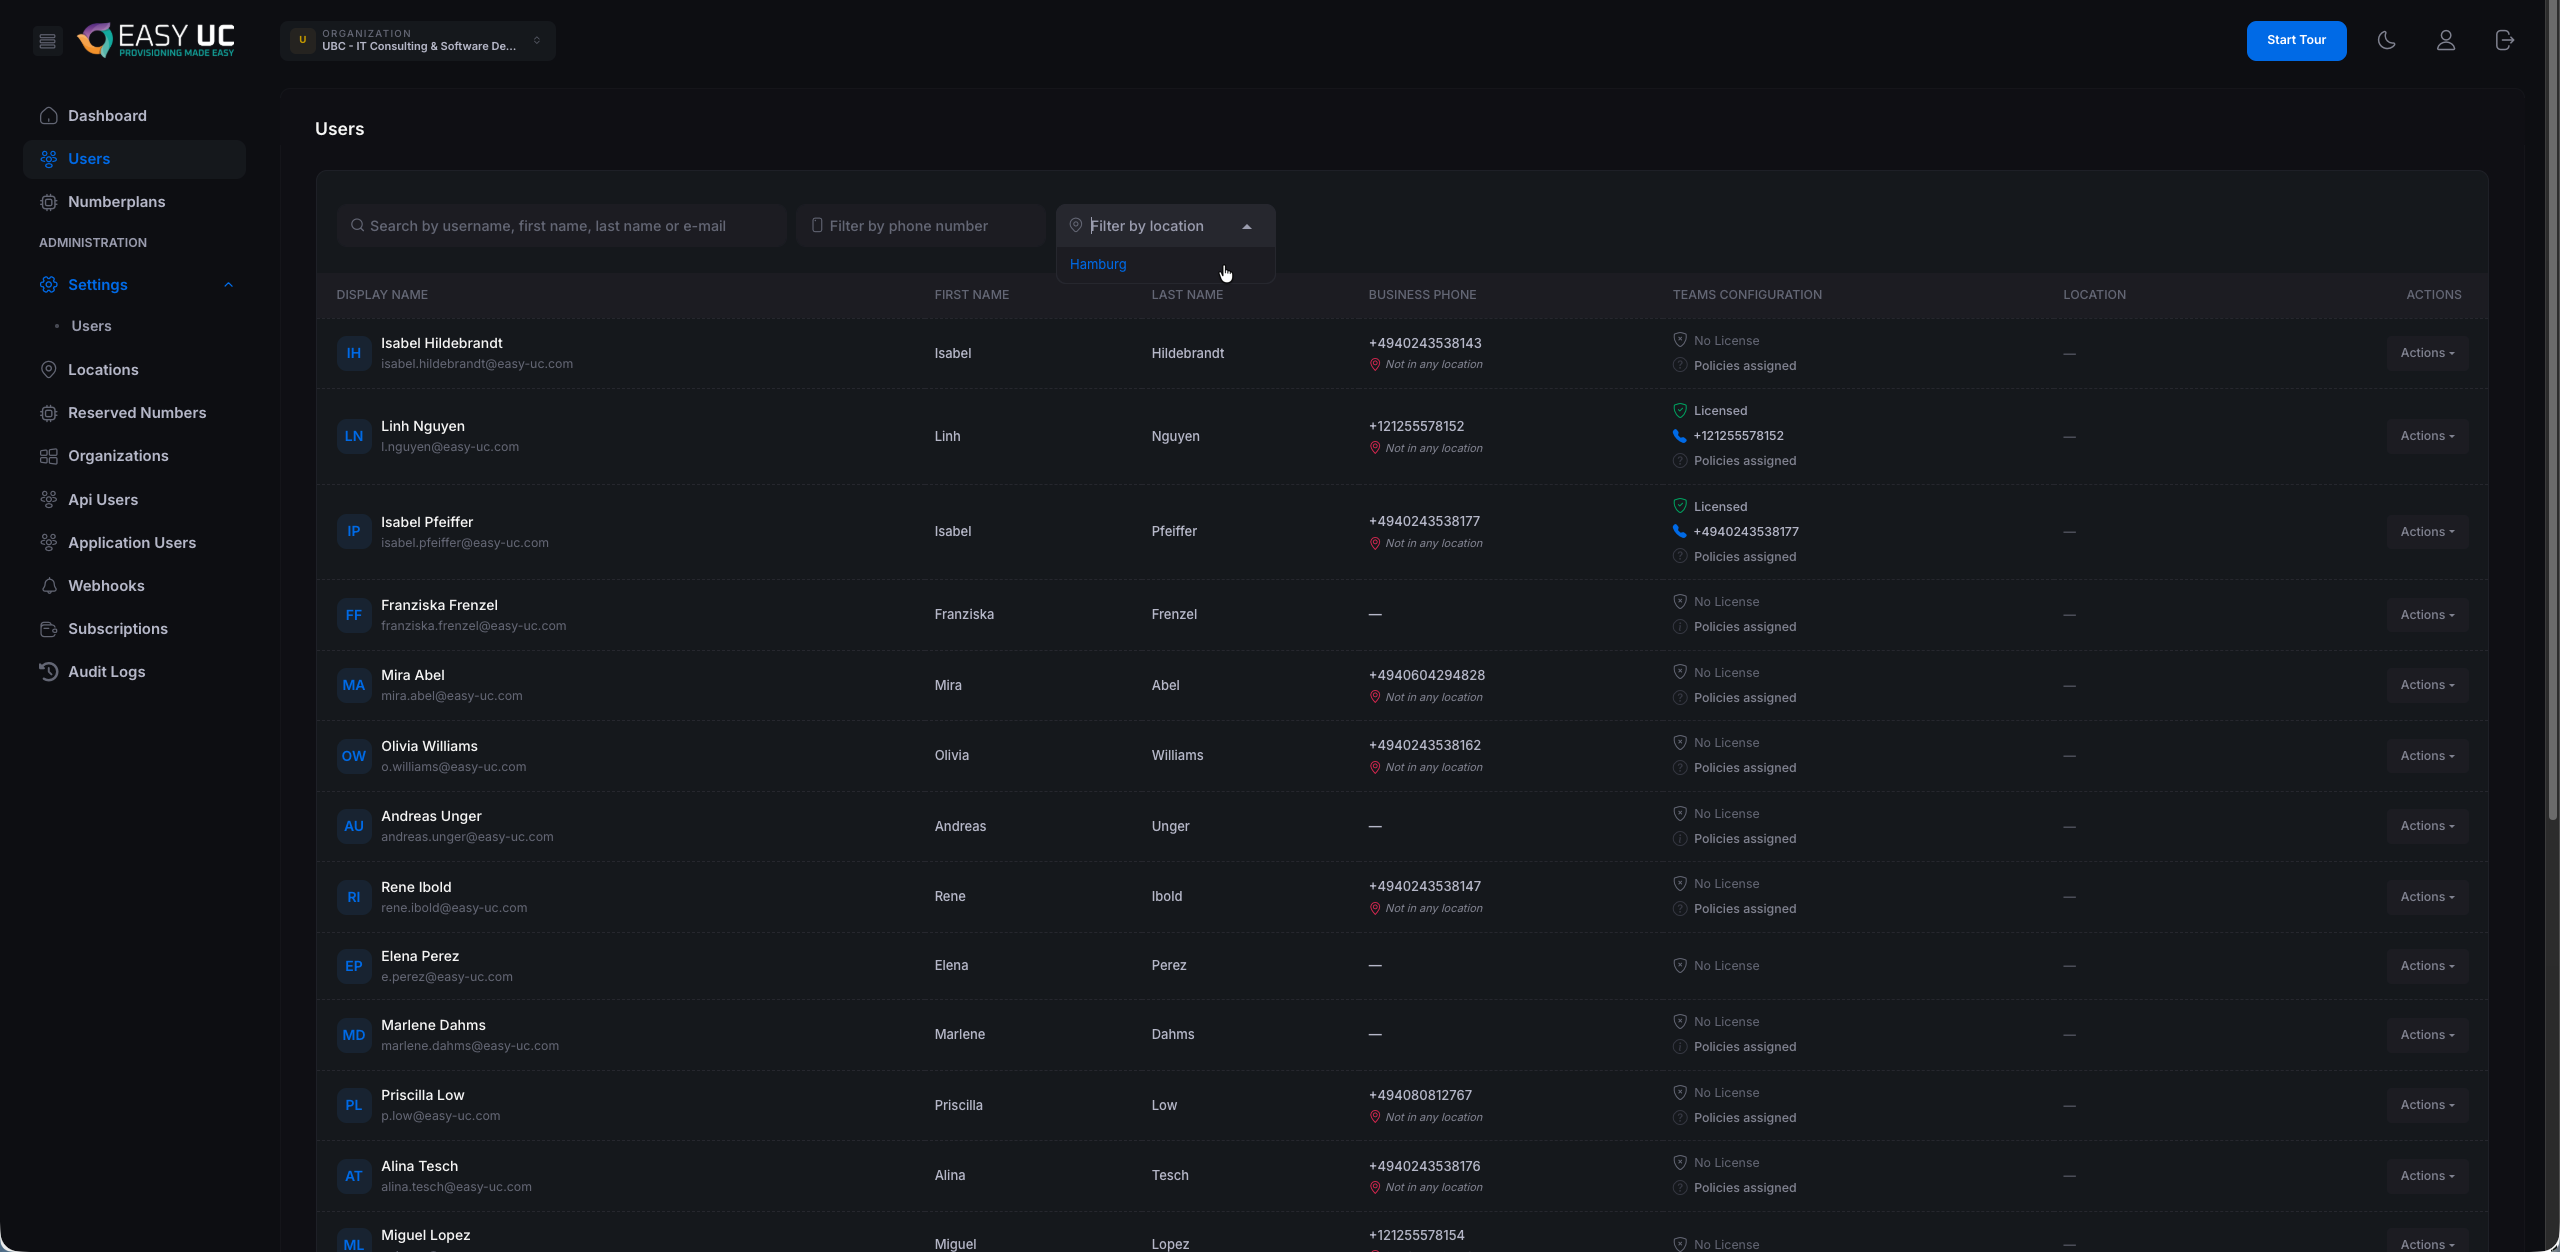
Step 7 – Verify auto-assignment in the Users tab
Switch back to the Users tab and use the "Filter by location" dropdown. It now includes your new Hamburg location.
Step 8 – Numberplans are populated now
In the Numberplans tab you now see your 10 Hamburg numbers from Teams. Per number:
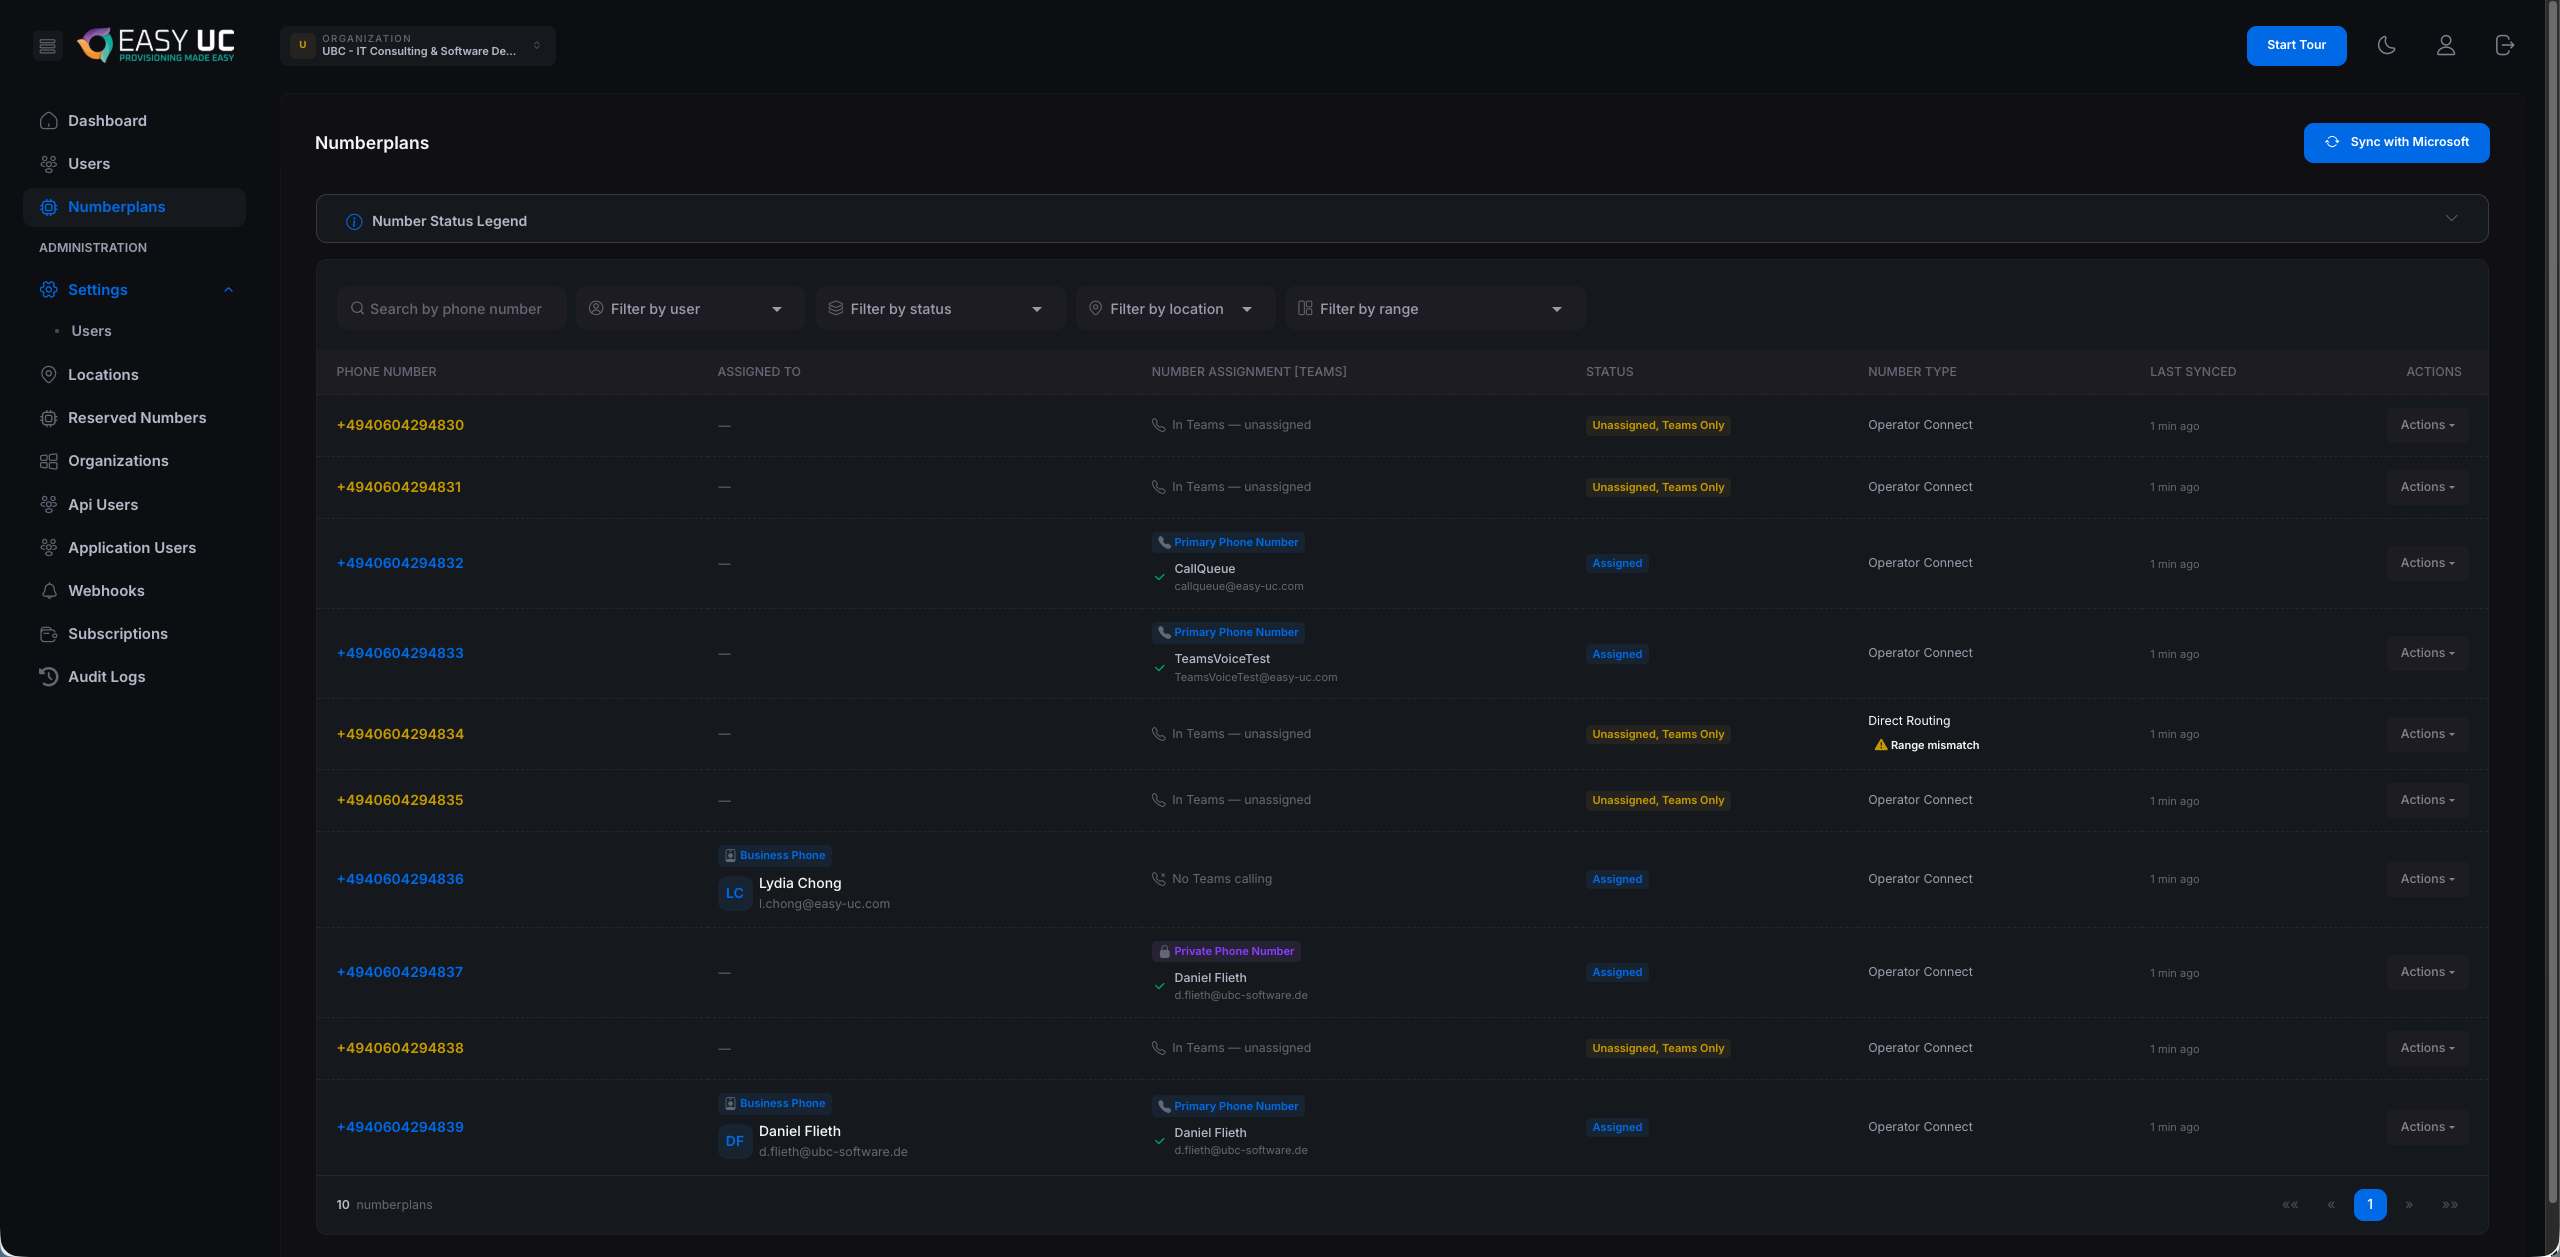
- Status: Unassigned (Teams Only), Connected or Range Mismatch — indicates whether the number is configured in Teams and can be assigned cleanly.
- Subscription: Routing model: Operator Connect or Direct Routing. Read from Teams, not manually settable.
- Last Synced: When Easy UC last synced with Microsoft Teams. The "Sync with Microsoft" button at the top right triggers a manual sync any time.
Prerequisites
For the Numberplan Manager to work, your Microsoft 365 environment must meet the following requirements:
- Microsoft 365 tenant with active Entra ID (formerly Azure AD)
- Microsoft Teams enabled for your users
- Phone System licenses (Teams Phone Standard or higher) available
- Provisioning of at least one routing type:
- Operator Connect (carrier service directly in Teams)
- Direct Routing (your own session border controller)
- Global Administrator permission for the initial app consent
Installation & first steps
Installation of the Numberplan Manager is done directly from the Microsoft Marketplace. No software needs to be installed on your servers.
Step 1 – Get the app from the Marketplace
- Open the Microsoft Marketplace or Microsoft Entra Store
- Search for "Easy UC Numberplan Manager"
- Click Get it now and sign in with Global Admin rights
- Consent to the required permissions
Step 2 – Complete tenant setup
After installation you will be redirected to the setup interface automatically. Here you provide basic information about your tenant.
Step 3 – Start configuration
Once setup is complete you can define locations and add number ranges. Locations & Number Ranges.
Locations & number ranges — reference
Concepts, every field explained, multi-range scenarios, range mismatch and location actions. For the end-to-end walkthrough with screenshots, see "App initial setup".
Concepts at a glance
- Location – The organisational frame for a physical site, region or function. Holds number ranges, user filters, license defaults and policies.
- Range (number block) – A contiguous sequence of E.164 numbers (e.g.
+4940604294830 – +4940604294839). A location can have several ranges — for example different routing models per block. - User filter – Rule that auto-assigns users from Microsoft Entra to this location — e.g.
City = Hamburg. On the next sync, any new user with the matching field is placed in the right location automatically. - License provisioning – On user onboarding, the configured Teams Phone and M365 base license are auto-assigned from the pool — including the Usage Location.
- Calling & emergency policy – Specified per range. The calling policy controls international/national entitlements, the emergency policy carries the emergency address (E911 / 110 / 112).
Multiple ranges per location
A location can have any number of ranges. Typical scenarios:
- Mixed routing: one range over Operator Connect, another via Direct Routing — within the same site.
- Special numbers: main block for regular employees, separate block for hotlines, meeting rooms or conference bridges.
- Different policies: one block with an "International" calling policy, another with "Domestic only" — e.g. cost control for trainees.
User filter — available Entra fields
Easy UC supports these Entra fields as filter source:
City– City — most commonly used, easy to maintain in HR systems.Country– Country — useful for international setups with one location per country.Department– Department — when locations are split functionally ("Sales", "Engineering") rather than geographically.OfficeLocation– Office / office location label — free-text field, e.g.HH-HQ,BLN-Office-2.
Hamburg + HH + Hamburg-City. Easy UC matches the user as soon as one value fits.Understanding Range Mismatch
In the Numberplans tab a number can show the status Range Mismatch. This means the number exists in Microsoft Teams but does not belong to any range of your locations. Typical causes:
- A new number was added directly in Teams (e.g. via PowerShell) without a matching range in Easy UC.
- The range was defined too narrowly (e.g.
…830 – …839, but…840was added in Teams). - Fix: extend the range in the location modal or add a new location for the off-block — the mismatch status disappears on the next sync.
Edit, clone, delete a location
In the Locations overview, three actions are available per location on the right of the row:
- Edit – Opens the modal with the current values — changes roll out on the next sync. Changing an active user filter updates existing assignments.
- Clone – Creates a copy including ranges, filter and license setup. Saves time for sites with similar setups (e.g. "Berlin" cloned from "Hamburg" with only the number range changed).
- Delete – Deletes the location. Users already assigned keep their number and license but lose the location link — auto-assignment no longer applies.
Routing types
Microsoft Teams knows three ways to handle external calls. The Numberplan Manager supports all three and lets you configure them per location.
Operator Connect
Numbers are provided directly by the carrier into Teams. Pro: No own SBC infrastructure, fast provisioning. Con: Carrier choice is limited.
Direct Routing
Existing PBX or SIP trunks are connected via your own session border controllers. Pro: Maximum flexibility in carrier choice. Con: SBC operation and maintenance is your responsibility.
Automatic licensing
On every number assignment the Numberplan Manager automatically checks whether all required licenses are present.
What is checked
- M365 base license (Business Standard, E3 or E5)
- Microsoft Teams Phone Standard (for telephony)
- Usage Location (required for license assignment)
License rule configuration
Under Settings → Licenses you define which license types are assigned automatically per location or user group. You can also define a priority – e.g. always prefer Business Standard when available.
Policies & compliance
After every assignment the Numberplan Manager runs an automatic compliance check.
- Calling Policy – Which call features may the user use?
- Emergency Calling Policy – How are emergency calls handled?
- Voice Routing Policy (Direct Routing only) – Which trunks may be used?
- Dial Plan – How are numbers normalized?
If a policy does not match the location standard, you receive a warning and can correct it directly from the Numberplan Manager.
Onboarding workflow
Onboarding a new user happens in a guided 6-step process.
- Assign business phone – pick a number from the pool
- Set Usage Location – country is set automatically in the profile
- Assign M365 base license – automatically from the pool
- Activate Teams Phone license – automatic
- Configure External Calling – activate routing type
- Validate & sync policies – compliance check
Guided Wizard
The onboarding wizard fully provisions a user — from the first phone number through licenses to calling and emergency policies. Every step shows its status (✓ done, ⏳ in progress, ⚠ error) and waits for its prerequisites. If something fails, the step can be retried in isolation — the rest is preserved.
Step 1 – Review the starting point
In the Users tab, click the employee — the detail panel opens from the right. At the top is the "Onboarding Progress" with all 6 steps, followed by the current state of each area:

- Usage Location – Already set to
Germanyby the location filter — status "Eligible". - Licenses – Microsoft 365 Business Standard is Assigned, Microsoft Teams Phone Standard is still missing — the wizard will draw it from the pool.
- Phone Numbers – "No business phone assigned" — the number will be picked from the pool in the first wizard step. External Calling and Private Line are still disabled (they wait for a number).
- Teams Policies – Calling Policy
Internationaland Emergency Calling PolicyTEST EMERGENCYare ready from the location config — status "Unassigned" until the wizard applies them.
Step 2 – Open the onboarding wizard
Click the blue "Onboard" button at the bottom right of the user detail panel. The "Onboard user" modal opens with all 6 steps as a list with status tags (Required / Optional / Eligible / Required Manual).

The 6 steps in detail:
- 1) Business Phone (Required) – Pick a number from the location's pool. Prerequisite for all other steps.
- 2) Usage Location (Optional) – Required field in Microsoft 365 — taken from the location. Without Usage Location no M365 license can be assigned.
- 3) Base License – Microsoft 365 Business Standard (or E3 / E5) — prerequisite for Teams Phone Standard.
- 4) Teams Phone License – Microsoft Teams Phone Standard — prerequisite for External Calling.
- 5) External Calling – Sets the number picked in step 1 as Business Phone and enables Operator Connect / Direct Routing — depending on the range.
- 6) Calling Policies – Automatically applies the calling and emergency policy configured on the location. Easy UC picks the right policy by number range.
Step 3 – Pick the phone number
Click "Select a number" at the top of the modal. A dropdown shows the available numbers — already filtered to the user's location (Hamburg).
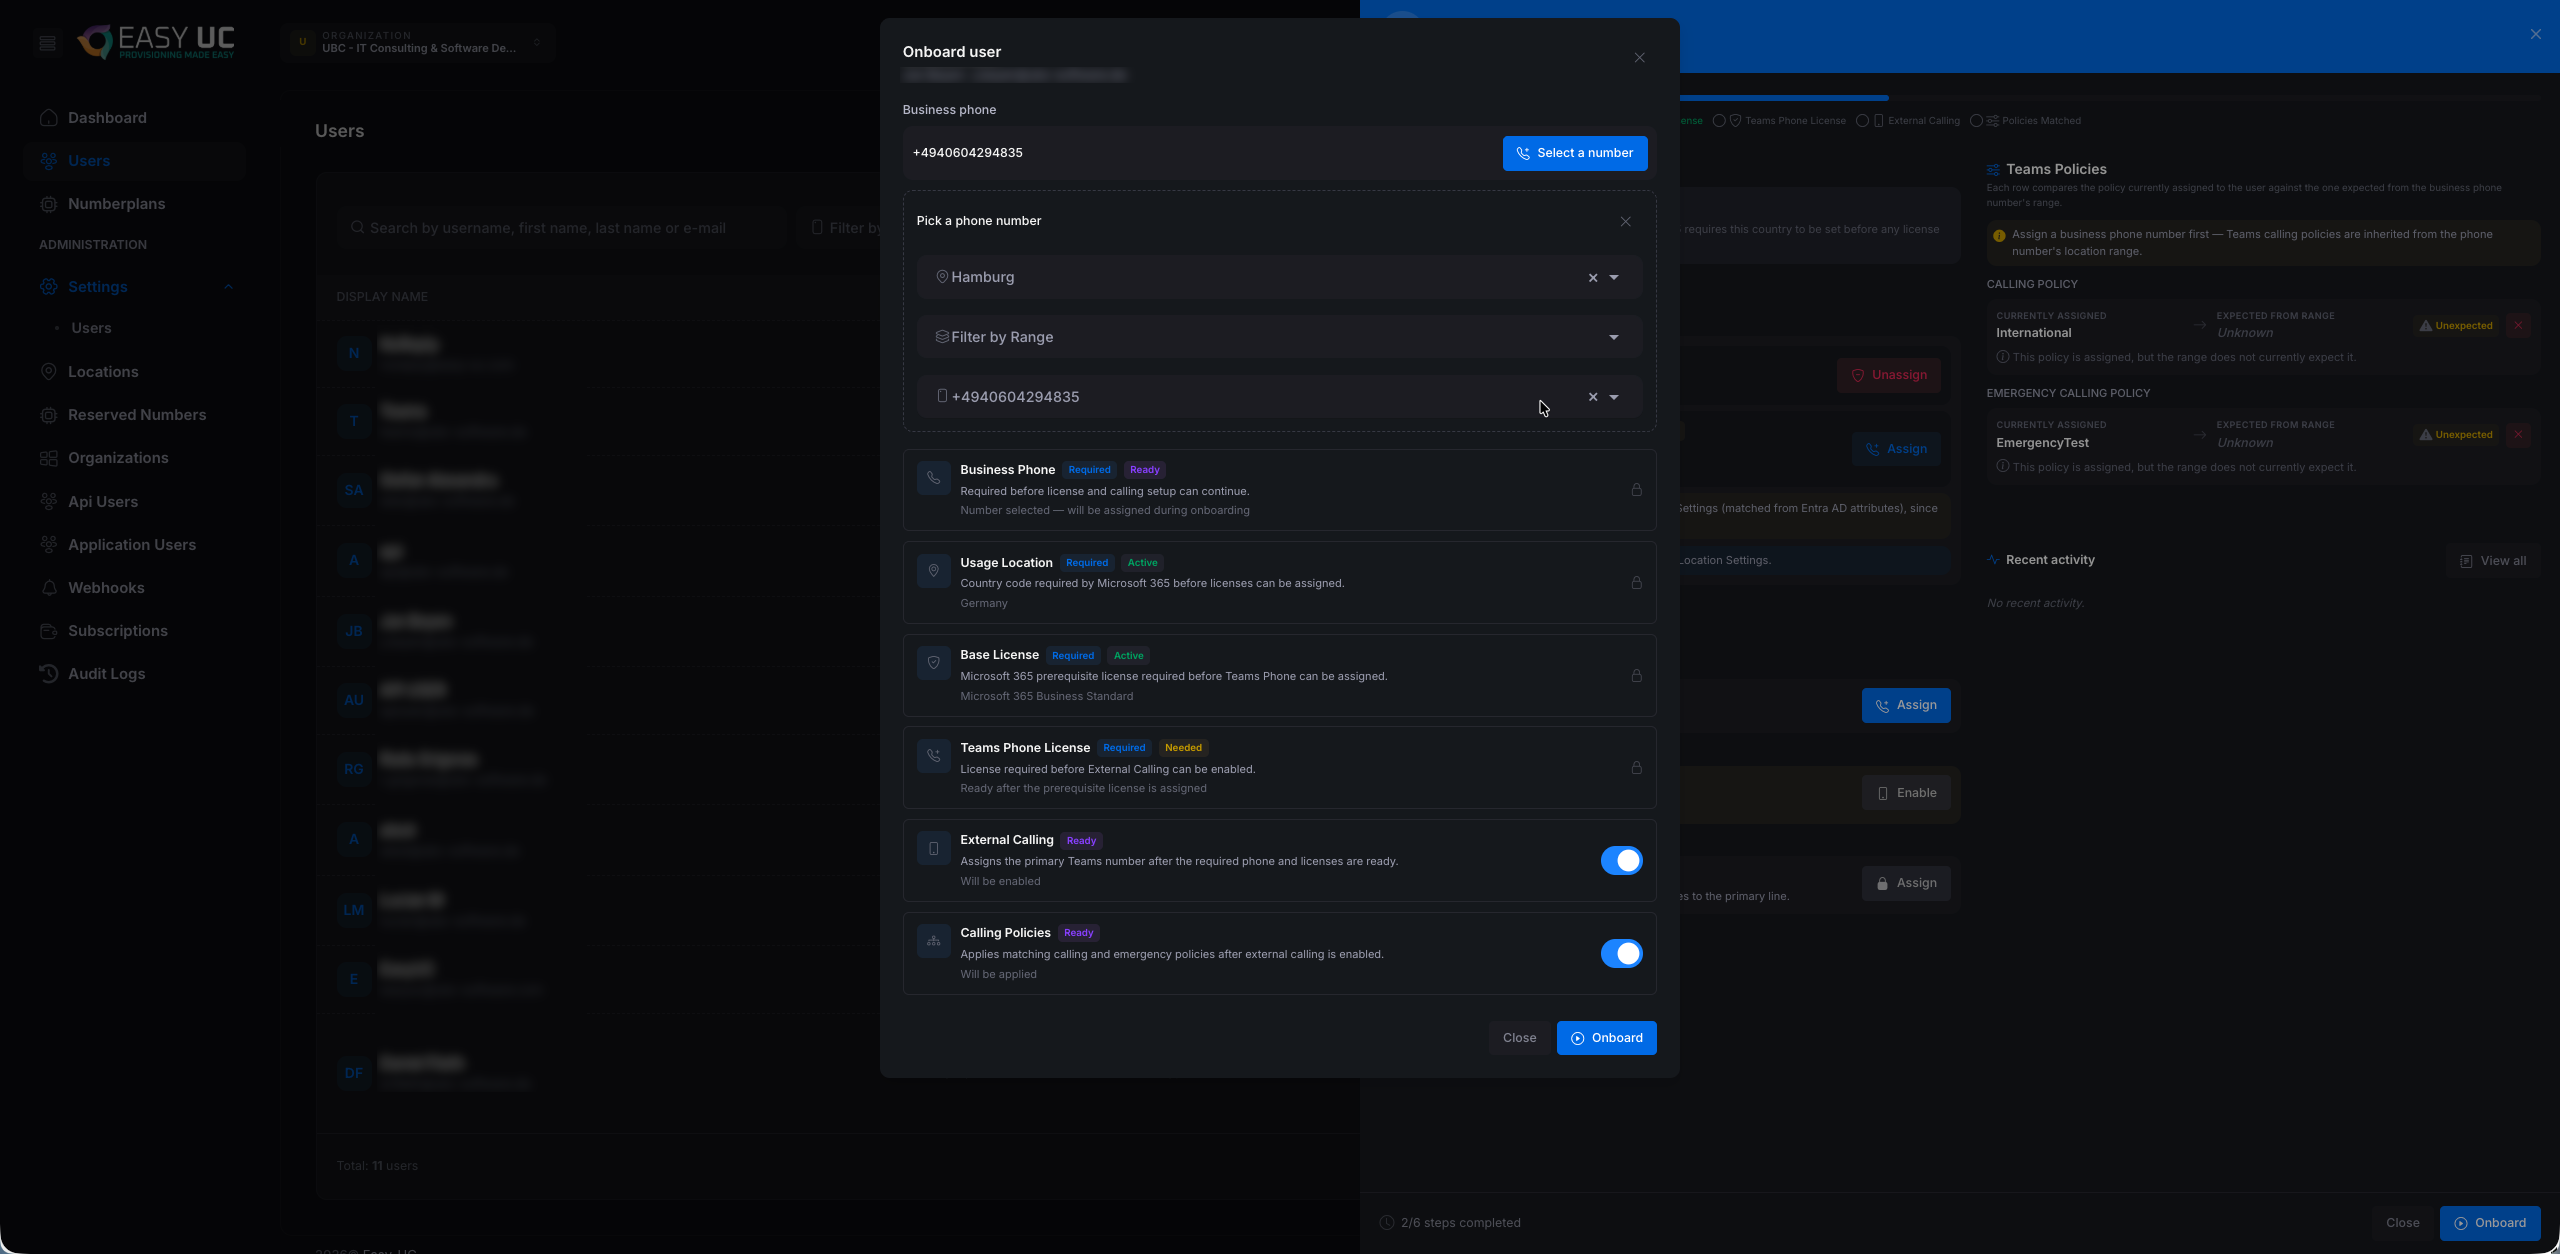
- Pick a phone number – Pre-filled with the user's location. Switch to a different one if the person is moving within the organisation.
- Filter by Range – Optional. Narrows the picker to a specific range inside the location — useful for locations with several ranges (e.g. "Manager" block vs. standard block).
- Available numbers – Easy UC only shows numbers still free in the chosen range — conflicts are impossible. Pick one with a single click.
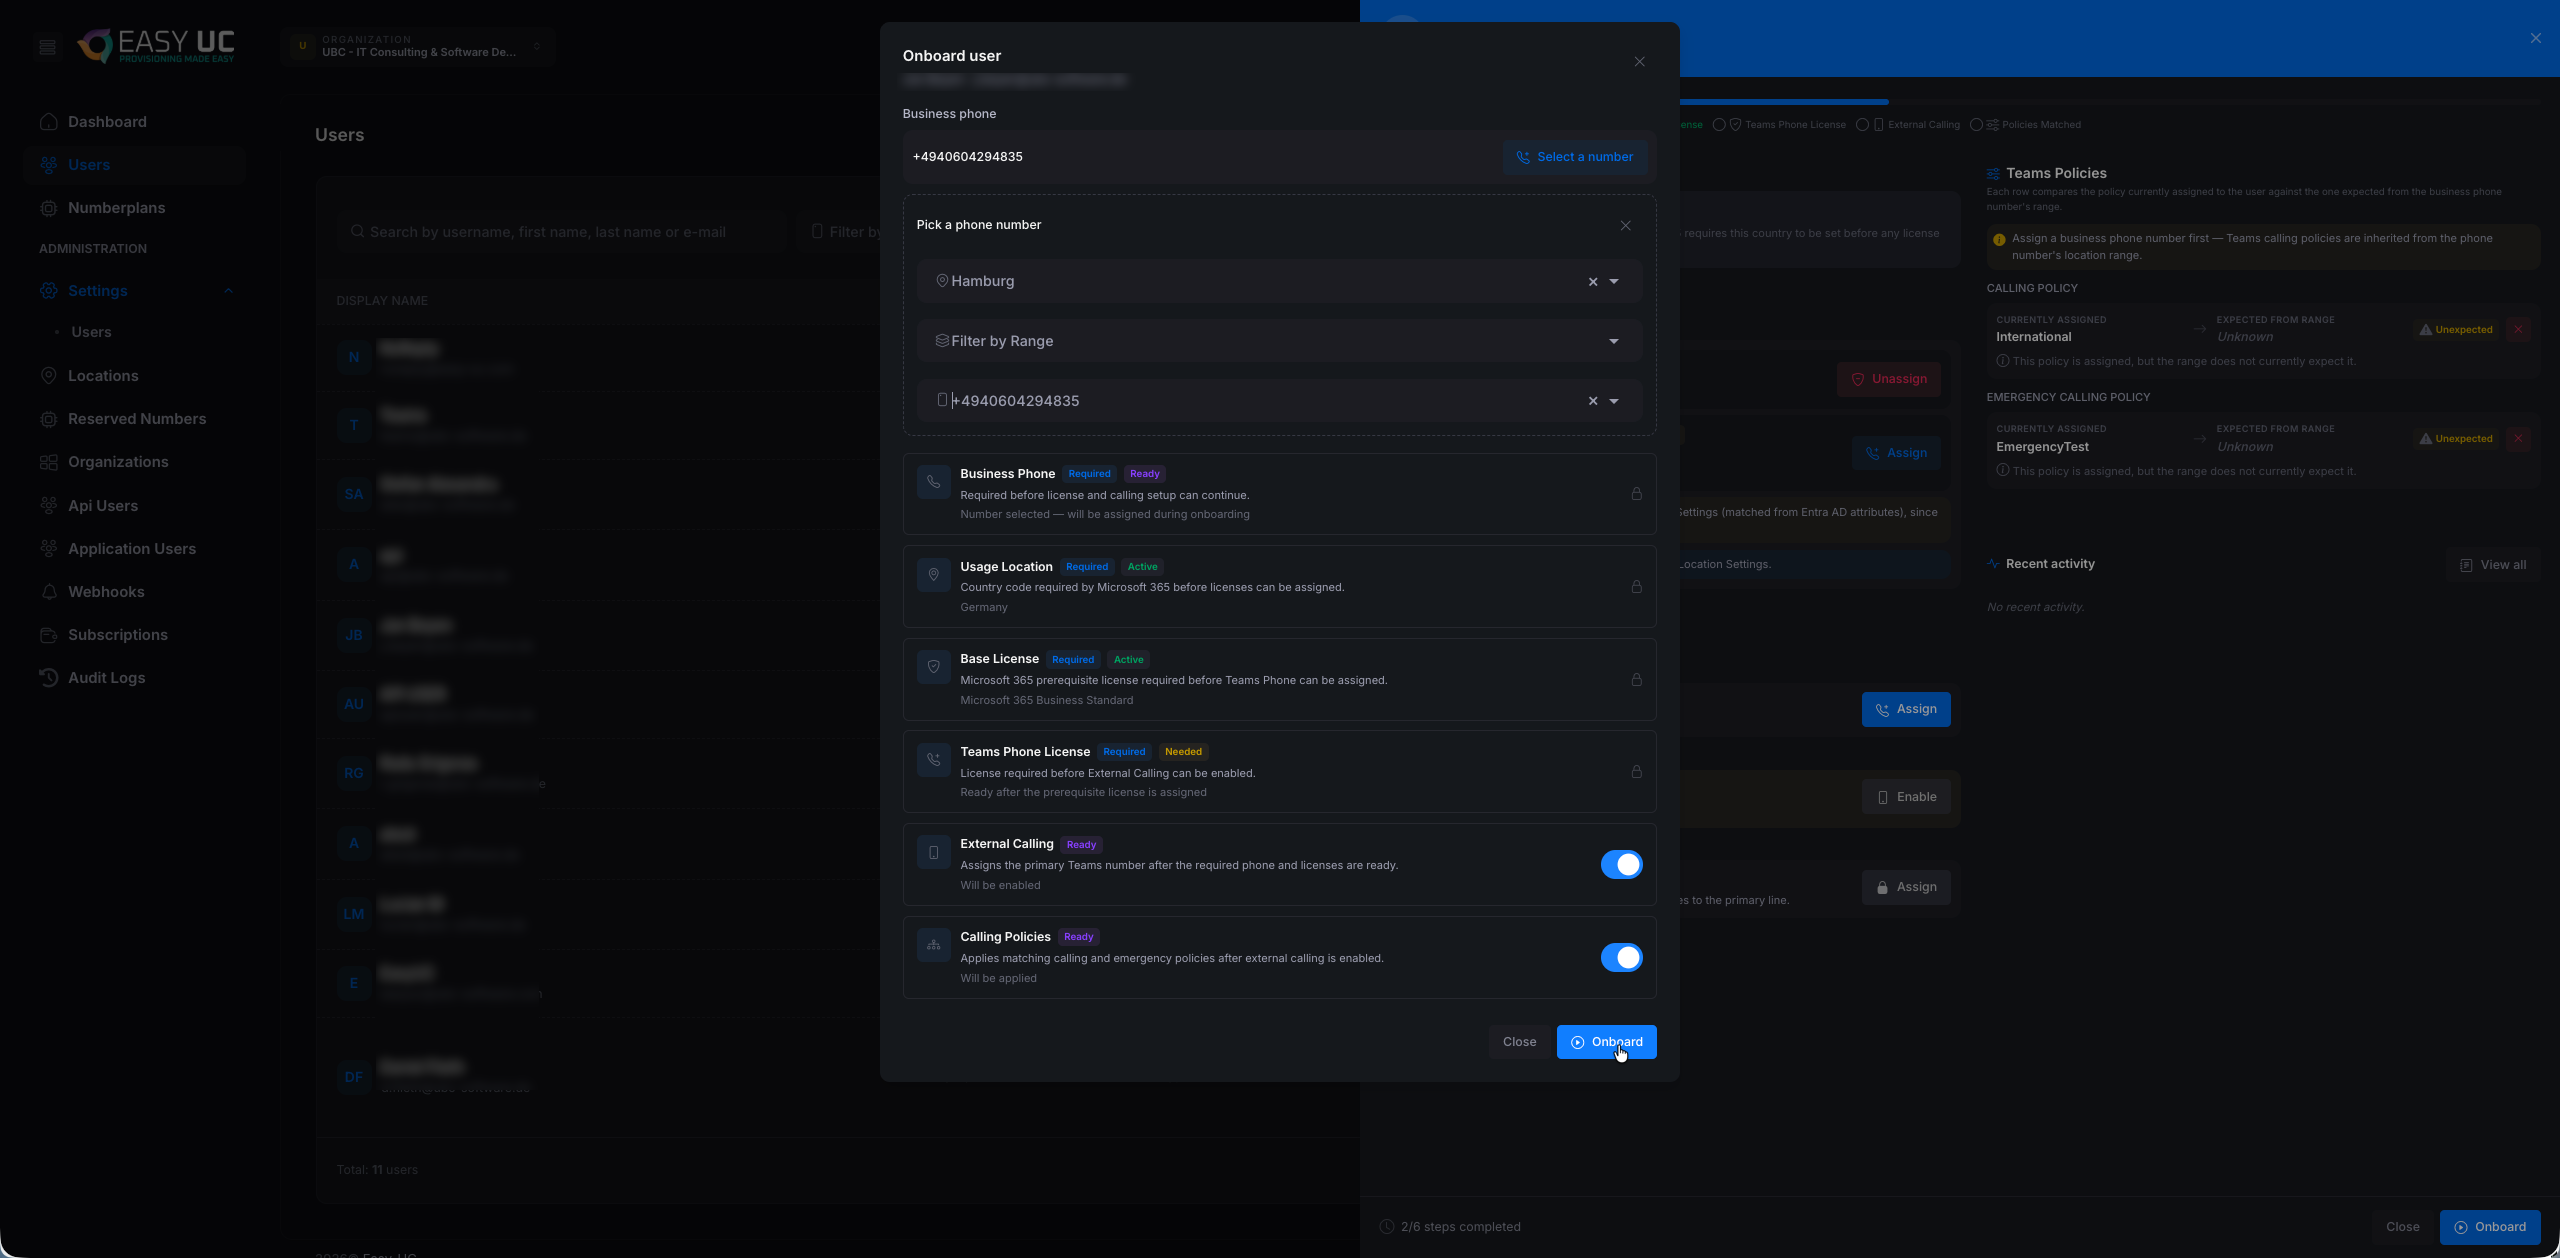
Step 4 – Start the onboarding
Once the number is picked, the "Onboard" button at the bottom right becomes active (highlighted blue). One click starts provisioning all 6 steps.
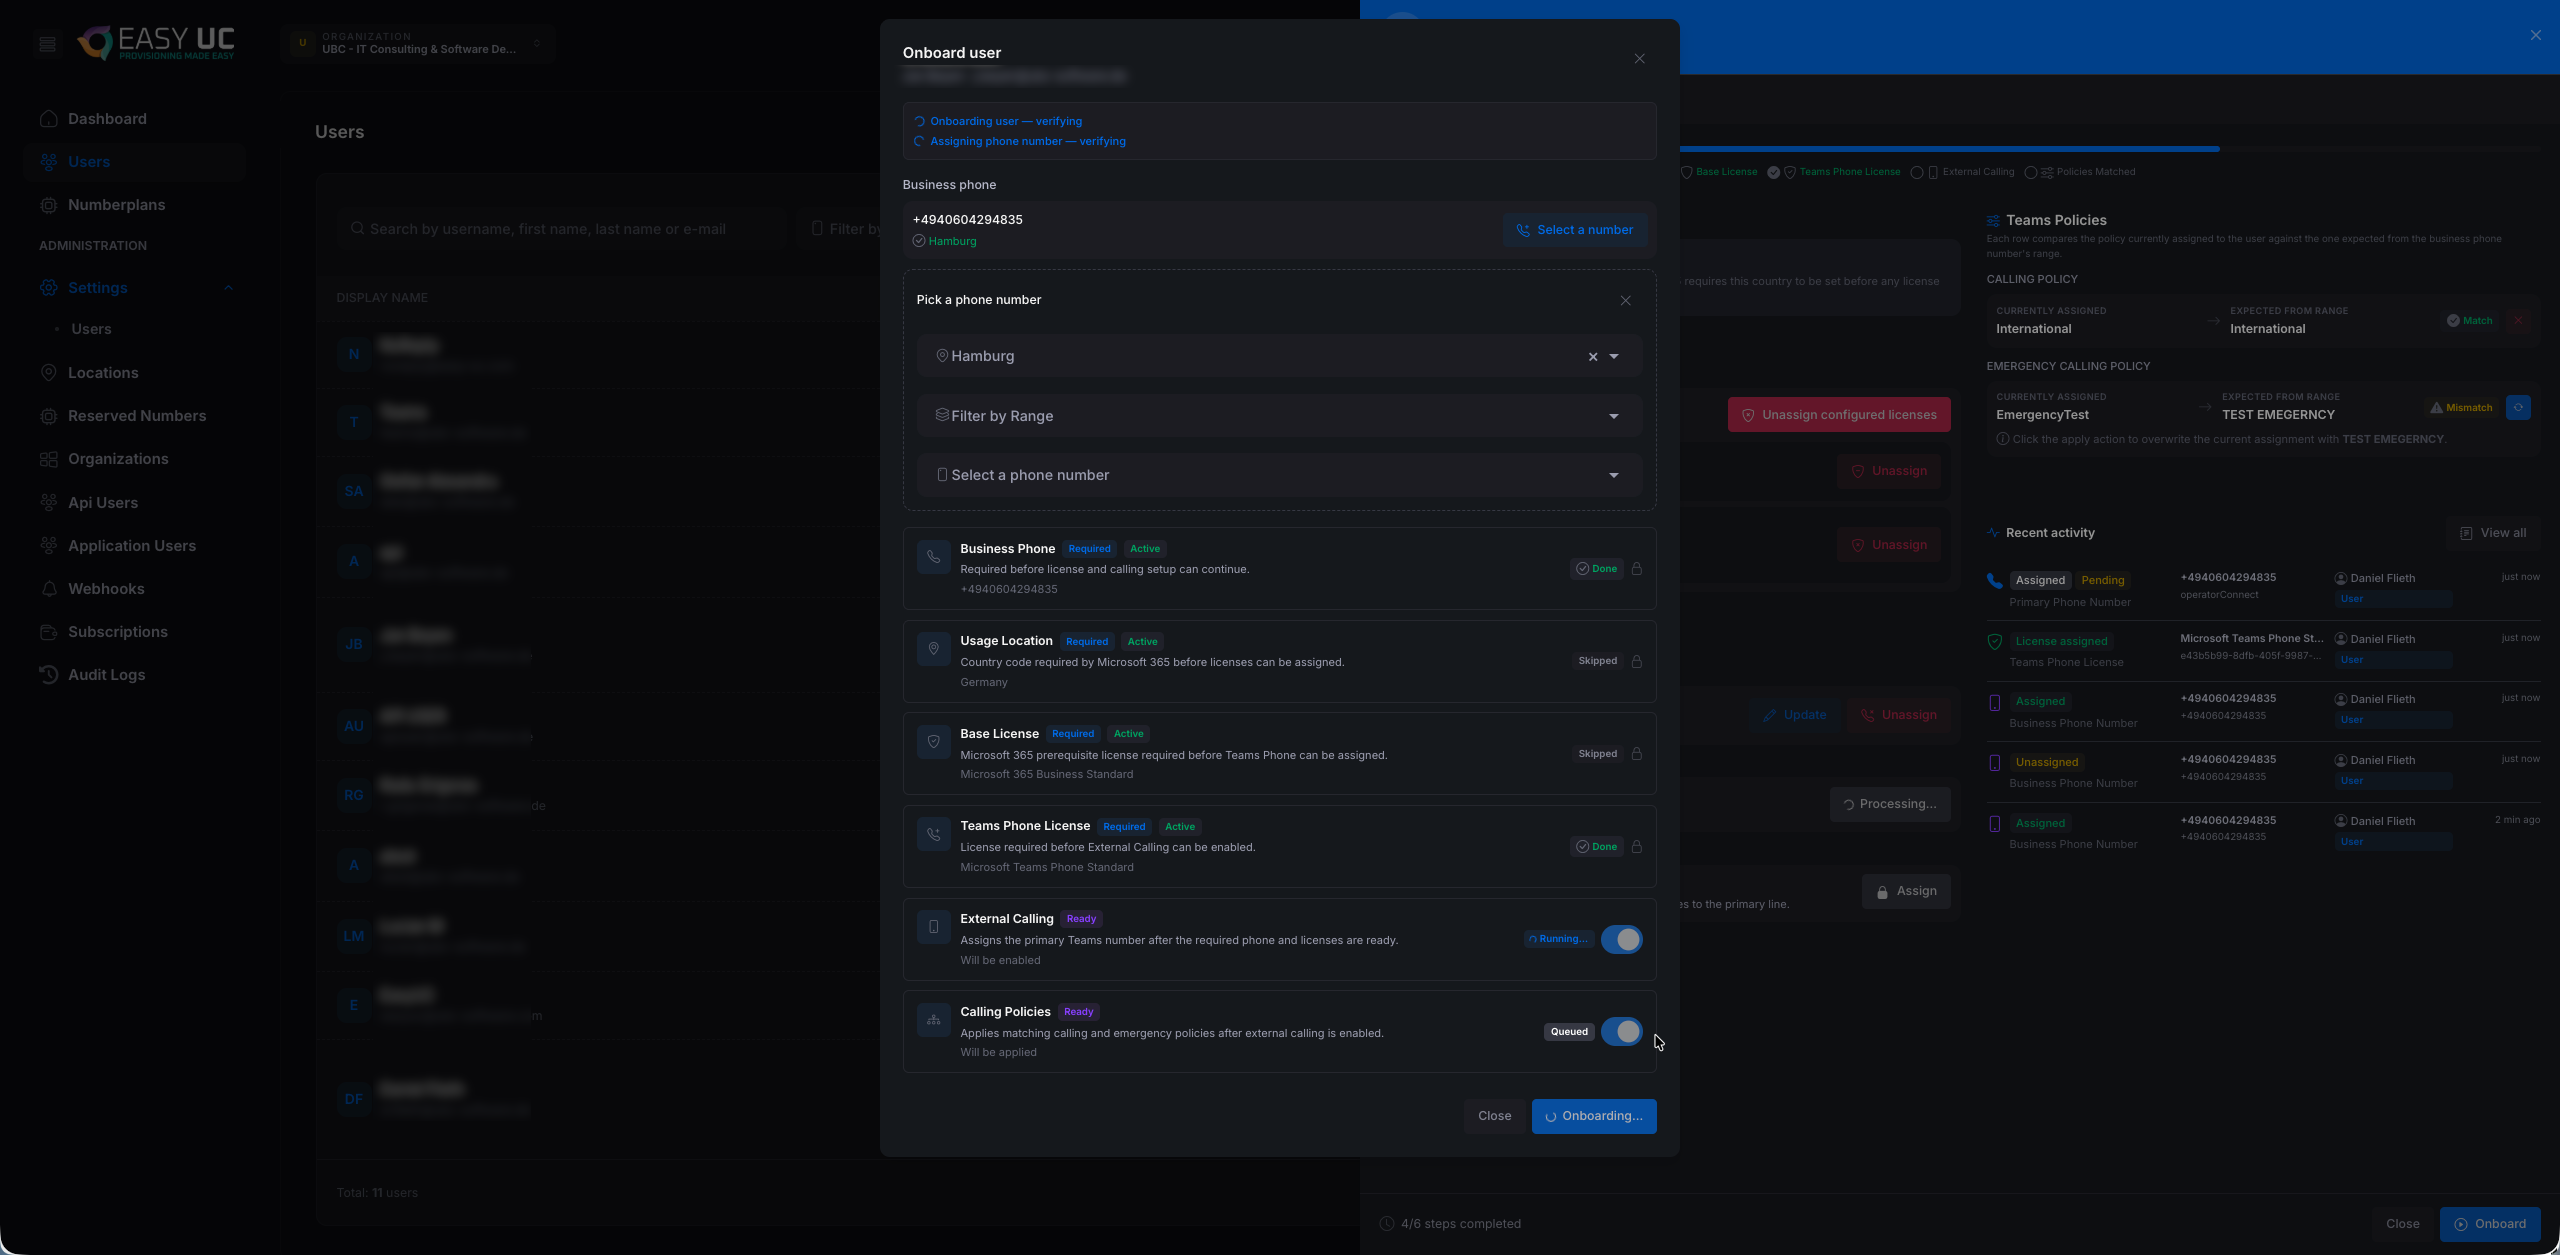
Step 5 – Watch the provisioning
Easy UC now runs the steps sequentially. The modal shows live status updates: Pending → Provisioning… → Done. A coloured status chip appears next to each step.


Step 6 – Success!
Once all 6 steps are green, a success notice appears at the top of the modal and the Onboard button becomes "Done". Close the modal — the user is live.
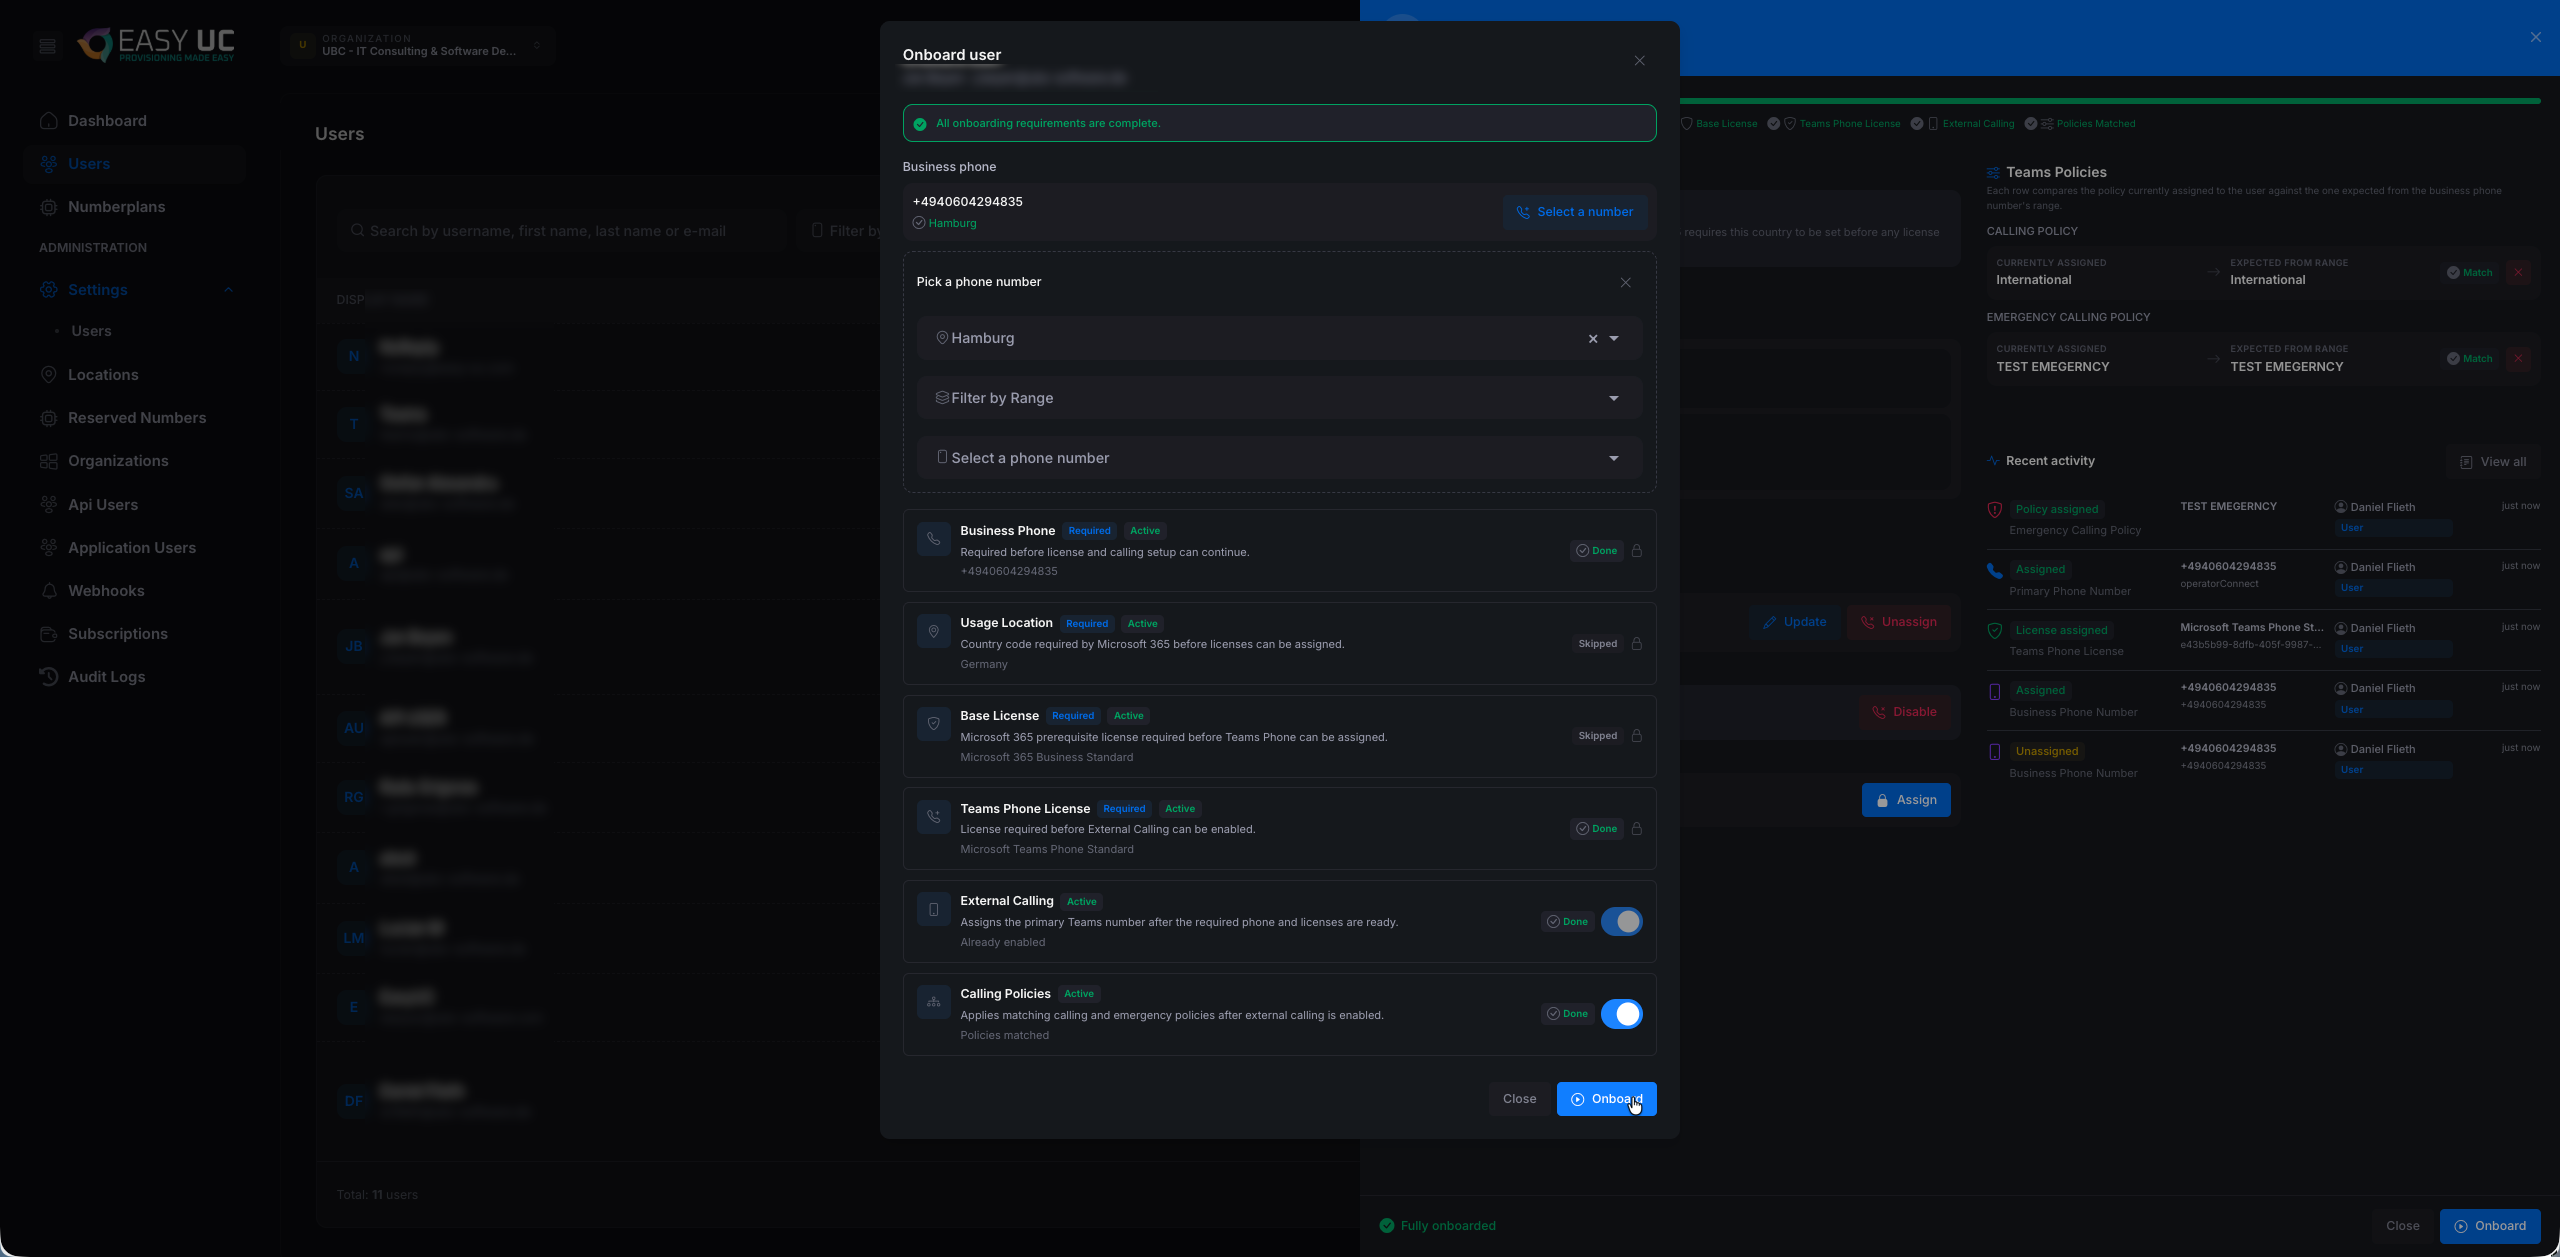
Step 7 – Verify the result in the user detail
After closing the modal, the user panel shows the complete configuration:

- Microsoft 365 Business Standard: Status Assigned, "Unassign" button available.
- Microsoft Teams Phone Standard: Status Assigned — the Teams Phone license is live.
- Business Phone: The assigned number is now in the profile with "Hamburg" as the associated location.
- External Calling: Operator Connect is active, the number is available as an external number in Teams.
- Calling Policy:
Internationalassigned — the user is allowed to make international calls. - Emergency Calling Policy:
TEST EMERGENCYassigned — the emergency address is in place (E911/110/112). - Recent Activity: On the bottom right, the activity list shows every provisioning step just performed with timestamps — perfect for audit traceability.
When a step fails
When a step fails, the modal shows ⚠ and a specific error message. The most common causes and fixes:
- "No license available in pool" – The Microsoft license you want is exhausted in the tenant. Purchase more in the Microsoft 365 Admin Center — Easy UC picks them up on the next sync.
- "Number not in range" – The selected number belongs to no configured range. Extend the range in the matching location or add a new one.
- "Permission denied" – The app has lost a required permission in Entra. Check permissions and use Actions → Recheck in the Organizations tab.
- "Throttled by Microsoft Graph" – Microsoft throttles API requests when too many fire in a short time. Easy UC retries automatically after 30 – 60 seconds. For bulk onboardings, spread them over time.
Multi-Tenant for MSPs
Managed Service Providers centrally manage any number of customer tenants.
Add organization
- Navigate to Organizations → New Organization
- Choose between self-owned (you own the tenant) or customer-owned
- For customer-owned: send an invitation to a Global Admin of the customer
- After consent the tenant appears in your organization list
Switching organizations
Use the dropdown at the top left to switch tenants without re-logging in. All areas (number plans, users, reports) immediately show the active organization's data.
API & Integration
REST API for external systems like ServiceNow, Workday or your own tools — create an API user, get a token and call the endpoints. Includes the live docs at api.numberplan.easy-uc.com/docs.
Typical use cases
- ServiceNow / ITSM – A new workplace-request ticket triggers onboarding including number assignment directly — no IT touch.
- HR systems (Workday, Personio) – New employee in the HR system → automatic API call → number and license ready on day one.
- Custom self-service portals – Internal tool lets end users pick their own number — Easy UC handles the assignment behind the scenes.
- Reporting & bulk operations – Scripts fetch the number plan status daily, or bulk migrations from on-prem telephony to Teams run in batches.
Step 1 – Open the Api Users tab
In the left menu under Administration click Api Users. On first visit the list is empty ("No data to display"). The "Create" button sits at the top right.

Step 2 – Create the API user
Clicking "Create" opens the "Create API User" modal. Fill in two fields:
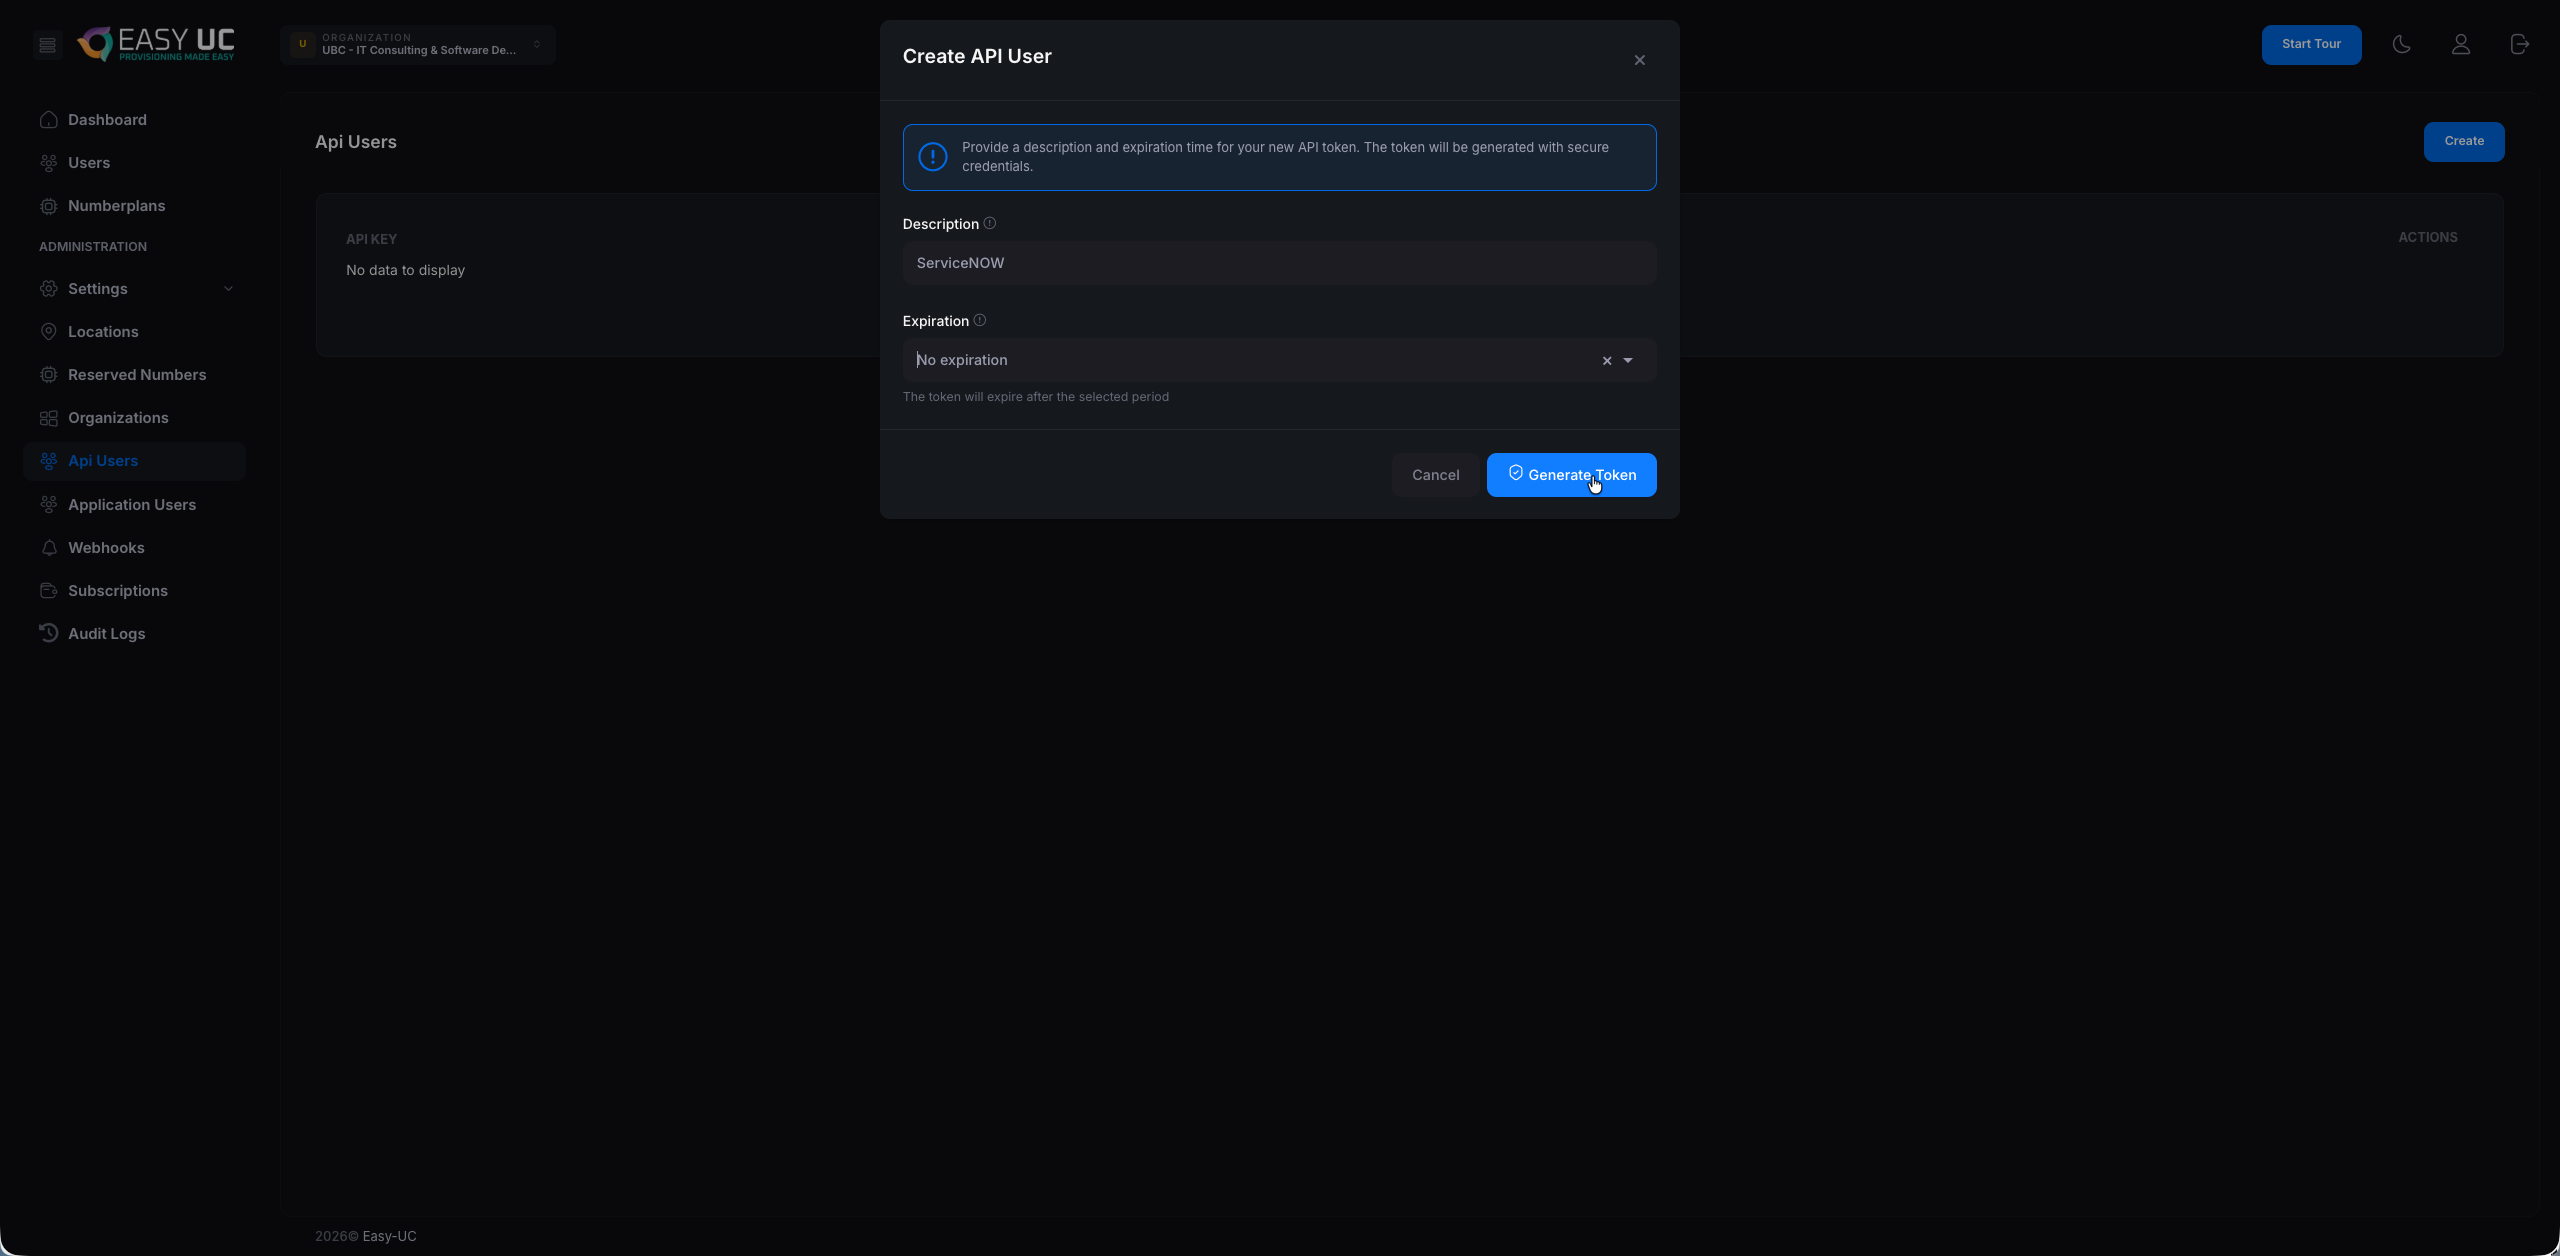
- Description: Clear name for the API access — e.g.
ServiceNOW,Workday-HR,Reporting-Script. Helps to identify and revoke specific tokens later. - Expiration: Expiration date:
No expiration,30 days,90 days,1 yearor a custom date.
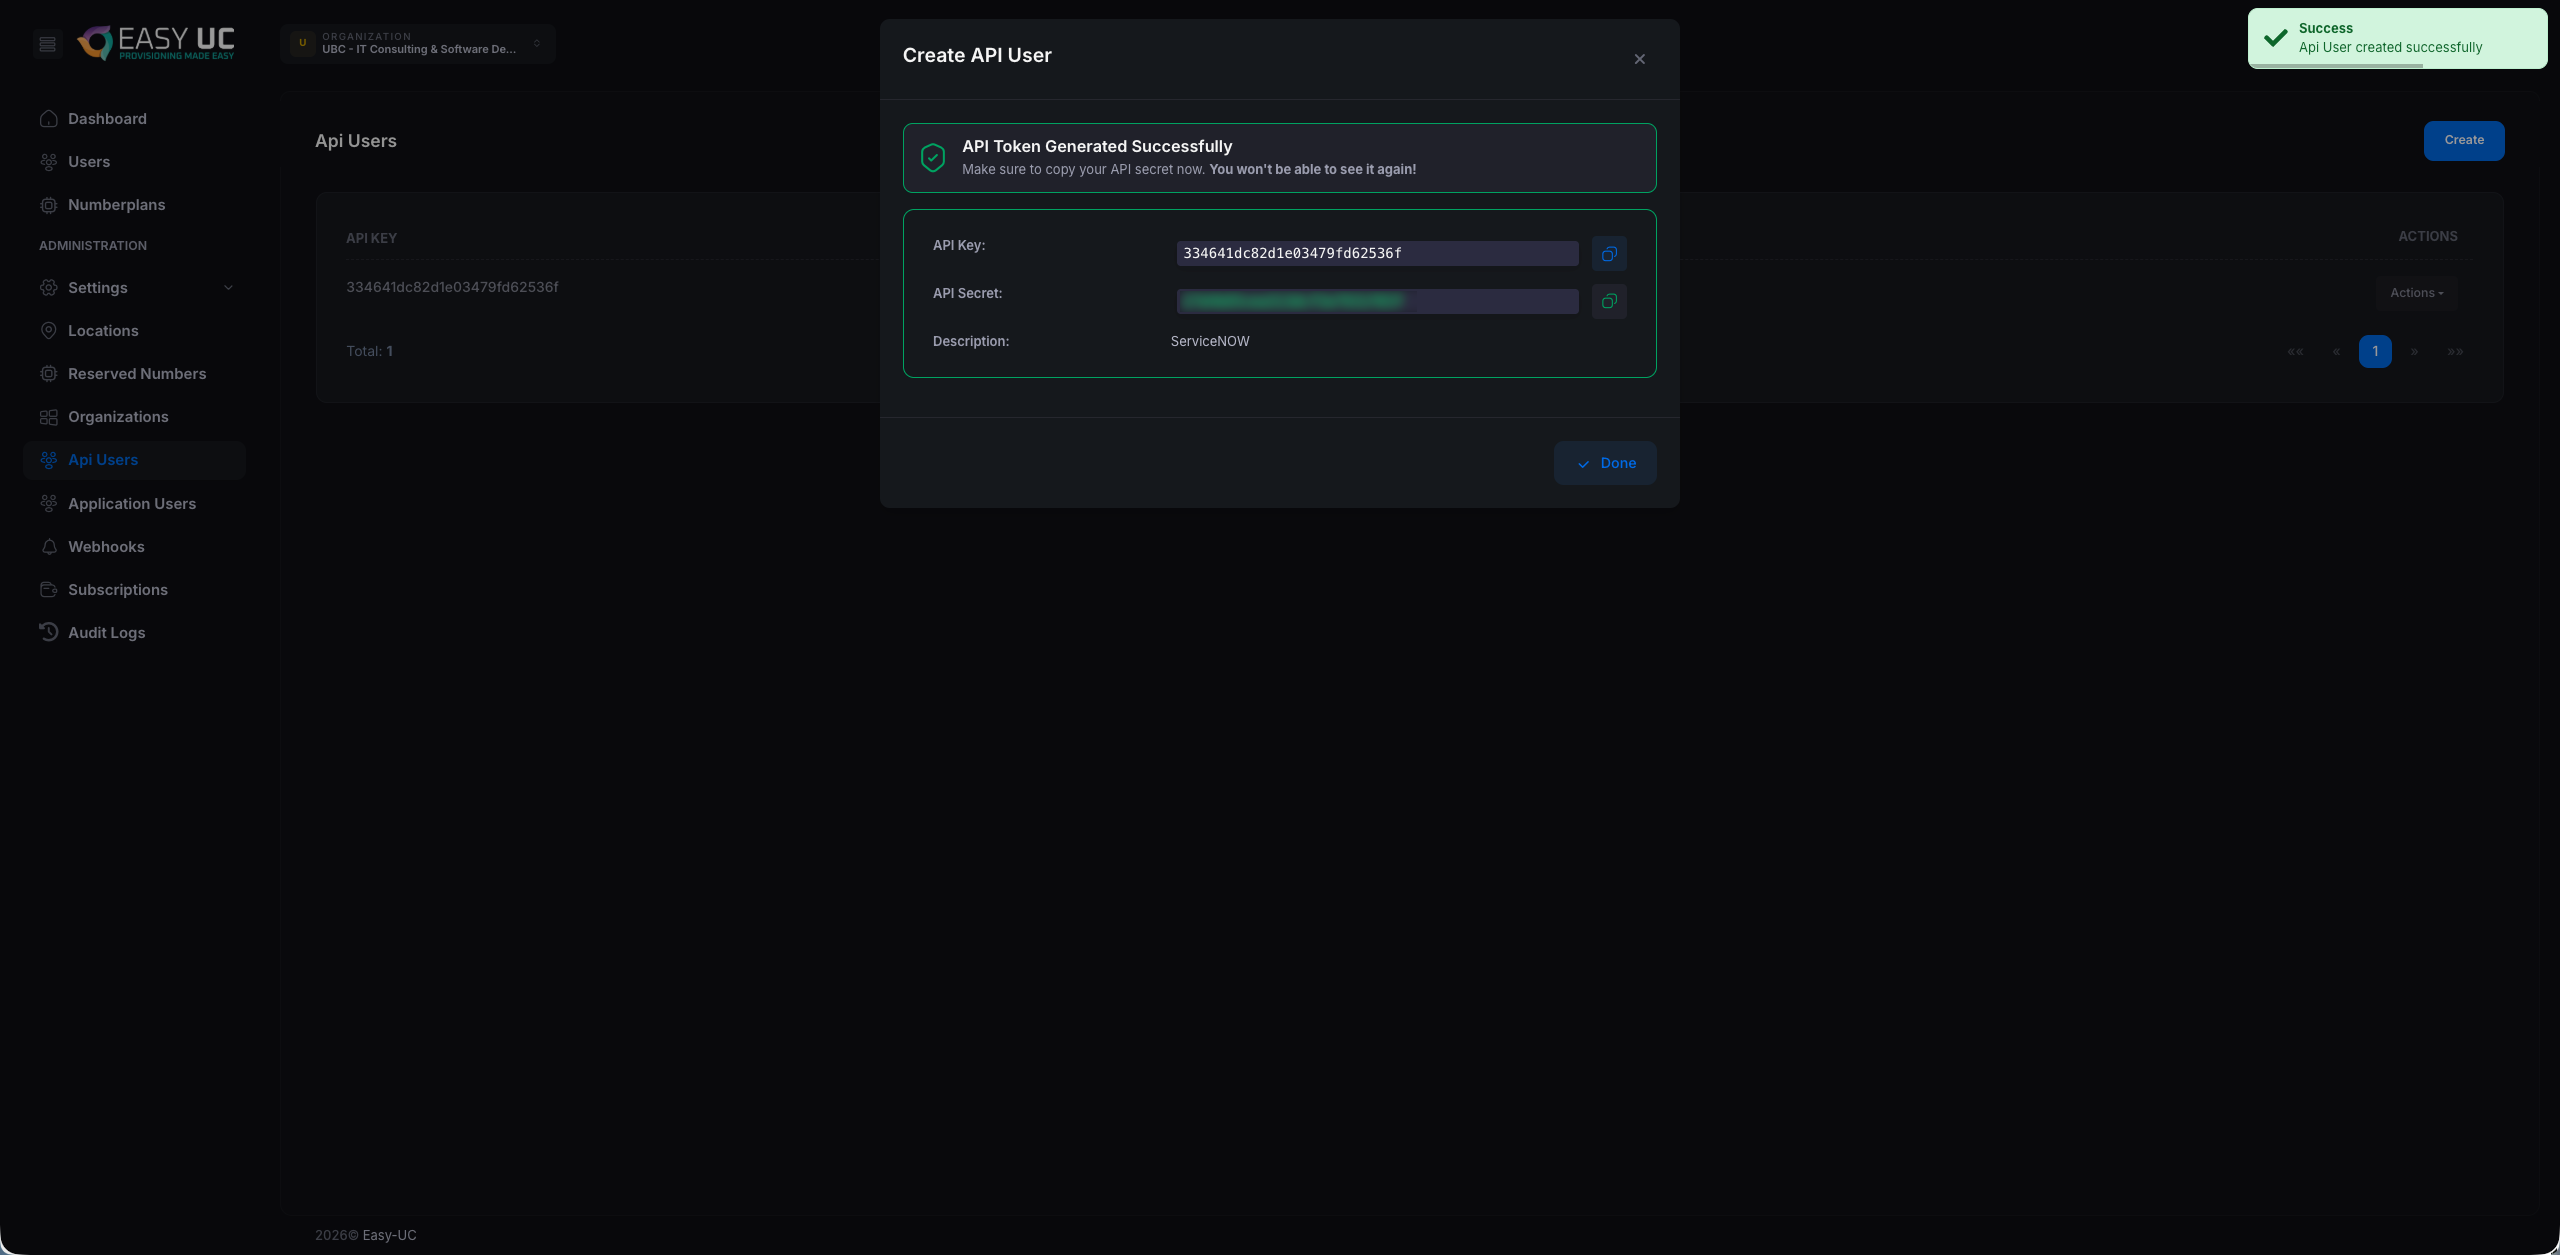
Step 3 – Save the API key + secret
Easy UC shows the API Key and API Secret once. Use the copy icon on the right to copy each value to the clipboard and store them securely in the target system (e.g. the ServiceNow credentials vault).
Step 4 – Discover the live API docs
The full OpenAPI/Swagger documentation lives at api.numberplan.easy-uc.com/docs. It shows every endpoint, request body, response schema and an interactive "Try it out" for direct browser testing. The OpenAPI spec is also downloadable — perfect for client code generation.
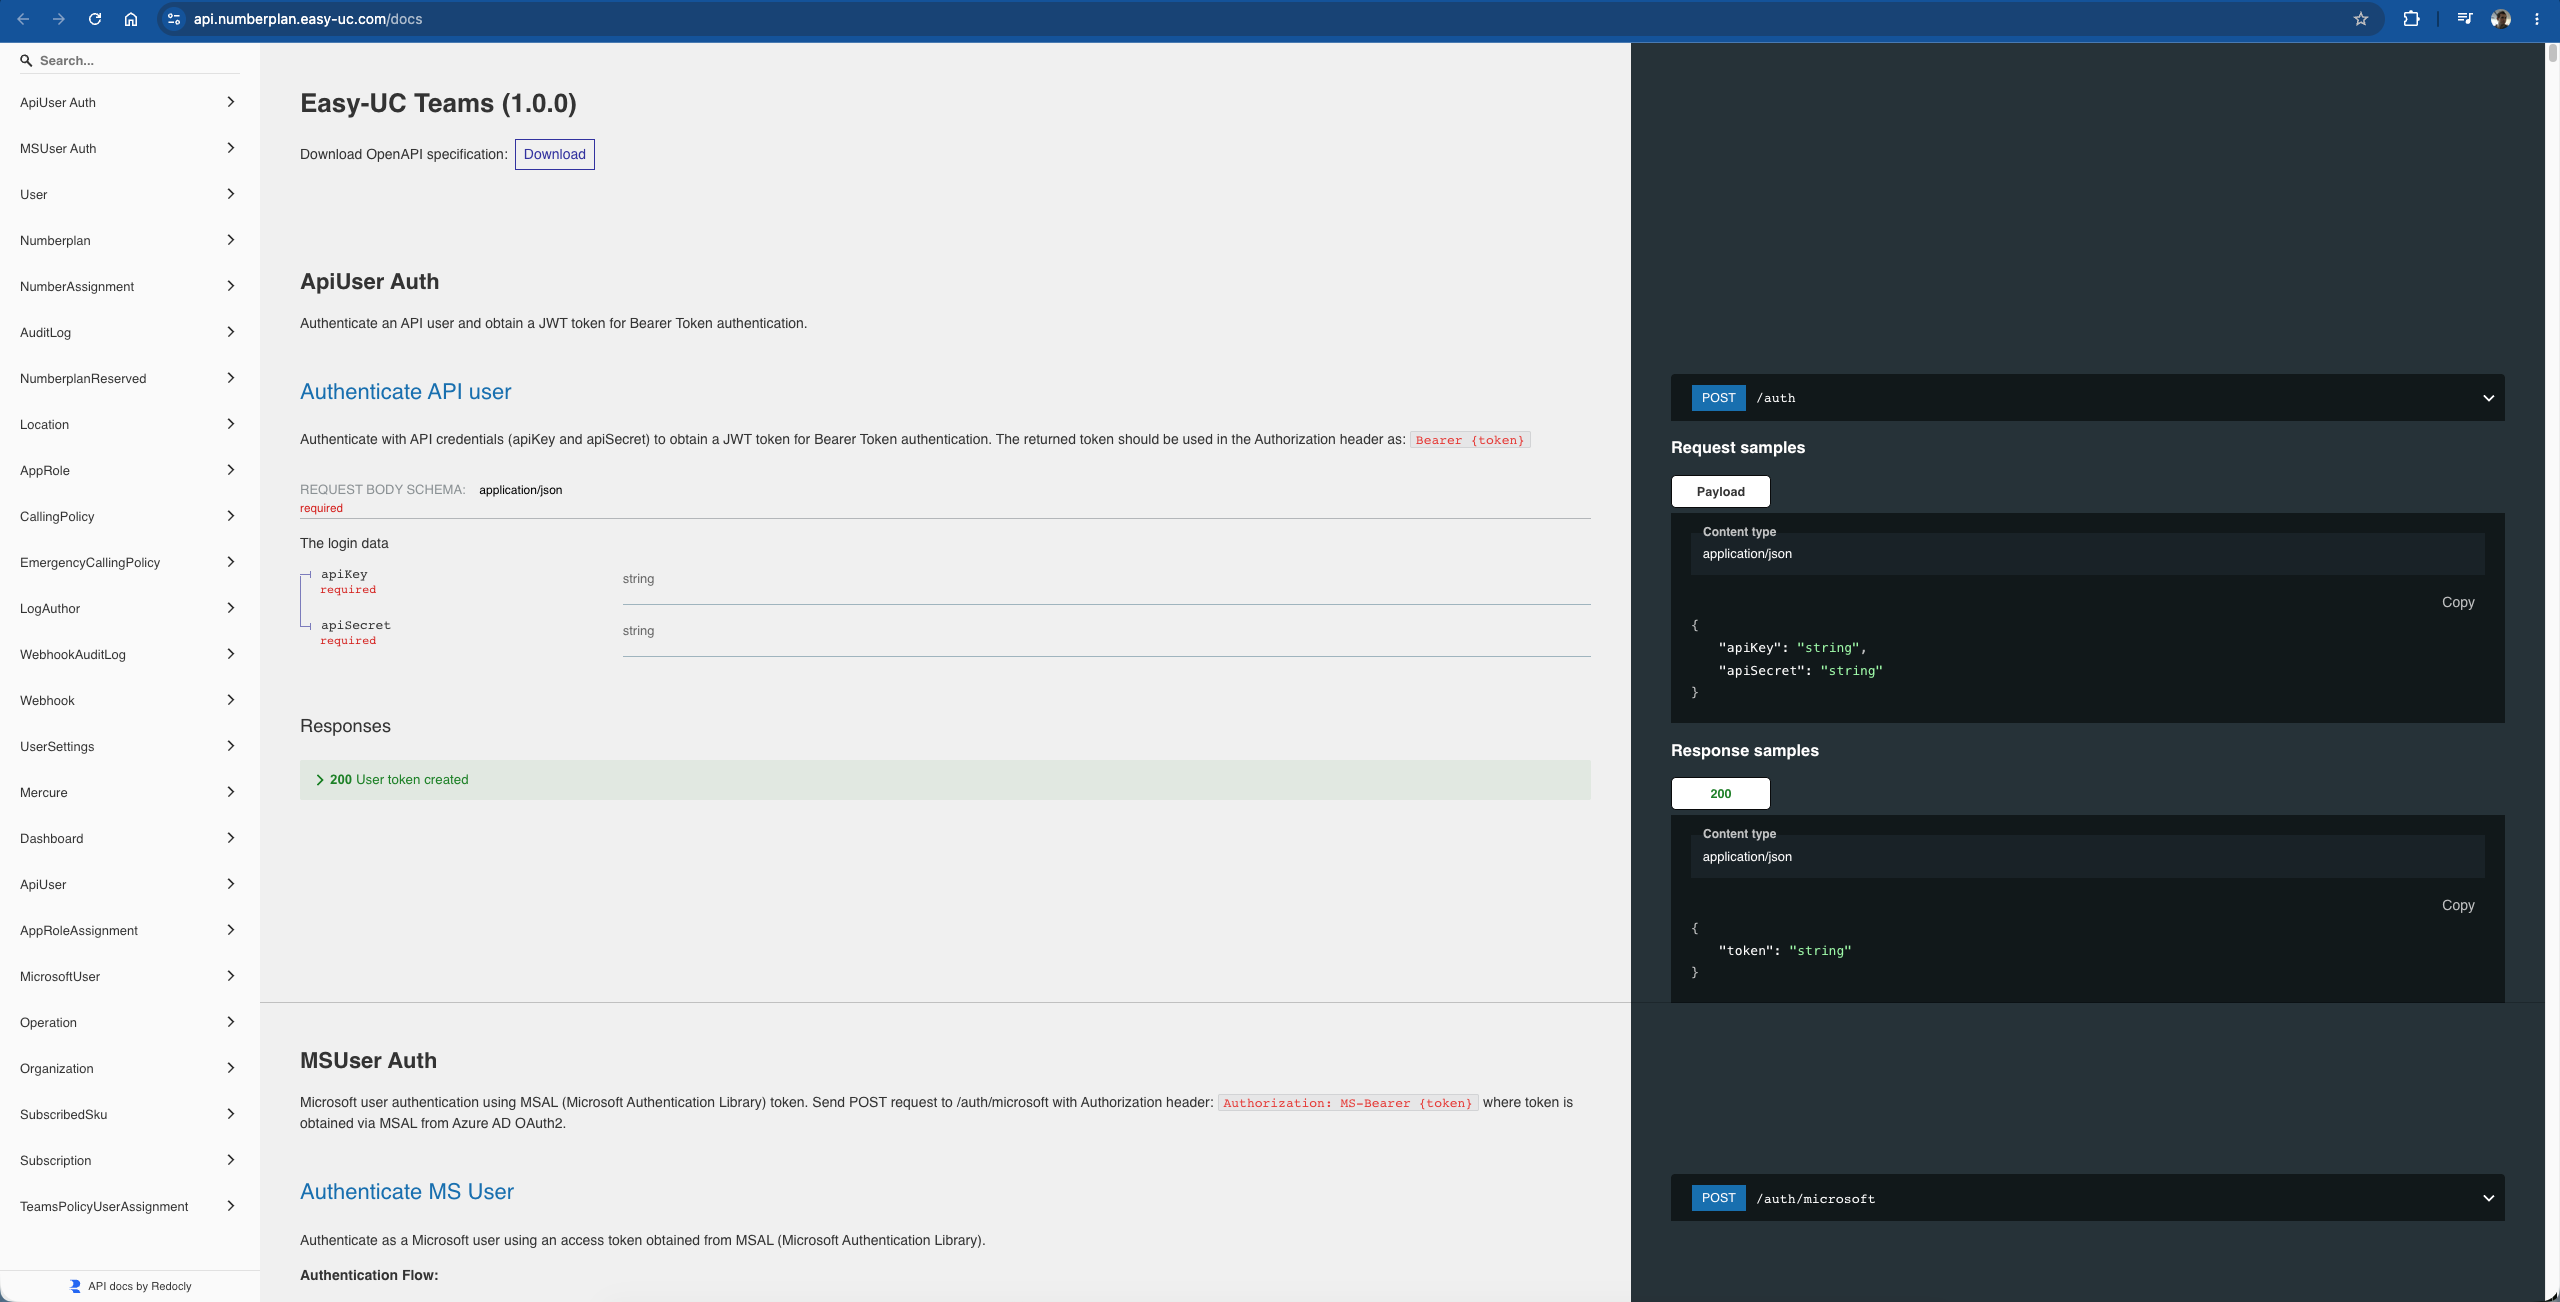
→ api.numberplan.easy-uc.com/docs
Authentication — from key to Bearer token
The API uses a classic two-step flow: first you exchange key + secret for a short-lived JWT bearer token, then use that token for every following call.
- POST to
/api/ApiUser/authwith JSON body{ "apiKey": "...", "apiSecret": "..." } - The response contains
{ "token": "..." }— a JWT, typically valid for 60 minutes. - Pass the token in the
Authorization: Bearer <token>header on every subsequent call.
Example: get a token (curl)
curl -X POST https://api.numberplan.easy-uc.com/api/ApiUser/auth \
  -H "Content-Type: application/json" \
  -d '{
    "apiKey": "334641dc82d1e03479fd62536f",
    "apiSecret": "your-secret-here"
  }'
Response
{
  "token": "eyJ0eXAiOiJKV1QiLCJhbGciOiJSUzI1NiJ9..."
}
Subsequent calls then use the bearer token:
curl https://api.numberplan.easy-uc.com/api/NumberPlan \
  -H "Authorization: Bearer eyJ0eXAiOiJKV1QiLCJhbGc..."
Most important endpoints
A selection of the most commonly used endpoints (complete list in the live docs):
GET /api/NumberPlan– List all numbers in a tenant — including status, assignment and location.GET /api/NumberPlan/free– Fetch only free, unassigned numbers — ideal for self-service pickers.POST /api/NumberPlan/assign– Assign a number to a user (triggers the onboarding wizard in the background).DELETE /api/NumberPlan/{number}– Unassign a number — licenses are released on request.GET /api/Location– List all configured locations with ranges and policies.GET /api/MicrosoftUser– Microsoft 365 users (from Entra) including license and telephony status.POST /api/Webhook– Register a webhook — Easy UC pushes events (number assigned, license granted, …) to your URL.GET /api/AuditLog– Query the audit log — every action with timestamp, user and result.
Example flow: ServiceNow ↔ Easy UC
A fully automated onboarding from ServiceNow looks like this:
- A "Workplace request" ticket is approved in ServiceNow. The workflow calls
POST /api/ApiUser/authand fetches a JWT. - Then
GET /api/NumberPlan/free?location=Hamburgfor a free number in the right location. POST /api/NumberPlan/assignwith the user mail and chosen number — Easy UC runs the onboarding (licenses, routing, policies).- ServiceNow receives a webhook callback (when registered) with the final result and closes the ticket automatically.
Security & best practices
- One API user per integration – Never share one token across systems — a leak would compromise everything. Use the description field to document the assignment.
- Set an expiration – Tokens valid forever are a compliance risk. Recommended: 1 year, with a reminder shortly before expiry for rotation.
- Use a secret vault – Secrets belong in Azure Key Vault, HashiCorp Vault, ServiceNow Credentials or similar — never in code repos or configuration files.
- Use the audit log – Every API call shows up in the audit log with its API user. On suspicious patterns, revoke the token immediately via Actions in the Api Users list.
Role concept & Application Users
Who can do what, who can do it where: two roles (Default Access / Helpdesk) combined with targeted location assignment — fine-grained down to single branches.
Application Users overview
The Application Users tab shows everyone currently assigned at a glance. Add new ones via "Assign user" at the top right.
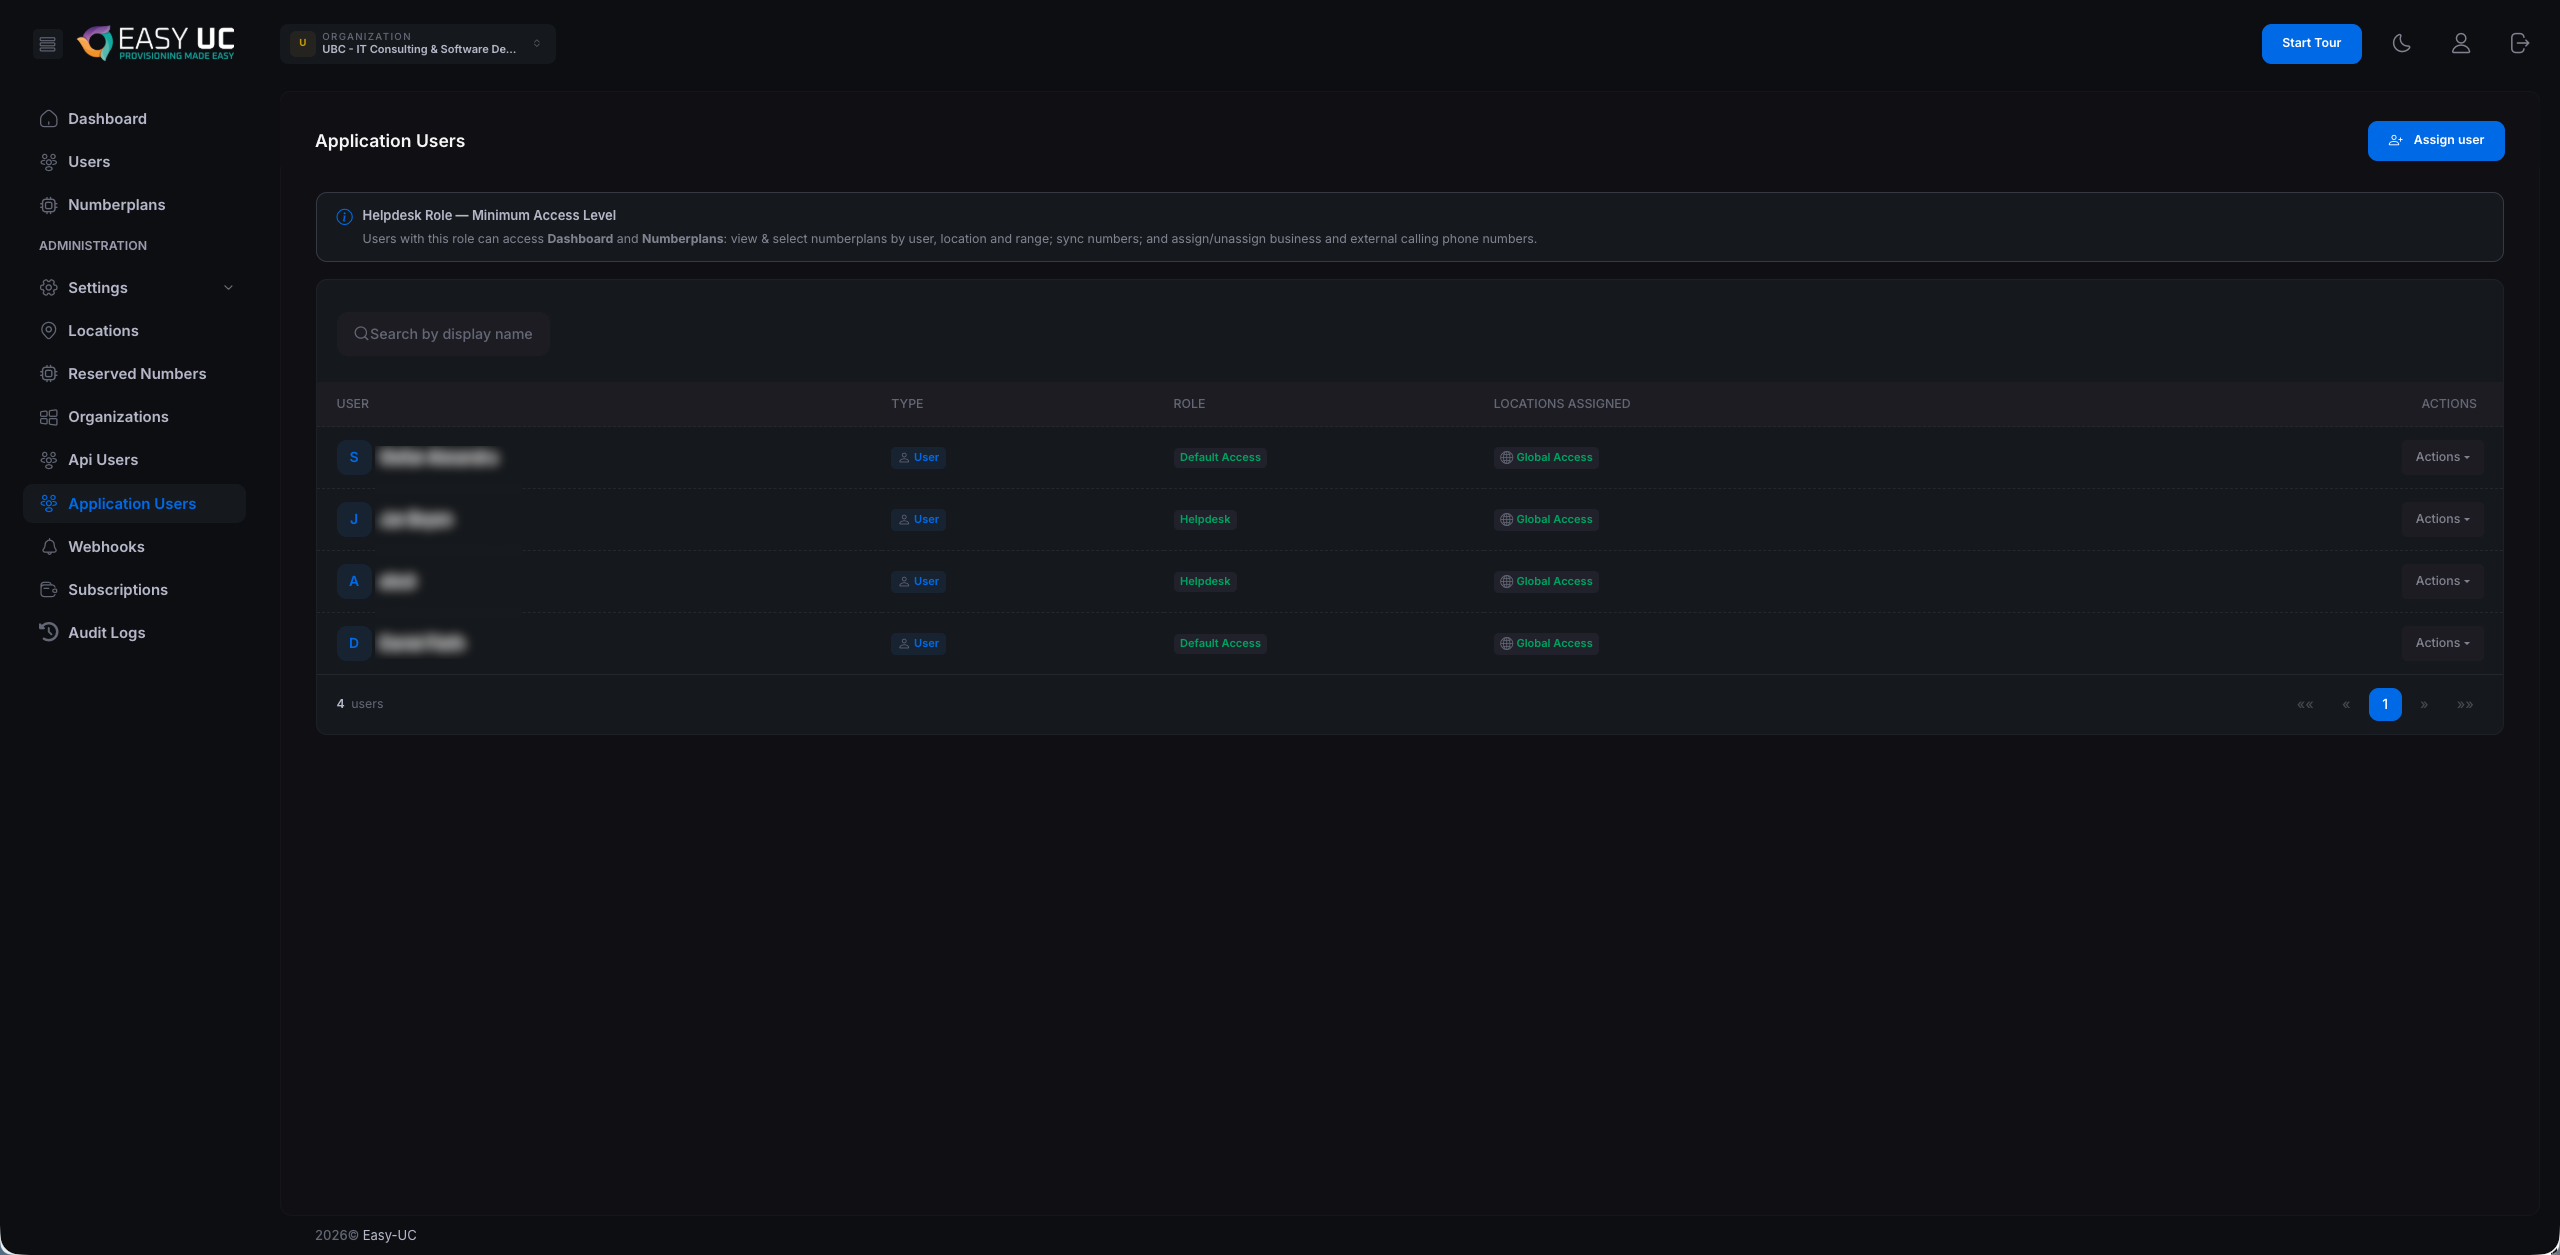
Columns explained
- User – Employee display name from Microsoft Entra (synced).
- Type – Account type — usually
Userfor regular employees (orGroupfor group assignments). - Role – The assigned role:
Default AccessorHelpdesk— see next section. - Locations Assigned –
Global Access= all locations visible. Or the specific list of assigned locations (e.g. "Hamburg, Berlin"). - Actions – Dropdown with Edit, Change Role and Revoke — see "Changes".
The two roles
Easy UC intentionally ships with only two clearly scoped roles — no nested permission tetris. The role decides which actions are possible, the location assignment decides where.
🛡️ Default Access — the admin mode
Full access to every area of Easy UC. Typically granted to IT admins and operations leads.
- Configuration: create, edit and delete locations, number ranges, license pools and policies.
- Application Users: assign roles to employees — including appointing other Default Access admins.
- API & webhooks: create API users, register webhooks, revoke tokens.
- Audit log & subscription: access to all activity logs and subscription management.
🔎 Helpdesk — daily operations
Tailored for first-level support: everything needed for daily onboarding and number handling — but no system configuration changes.
- Dashboard: read access to all KPIs of the assigned location.
- Numberplans: view and filter numbers by user, location and range, trigger sync with Microsoft Teams.
- Business Phone: assign and unassign numbers — including External Calling.
- Onboarding wizard: onboard users including automatic license and policy assignment.
Assign an employee — the "Assign user" flow
Click "Assign user" to open the "Add Assignment" modal. Here you connect a Microsoft 365 employee to a role and a location scope.
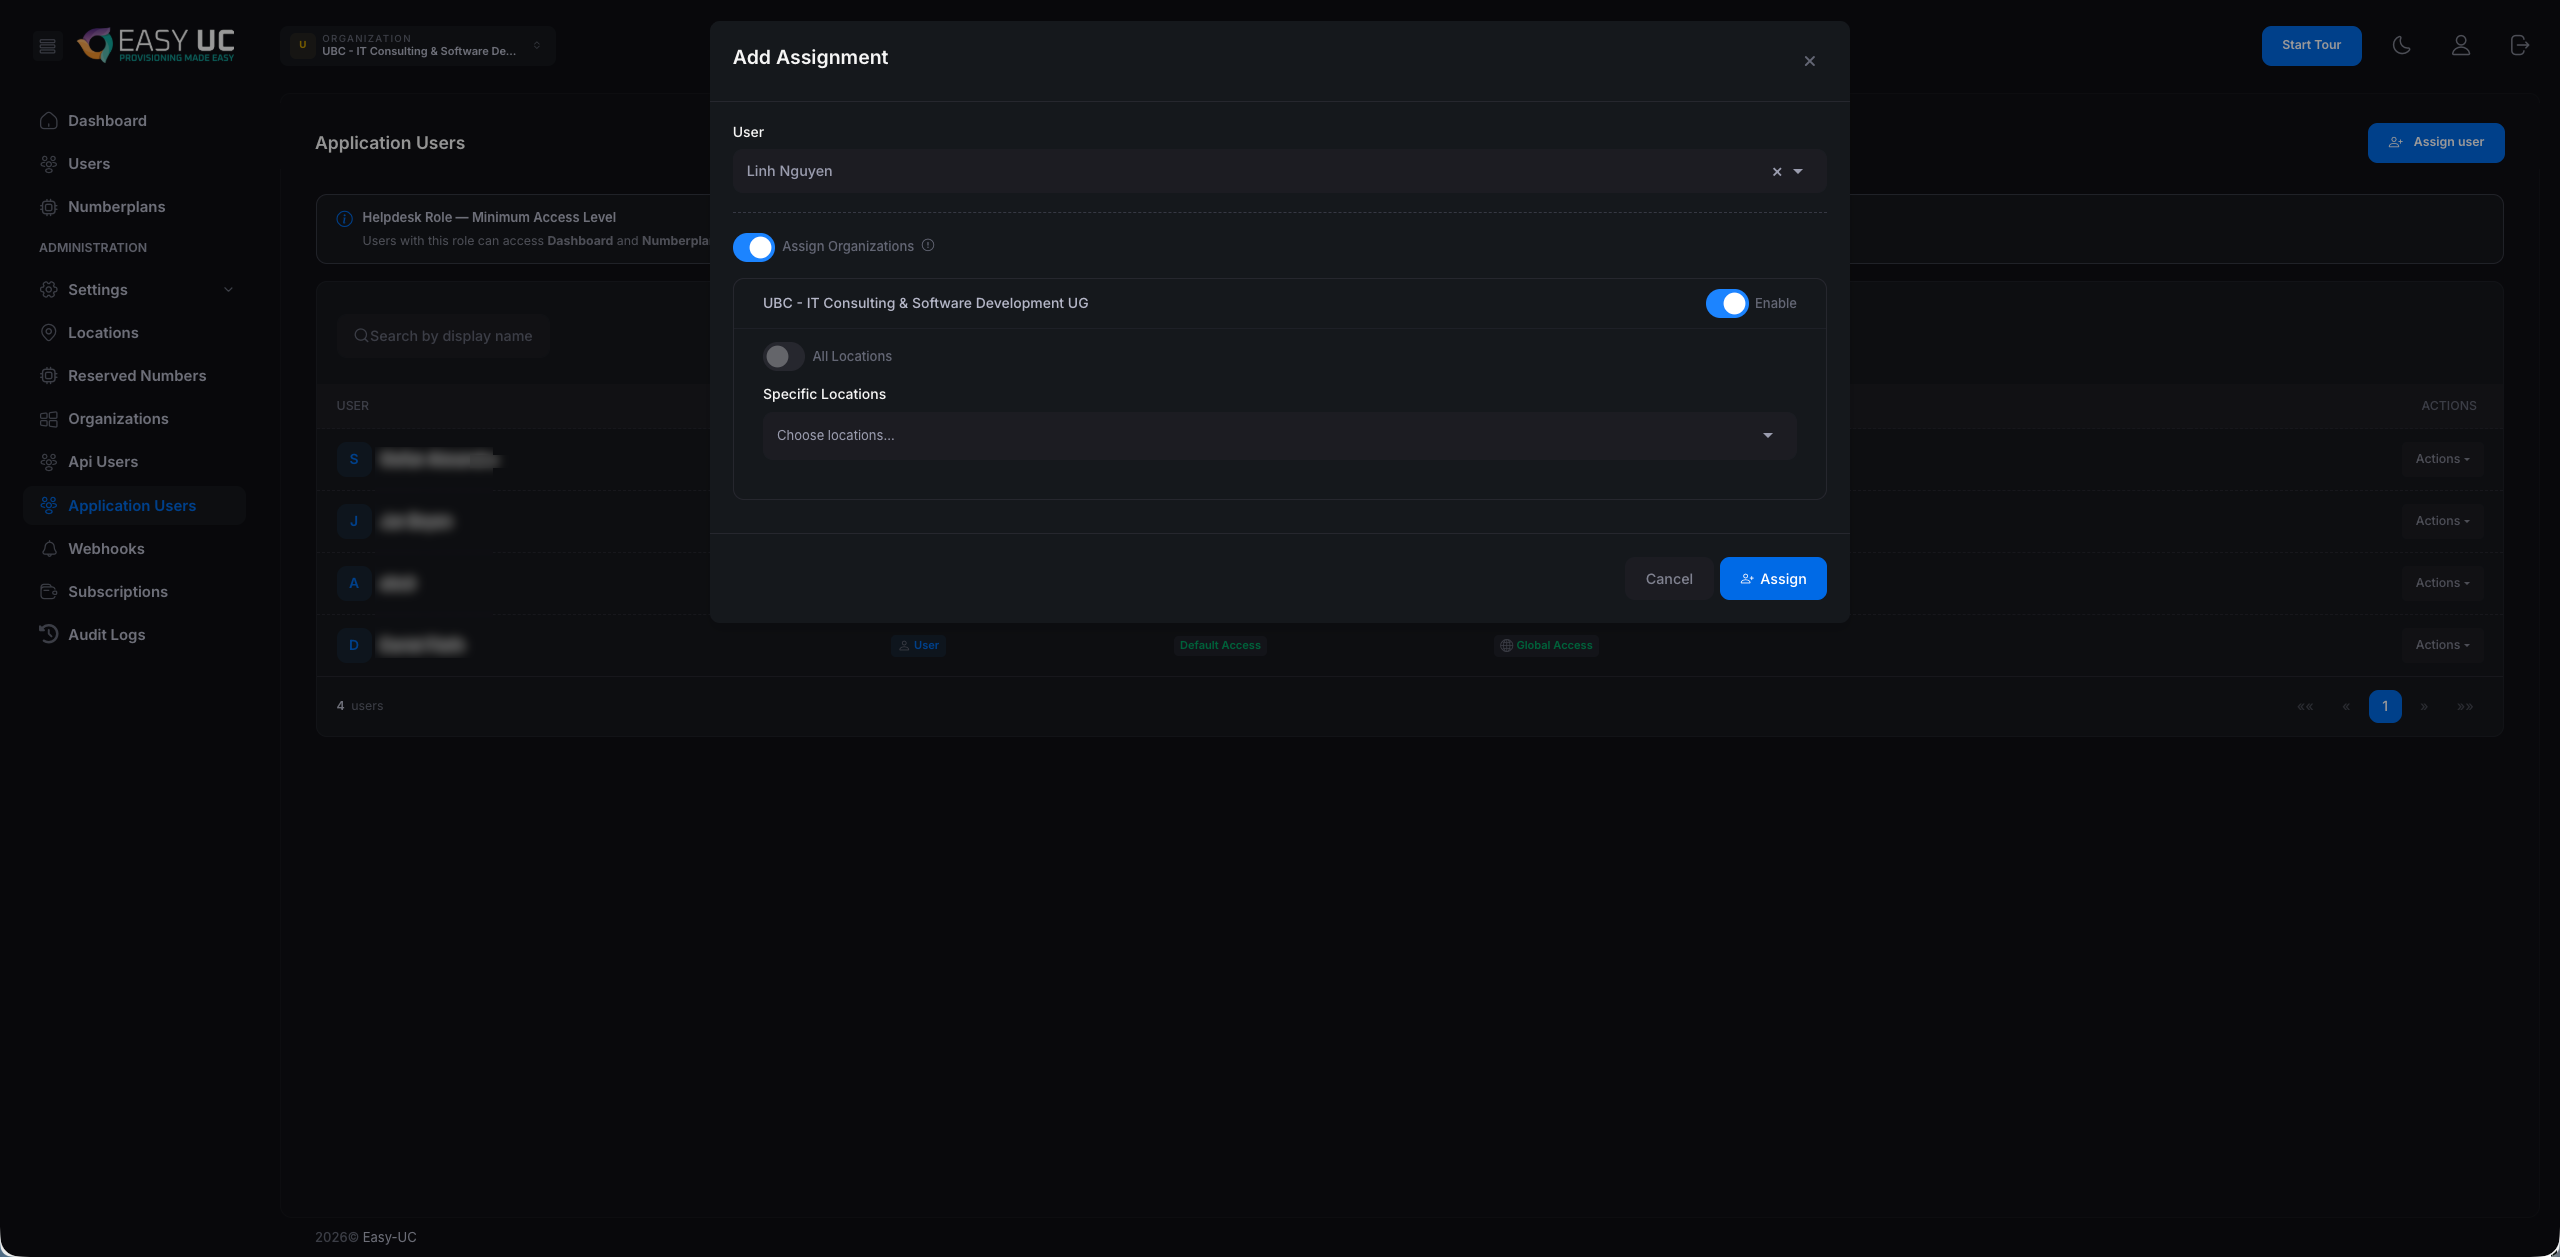
User field
Type the name or email of the employee — Easy UC suggests matches from the Microsoft Entra directory. Example: Linh Nguyen.
Assign Organizations — set location visibility
The "Assign Organizations" toggle controls which organisations (tenants) and locations the user can access. Three options per organisation:
- Enable-Toggle – Show or hide the entire organisation — the yellow toggle on the right.
- All Locations – Radio — every current and future location of this organisation is visible. Best choice for Default Access admins who work org-wide.
- Specific Locations – Multi-select dropdown — assign one or more specific locations. Best choice for helpdesk people who should only see "their" region.
Typical setup scenarios
How role + location scope plays out in practice:
- IT admin (Default Access · Global Access) – Full access across every location and organisation — the typical choice for IT leads and operations owners.
- Regional helpdesk (Helpdesk · Specific: Hamburg, Berlin) – Northern helpdesk — onboards and manages only users in the assigned locations. Other branches stay invisible.
- MSP operator (Default Access · several customers, global each) – Managed Service employee — full access across several customer tenants at once, no re-login.
- Branch lead (Helpdesk · Specific: own location only) – Sees only their own branch, can onboard and manage numbers there — no view into other locations or configuration settings.
Edit or remove assignments
In the Application Users list, open the Actions dropdown on the right of each row. Available actions:
- Edit – Adjust the location assignment — e.g. add or remove branches.
- Change Role – Switch between Default Access and Helpdesk — changes apply on the user's next login.
- Revoke – Revoke access entirely — the employee can no longer sign in to Easy UC. Past activities remain in the audit log.
Audit log
Every action in the Numberplan Manager is logged. The audit log is tamper-proof.
Every action in the Numberplan Manager is logged. The audit log is tamper-proof and supports:

The columns in detail
Each row documents one action. The key columns:
- Number — the affected phone number in E.164 format, including whether it is a Primary or Business Phone Number.
- Event — the action performed:
Assigned,Unassigned,License Assigned,License Unassigned,Policy Assigned,Policy Unassigned, … - Status —
Successful,PendingorFailed. OnFaileda hover reveals the Microsoft error message. - Date — timestamp in
DD.MM.YYformat, with full time as tooltip (server time zone, ideally UTC). - User — the M365 user the number/license/policy was assigned to (UPN + display name).
- Author — who triggered the action: an Application User from the portal, or
Numberplan Syncfor system-driven updates from the background sync.
Filter bar
Use the filter bar at the top to narrow down the view. Multiple filters combine with AND logic:
- Search by phone number — full-text search over E.164 or substrings (e.g.
+498066). - All Types — filter by number type: Primary Phone Number, Business Phone Number, Reserved Number, …
- All Events — show only one specific action (e.g. only
License Unassignedto track released licenses). - All Users — filter by the affected M365 user. Handy during off-boarding ("show me everything that was assigned to X").
- All Authors — filter by the executing Application User. Shows e.g. all actions by helpdesk over the last week.
- All Statuses — e.g. select
Failedto collect only error cases for a post-mortem.
Which events are logged?
The Numberplan Manager logs every change to the inventory — whether it comes from the portal, the API or the background sync:
- Assigned / Unassigned — phone number assigned to or released from an M365 user (or resource account).
- License Assigned / License Unassigned — Teams Phone license (Teams Phone Standard, Operator Connect, …) set or removed.
- Policy Assigned / Policy Unassigned — voice routing, emergency calling, caller ID or dial plan policy changed.
- Reserved / Released — number moved into or out of the Reserved pool.
- Created / Deleted — new number imported or inventory entry removed (e.g. after operator change).
- Sync — system events from the background sync: inventory reconciled with Microsoft Graph, drift detected, conflicts resolved.
Author: human or system?
The Author column shows immediately whether an action was triggered manually or automatically:
- Application User (name + email) — the action came from the portal or self-service API by an authenticated user.
- Numberplan Sync — the periodic background sync detected drift (e.g. a license removed manually in Teams) and updated the inventory.
- External API — call from a connected system (ServiceNow, ITSM, custom scripts) via API key. Shows the Application User linked to the API key.
What can you use the audit log for?
The audit log is more than just a technical trace — it is your central record for compliance, forensics and daily operations:
- Filter by user, time range, action and organization
- Export as CSV or JSON for external SIEM systems
- Optional retention policies (e.g. 7 years for compliance)
Regularly filter for Status = Failed. Frequent failures on License Assigned point to an empty license pool; clustered Policy Assigned failures point to an outdated or deleted policy in Teams.
Troubleshooting
"License could not be assigned"
Cause: No free licenses in the pool or Usage Location not set.
Fix: Check licenses in M365 Admin Center or set Usage Location for the user.
"Operator Connect Trunk not available"
Cause: The configured carrier is not active for the tenant.
Fix: In Teams Admin Center → Voice → Operator Connect verify the carrier is configured.
"Policy mismatch detected"
Cause: An assigned policy does not match the location standard.
Fix: Click "Sync policy" in the wizard – the correction is automatic.
FAQ
Do I need PowerShell knowledge?
No. The Numberplan Manager is explicitly designed so that no PowerShell is needed. All actions happen via the graphical interface.
Does this work with multiple tenants at once?
Yes. The multi-tenant architecture is designed for MSPs from the ground up. Any number of customer tenants can be managed in parallel.
Where is the data stored?
All configuration data lives inside your own Microsoft 365 tenant. The Numberplan Manager does not store tenant data in external systems.
How much does the solution cost?
$60 per month – all features, unlimited users. 30 days free trial.
Who can help with setup?
Write to us – we offer free setup support during the trial period. → Contact